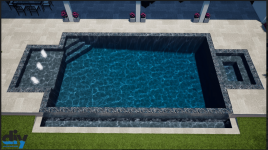
16 July 2024 Finishing Up my OB Pool

07 April 2022

Folks,

Huge milestone behind us! Below are a few photos that show 126 yards of concrete in place! The pour went very well, here are a couple of notes from my experience that may help others in the future:

  • Over a week ago I measured the location of everything that protrudes through the slab to be absolutely certain the location was correct.
  • I noticed there was a clean-out in the plumbing that I wanted missing. This was to be at the rear of the house that would give access to one of the 2 major drain headers for the sanitary sewer. A lot of builders lack this and their rationale is you can remove a toilet to access the pipe. True, but do you really want that to be the only way? I really didn't want to redo the plumbing due to cost and additional inspection. Next best option is to use a near by vent line by adding a Tee that will point outside and provide an access point.
  • I went around all the form boards twice to be sure nothing looked like it had been loosened and all boards were straight and not bent. Looked great, but this was only due to my foundation contractor that had already done this and fixed two minor flaws. PS these were not the cheapest. Picking cheapest can be really problematic. Best Value that meets the specification is my primary selection criteria.
  • I had water supply secured prior to the foundation work. In my case that's two wells powered by a portable generator. Concrete strengthens over time, about 28 days. During this time there's a reaction called hydration that occurs and requires water. If water from the slab evaporates excessively ultimate slab strength can be reduced by 50%. So I am drenching the slab sever times per day for the next 7 days. It's not hard so long as you have lined up water supply.
  • I have a detailed schedule that is updated weekly to make sure I can generate a "look ahead" list so I don't delay construction. Next few activities include:
    • Block and precast member installation (materials to be delivered in a week)
    • Truss production and delivery to site 4 weeks from ***EDIT***slab completion Block Delivery
    • Interior framing contractor selection and commitments for start no later than June 1st
    • Window delivery and window installation contractor committed for June 1st
  • The list above is not complete... just illustrates why a lot of OB projects take so long. If you wait 'till you need something before you start trying to line it up you will be delayed terribly. There are two examples of this I know personally. Took them both 2 years to build.
  • I also informed the contractor that I had a 3rd party testing service that will take core samples and slump tests. They all know what this means and any that resist this creates a red flag to me. The early mix was getting a little too soupy to me. It tested OK (6" slump. 7" is where I reject it). He was in constant communication with the batch plant and all of the rest of the samples tested 4". Testing my ~126 yard slab per ASTM methods costs about $500 or less. The slab is worth about $50,000. A pretty easy decision for me.
Finally, finally, finally today I will take the next step on my pool build by requesting a final modification to the preliminary design then get final construction plans. Our change is pretty simple just to relocate the steps to a corner. DIY is my pool designer and allows two revisions at no charge so long as they are requested before production of construction drawings. These are required for the pool building permit that is started and on hold.
Chris
1649351817955.png

1649351935338.png

1649352005252.png

1649352080335.png

1649352123961.png
 
Last edited:
Love me some pretty concrete foundation work … they should have a guy hanging from a harness on a crane so they can lower him to any point on the interior of slab to smooth out any slight imperfections … always good to give the new guy that job because they’re usually skinny and easy to swing around.
 
We're barely started, LONG way to go... my wife's vision is all about the house. Mine is all about the pool. Here's the look I hope to create. I submitted a minor revision to DIY today and will post their renderings after they supply them, usually 3-5 days.

Chris
 

Attachments

  • Chris Blair - CD 1.0_017(1).jpg
    Chris Blair - CD 1.0_017(1).jpg
    274.9 KB · Views: 62
  • 2D(1).png
    2D(1).png
    83.2 KB · Views: 59
Is the far long edge an negative edge spillover or just a tiled knife edge to give a horizon effect?

What’s the other side of that wall going to be finished with?
 
The far Edge is to be an infinity or spill over. The other three sides are intended to be knife edge. We haven't spent much time yet on the outer wall covering that faces the lake. For now we just show it as matching tile. Any ideas?

One thing I'm going to be very interested in on the detailed design is the volume of the catch Basin below and the pump controls. Seems to me this is going to be a little tricky. When people get in the pool the level will rise instantaneously and the other three sides with knife edge are only tapered slightly so there's very little volume there. So the spillover dimension will have to be sized so that the pool doesn't overflow every time somebody gets in or out and the catch basin will have to be sized so it does not overflow either. Also seems to me that the volume would be related to how many people get in the pool at the same time. Optimizing the catch basin volume could really benefit from level switches that control a variable speed pump. this all gets very weird when you start thinking about the design basis. So let's say the design basis is 5 adults get in at the same time. The mean volume of an adult male is 65 L. So lets say 70 to be on the safe side. That's about 18 and a half gallons times 5 so say about a hundred gallon volume for the catch basin. But you don't want the pump sized only for that case so catch Basin doesn't get sucked dry when only one or two kids get in. A 6 in x 6 in by 32 ft catch basin is only about 60 gallons. So that volume is important as well. I never thought about people in terms of their volume before. This gets to be a little comical if you start playing with it later at night. No wonder designers are so weird.

Chris
 
Last edited:

Enjoying this content?

Support TFP with a donation.

Give Support
Average adult male volume is 65L, to which I say ….

eddie murphy GIF


Clearly you’re pool will only be for the skinny people that eat salads … I’ll be hanging out by the BBQ grille …
 
Also, make sure to account for the length of your basin wall to your weir wall. On a windy day will the “spill over” water land in the basin or splash outside of it. You also have to take this into account if you expect one of those 65L + guests to jump in, cannon ball style. My advice, determine your dimensions and depth and then multiple the length, weir wall to back of basin wall, by two.
 
I know you know this but it goes without saying that vanishing edge pools need extremely level walls to make the water level and edge line up. A simple twine & bubble level is not going to cut it. So the day they do tile work on they spillover edge, make sure someone is out there with a high visibility green laser level so the tile guys know exactly where they need to hit for an edge.

I would also suggest not using the tile as the final edge piece but find a trim tile to place on the knife edge so that you get a clean edge. Regular cut tile and bullnose pieces can have significant dimensional variations piece to piece and so you want to define that edge as accurately as possible. It drives me nuts in home bathroom construction when I see tiled showers that have inside corners with straight tile butted against each other at 90°; that’s the worst possible tile joint to make. Or they do the same thing at the floor - regular tiled just butted perpendicular to the floor tile. It takes extra work and cost, but trim tile and/or edging trim (metal or ceramic) makes all the difference between a hack job and a professional job.
 
  • Like
Reactions: BigPapaSmurf
I know you know this but it goes without saying that vanishing edge pools need extremely level walls to make the water level and edge line up. A simple twine & bubble level is not going to cut it. So the day they do tile work on they spillover edge, make sure someone is out there with a high visibility green laser level so the tile guys know exactly where they need to hit for an edge.

I would also suggest not using the tile as the final edge piece but find a trim tile to place on the knife edge so that you get a clean edge. Regular cut tile and bullnose pieces can have significant dimensional variations piece to piece and so you want to define that edge as accurately as possible. It drives me nuts in home bathroom construction when I see tiled showers that have inside corners with straight tile butted against each other at 90°; that’s the worst possible tile joint to make. Or they do the same thing at the floor - regular tiled just butted perpendicular to the floor tile. It takes extra work and cost, but trim tile and/or edging trim (metal or ceramic) makes all the difference between a hack job and a professional job.
Great points you make Matt. For my quality control before the pour on the slab (and use on the pool) Robin got me a great Christmas present - a brand new Zip Level 2000 Pro. These things are the cat's meow for anybody that requires extremely accurate levels within 200'. It's a little more accurate than the newer rotary laser levels. I checked all the form boards before the pour with this. Then today I went out and checked every 10' or so in both directions. Around the edge where the slab is right at form board level deviation 1/8". The hard part on a large slab is in the middle between the boards. For this the contractor drove and marked metal spikes that were removed as the surface set. This worked great and max deviation over 85' was 1/4" 80% of the readings were 3/16" or less. For the knife edge I will use the laser level in high definition mode which only works within 4" elevation range but in this range it's isothermal accuracy is .01". I really like your idea on the edging trim. I'd also like to find a way to make adjustable without a lot of work. I'm thinking of longer single pieces maybe even SS cut to length with some sort of leveling studs spaced on the bottom to fine-tune the top edge right before the knife edge... I will go nuts if the overflow isn't right.

Chris
 
I was all SAY WHAT??? I never even thought of all of that!!!!!!!! Good job thinking of it and figuring it out! Now to see it in practice!
Thanks for the encouragement Kim. Seems like just yesterday you were talking me through TFP basics so I didn't screw up too bad when I fired the pool guy.
 
  • Love
Reactions: kimkats
13 Apr 2022

Folks,

So far we've only found one revision that we wanted to incorporate which is to make the steps diagonal in the corner. We're also considering reducing the length of the inside dimension of the pool to 30X16. We'd leave the sundeck and spa the same dimensions. For clarity we've left off the screen enclosure. It will connect to the house with structural gutter and go out about 3' beyond the catch basin. What do you think about the light positioning (see second to last photo)?

Chris


1649861602963.png

1649861851351.png

1649861999459.png

1649863646960.png

1649864143886.png

1649861490954.png
 
Lighting- I would not have the light just under the spa. I worry anyone sitting on the loungers will be looking right at it. I think the one on the long wall will fine for the deep end.

Seating by the spa-I would like to see a bit more space for that area so people could sit and chat with people in the spa.

Thinking about a bench along the wall by the house for people to sit on to watch TV or chat with people on the covered area.
 

Enjoying this content?

Support TFP with a donation.

Give Support
Thread Status
Hello , This thread has been inactive for over 60 days. New postings here are unlikely to be seen or responded to by other members. For better visibility, consider Starting A New Thread.