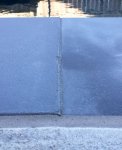
How picky is too picky?

The weirdness on the ends of some of the joints might be due to the slope that the tiles are supposed to have. Where two sloped surfaces meet for a 90° corner (or any angle) it requires a compound-miter cut. Which is just as easy to do as the cut you have, if the setter has the right tool and the right skill. So it is not unreasonable to expect that not only should the joint not be all ragged and chipped, but that the grout line should be of the same width on the vertical surface as it is on the horizontal surface (not growing wider from one edge to the other).

compound miter.png
 
OP stated they used a hand held angle grinder. That would explain the sloping cut.
Yes and no. If the operator made those cuts at exactly 90° from the top surface, and then properly sloped the coping, the end cut would have that wedge shape. He needed to cut 45° along the surface, with the blade "leaned over" I degree or two, so that when sloped the miter would be correctly angled in both directions (vertically and horizontally). This mistake could have been made with any tool, even a table saw, if the operator didn't know how to make a compound miter cut (which he clearly didn't). The uneven and chipped finish of the cut was the angle grinder, the incorrect angle was operator error.

Either way, an angle grinder is not the right tool and caused a great deal of what the OP is unhappy about. I can't think of any good excuse to use that tool like that, instead of the right one.
 
Last edited:
  • Like
Reactions: trophft
I was going to suggest that. As part of the fix, you can request that the work be postponed until after the end of swim season, as part of the negotiation. Loss of use should be considered as part of the damages. You could use that fact as a negotiating point, as in: fix it in December and we won't be adding any Loss of Use damages to the claim. If the PB comes back and says "No, it's now or never." then that would be something to let go of. Chances are he might want to postpone, to lessen the hit he'd take by fixing it during his busy season. Of course, you wouldn't pay him until it's done.

Great points.
Now just got an email notice that our final construction loan disbursement payment must be approved by November 8th, then repayment period begins and no other funds will be available. Might need to call lender to request an extension...
 
I agree Dirk, stating it would be next to impossible to make the cut perfect by hand. Something thattfink you will tend to get too much angle as you cut down. I have another observation. I will PM you and see what you think.
I'll have to grab my level and double check but I don't think the coping is noticeably sloped towards pool...concrete deck is noticeably sloped away for sure...

Also there's no way this tile guy would have taken into consideration the angles needed for a proper compound mitered cut...he didn't even take the time to lay out the coping for symmetrical corners (hence all the triangle cuts at the corners)...

Honestly though I'd rather a bunch of random triangles than a fat nasty grout gap at the corners!

It's a shame because it looks so good from afar!20200906_185934.jpg
 
Last edited:
Dog and I were contemplating if coping is supposed to be sloped like the deck or not. I'm saying it should be, but I'm not a pool builder. My reasoning: if there's a reason to slope the deck, the same reason would apply to the coping (to keep water and debris from running into the pool).

And we were trying to figure out which way that end gap would go, narrow at top, wide at bottom, or the other way around, if the coping was sloped but not cut for the slope. I concluded it doesn't matter. Joining two straight runs of coping at a 90° corner is as easy as it gets. There's no excuse for what you got, other than a lack of required tools and skill...
 
  • Like
Reactions: trophft
He needed to cut 45° along the surface, with the blade "leaned over" I degree or two,
Actually, that's not right either (which is why I'm not a tile setter)! If the coping was sloped, it wouldn't be 45°, but slightly less than 45°. That's what's so frustrating about this. Getting those two compound angles just right is probably just math, or even just some trial and error. But once you have the two angles, you could pretty much use those two numbers forever, from pool to pool, as long as the slope of the coping was constant (the thickness or length or width of the coping wouldn't matter). So he only had to figure it out once, and remember it for the next time. Which means this was either his first job, or he's been doing these same crummy cuts forever. Sad. :(

Ever seen the framing of a roof, and the crazy cuts that must be made so that all the rafters meet the hips and ridges correctly? Same principle. Those are not eyeballed. There's a skill and the right tool and a formula (or table or calculator) that is used to get those right. Once you do a few, you have it down. It's not that hard.
 
  • Like
Reactions: trophft
The 1 degree slope isnt noticable on a 45 joint. The middle of the cut doesn't matter all you worry about is the top and the ends. That was cut by hand and sloppy looks like a grinder was used or a small demo saw. Those should be cut on a wet tub saw or a demo saw with a cut guide
 
  • Like
Reactions: trophft

Enjoying this content?

Support TFP with a donation.

Give Support
So @jimmythegreek, the coping should be sloped like the deck?

And thanks for the correction. While technically it should be a compound miter, it's so slight as to not be noticeable, so I over-stated that. But, of course, that makes the guys workmanship all the more inexcusable. And so Dog, like you said, it did have more to do with the grinder than the miter aspect.
 
Last edited:
  • Like
Reactions: trophft
The 1 degree slope isnt noticable on a 45 joint. The middle of the cut doesn't matter all you worry about is the top and the ends. That was cut by hand and sloppy looks like a grinder was used or a small demo saw. Those should be cut on a wet tub saw or a demo saw with a cut guide
And the grout lines between the coping? A few already cracking and crumbling in some joints; all inconsistent joint widths (no spacers, just eye-balled it); some discoloration (some look gray and some are brown like they're dirty)...just overall disappointing and not the quality standard that this PB has maintained throughout the other phases of the build.
 
For future use: if you do decide to redo some or all of the coping, and get the PB on board, it wouldn't be unreasonable to ask for (as in, demand) a different tile guy. The rub for the PB will be that by using the same guy, he could expect a free or discounted redo that he wouldn't get from someone else. So that'll be a tough ask. I just know I wouldn't want that same knucklehead back in my yard... Best case: the same tile contractor has other employees that are better, so a different guy wouldn't affect the redo negotiations between PB and tile contractor. Either way, make sure the saw Jimmy described is on site next time!
 
  • Like
Reactions: trophft
Dirk I always put a hair of pitch on my copings. Standard way is to have a 12" level with the bubble touching the back line. On complex pools and with waterfalls that changes. When adding a waterfall or sheer decent wall you slowly adjust amd pitch away from the feature into the pool so water doeant collect at the bottom. There are lots of coping installed dead level and just the deck has slight pitch. Sometimes you have to level it for the shape and lay of the pool
 
  • Like
Reactions: Dirk
Had PB come out to do final punchlist items and replace a few chipped coping blocks (Diamond Cast pre-cast concrete by Noble Tile) and re-grout some unsightly joints.
These pics are the final finished product...that can't be right, can it? This isn't a "budget" pool. We actually paid an "upgrade" for this coping over travertine.
Possible solutions?
Thomas 8.jpgThomas 7.jpgThomas 6.jpgThomas 5.jpgThomas 4.jpgThomas 3.jpgThomas 2.jpgThomas 1.jpg
 
I do not have any suggestions, but I do think you are justified in not being happy with the final product. The surface looks splotchy, does it change to a more uniform color when dry or is it always like that? Good luck.
 
I do not have any suggestions, but I do think you are justified in not being happy with the final product. The surface looks splotchy, does it change to a more uniform color when dry or is it always like that? Good luck.
It's always splotchy like that. It looks good and uniform and dark when it's all wet (i.e. when it's raining), then it's all dark grey and looks like what we pictured. As soon as it starts to dry up then it turns streaky and just looks like a 20 yr old coping.
 
It's always splotchy like that. It looks good and uniform and dark when it's all wet (i.e. when it's raining), then it's all dark grey and looks like what we pictured. As soon as it starts to dry up then it turns streaky and just looks like a 20 yr old coping.
Would a sealant help with the color?
 

Enjoying this content?

Support TFP with a donation.

Give Support
Thread Status
Hello , This thread has been inactive for over 60 days. New postings here are unlikely to be seen or responded to by other members. For better visibility, consider Starting A New Thread.