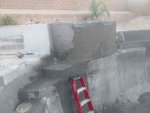
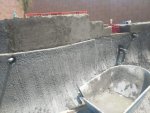
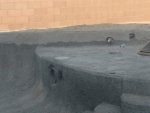
Blank canvas in Laughlin, NV.

HELLO POOL PEEPS!
Latest from my never-ending Laughlin story. One day maybe I'll have some ground shaking updates, but not today.:hammer:
lol
I tried to run my low voltage wires by pulling them through the conduits with string. Nope! Broken string each time!
So I bought a fish tape to help me run my low voltage wires to the steps. First day the tool fell totally apart! Was missing a screw so it just collapsed on itself, with wires attached 50 feet or so away! That was fun!
Returned it to Home Depot the next day and got another one.

Spent a couple of hours today pulling some wire and actually accomplished a bit. Have my main step wires in position!
Now the ugh! news: The fish tape has a nice feature to it. I can measure the exact distance from point a to b through my buried conduits!
Already purchased Glowbrite Bubbler light wire length...50ft. Measured distance with said fish tape tool? 61 feet, yep missed it by that much. Luckily all my other pool lights' cords are long enough...
:calm:
We've had no pool for 14+years, a few more days-weeks-months without one ain't gonna hurt....
 
:brickwall:

Ok, ok, ok...
Not swimming yet.
Goal is to have tile and electrical finished by months end.
Then deck first week of August.

I have two issues that I am trying to resolve. The first isn't that bad.

#1 I finally ran all of my low voltage wiring to my semi-cheap Malibu deck steps. But now I have 10 really expensive hi voltage steps lights that I am going to use too. My plan is to use both and be able to use two different circuits. But I do need to run a new set of conduits from the hi voltage lights to the pool equipment area. (With 120° outside temp right now might take awhile)

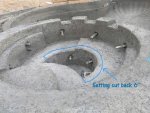
#2 And this one is a doozy. Been keeping me up at night. My spa seats are too wide! I could probably live with them the way they are, but it will always bug me. Too much footsy playing...solution? Cut the concrete back 6" on the spa seats without hitting/compromising the plumbing.

I'll post some pics tomorrow to further explain my delima.
:???:
 
Well, it is not all bad news here for me, self proclaimed as "the do-it-yourself-pool-builder-in-Laughlin":smile:
Worked on my step lights today and can proudly say that I am about 60% done!

Talked to a few people regarding my spa issue. Will be fixing it myself when "the wife" goes to
her soon-to-be-sister-in-laws bridal shower in a few weeks. hehe
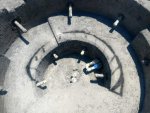
The pic below is my spa. When I supervised the shotcrete, the spa was the final thing they did. I was more focused on the arm rests than the rest of the spa.
Now that I have had some time to soak it in, I feel as if the seats were poured too wide. It doesn't leave much leg room at the bottom.
Cutting the concrete back about 6" will give me some relief. If I don't fix it now, it will surely bug me forever. :!:

spaup.jpg
spaintro.jpg


Help me Obi Wan Kenobi, you're my only hope! LOL
 
Where is the steel in there? Will you be able to take out that much and not hit it? What will you use to cut/chip/beat that out?? Yeah I don't think you want your wife there due to all of the blue air that will be around due to the a MANY adult words.................

Kim:kim:
 
Blue air! :D I'm gonna have to put that in my vocab data bank.
I have before pictures that show where the rebar/pipes are. I have measured it all, it's just a matter of taking a deep breath and going for it.

The safest way that I have come up with is to drill 16" holes down along the black line. Then go to town on the chiseling. I'm going to take my sweet time because one little "oops" could turn into, "I TOLD YOU! YOU SHOULDN'T'VE DONE THIS POOL THING YOURSELF! HIT THE ROAD JACK!":shock:

:-D
 
Smart man!! Does your drill have a level on it to help you make sure to keep that drill bit straight up and down??? THAT will be a very important part that will be VERY hard to do!

I am guessing she does not go out there very often to see how things are going LOL

Kim:kim:
 
Hello...my latest project: sorting tiles.
Figured that I don't want to have the same pattern/tiles next to each other.
So I've been laying them out and trying to get the perfect layout.
Actually kinda fun.

tileo.jpg

The last couple of weeks I have made a bit of progress.
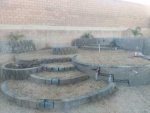
I have stucco'd the planters and retaining walls. Began capping the said planters with some cool stepping stone paver things.
Next project is "the spa", tile and deck.

Anyway, don't feel sorry for us in the Nevada desert. I still have a river and a boat and the river has some nice cold water!
:splash: , someday....
 
I love what you did with the tile! It is SO needed ahead of time! There was one build with those same, pretty tiles where the installers put all of the light ones together and all of the dark ones together.....it looked awful :( He made them redo it. Now I tell everyone one to pick through their tiles. Find the really pretty ones to put where the eyes fall as you walk out to the pool. Take out the ugly ones and use them to cute up and put in the skimmer throat and such.

Just think of all of the money you can use on boat gas from you doing all of this work you are doing on your own!

So..............where are my pics???

Kim:kim:
 

Enjoying this content?

Support TFP with a donation.

Give Support
kimkats...sorry, no more pictures until I'm done with the planters. :D Shh...don't tell anyone, i actually started to mortar the tile line today. No pictures of that either in case I've totally screwed it up! :crazy:Can't handle that kind of negative publicity. Actually, I don't know how bad I could've done, I only bought one bag of mortar mix! lol
Sorry just feeling silly about this pool right now, maybe it is heat stroke or my concert addiction getting the better of me....or this keyboard auto doing something...:rockon:
 
Hey Kim, here's some visual fodder for you...

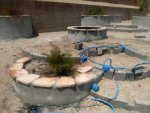
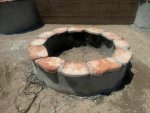
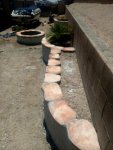
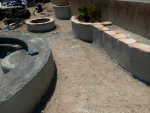
Some kinda updated pics...Stucco'd the planters and the fire pit. Capped them off with some concrete stepping stone pavers.
Probably going to paint all of them differently...
steppyu.jpgup.jpg
Mr. Sun is not making our palm trees happy!

firepit.jpg
bench.jpg
caps.jpg

Spa issue....
spacut.jpg
Floor of the spa is too small for our tastes.
Was originally going to cut back 6"(along black painted line).
Now the plan for tomorrow is to cut back the entry steps. (along chalk line)
This way there is less chance of me hitting crucial hidden objects under the gunite.
I may cut back the black line on the right side, only if things go well on the steps.
I will have to reset the spa light, but since electrical has not been finished, it shouldn't be too hard!(yeah procrastinator me!)
Tomorrow evening will either have a post of a :D or a :( or I might just be crying too much to type.

...
 
DUDE! I LOVE those cap stones on the planters!!! What a wonderful color and shape! You have a great eye and skills!

Coloring them-----------NO paint. Stain will be a better pick as it does not peel or flakes like paint does.

Does your wife know what you are planning with the spa yet??? LOL What tool will you be using to do this work?

Kim:kim:
 
So, I didn't get to tearing up the spa this weekend.
I got a late start and it just wasn't in the cards, so...
IMG_20180811_175420208.jpgIMG_20180811_112101872.jpgIMG_20180811_175714274_HDR.jpg
Instead, I spent the weekend leveling the pool so I, yes I,
can install my pool tile in an even surface.
Just want to say that this was difficult work!
The pool looks perfectly vertical from afar, but there are all sorts of "waves"! Didn't quite finish but should be done soon...
Good news, saving $2000-$3000 doing it myself.
Bad news, I'm tired.

Also, found some rebar peeking out near the spa...
Had to cut that out so I wouldn't get a rusty mess later in life...
IMG_20180811_175730013_BURST001.jpg
Enough for today...
 
I am guessing just "tired" does not cover it..............this would be cold shower, peanut butter sandwich, then fall into bed tired........The saving and knowing it will be close to purrfect will make it worth it in the end!

Kim:kim:
 
Here's a question that maybe someone could help me with. So I used type s mortar mix to plumb/level my pool wall where the waterline tile is going. I'm going to have one row of 6x6 tiles around most of the pool with the deep end being 3 rows high and around the spa 6. The guys who were originally going to do my tile gave me a grocery list of materials. (30+ bags type -s mortar mix, 4 bags 3n1 thinset another bag of different thinset for the step tile and 2 bags grout.)
Didn't say anything about a waterproof membrane.
Should I put on a waterproof coat on top of my pretty mortar work before I slap on the thinset and tile?
Sounds like a good idea to me, just don't know if it's overkill.

Thanks for any info....
 
Thats not overkill at all and should absolutely be done. Type S mortar is not designed to be submerged and will break down with time if not waterproofed. The same goes for the thinset so make sure you use a quality product designed for continuous water exposure.
 
Thats not overkill at all and should absolutely be done. Type S mortar is not designed to be submerged and will break down with time if not waterproofed. The same goes for the thinset so make sure you use a quality product designed for continuous water exposure.

Thanks Brian, I figured just by looking at it that water might somehow find it's way behind the mortar and cause some kind of damage.
So I will be doing the waterproofing too. Question is: what is a good waterproofing membrane?
My local HD has redgard that does waterproofing and crack prevention, it looks kinda pricey but if it works....
This is another ah-ha moment in my DIY pool building adventure. If I would've let the, "pro's" do my tile, they would've skipped the whole waterproofing step and just slapped on the tile. Sure they would've probably done it quickly and professionally but then in a few years I'd be, well...:brickwall:
Oh and Thanks Kim...:D
 

Enjoying this content?

Support TFP with a donation.

Give Support
Thread Status
Hello , This thread has been inactive for over 60 days. New postings here are unlikely to be seen or responded to by other members. For better visibility, consider Starting A New Thread.