Yet another "how do I" thread (but at least I am a supporter now :))

troye

0
Silver Supporter
Apr 10, 2013
103
Sunny SoCal
Pool Size
15000
Surface
Plaster
Chlorine
Liquid Chlorine
I took the plunge, not in a bad way. I've been wanting to contribute but just have not had the money. I still didn't but just could not feel good about utilizing the awesome resource TFP without contributing. Glad to be a silver supporter with plans to upgrade to Gold. This forum has provided me with so much guidance, help and direction.

I am in process of rehabilitating our pool. It all started with "just" the flagstone coping needing to be redone which is a large enough project , then added the removal of the top 3.5" of pebble tec due to delamination, damage and old repairs not matching, this is still in process (separate thread).

Now.... to the last issue (I hope) Seat Repair...How?
I knew I had some delaminated pebble tec on our seat, but today I decided to remove just a small piece and to my surprise the gunite below the pebble tec has some integrity issues.

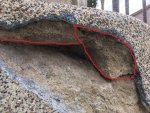
1. First pic (Seat1) - The seat and the outline indicates the pebble tec I will need to remove
2. Second pic (Seat2) - you can see a chunk of the gunite that came out with the pebble tec. Red circle shows what also might be loose
3. Third pic (Seat3) - shows most likely the part of the seat I will need to rebuild

My initial thought is I will need to create a form and then use cement to rebuild the seat. How exactly? What kind of cement, and materials do I use? Any tips / help you have to offer is greatly appreciated.
 

Attachments

  • Seat1.JPG
    Seat1.JPG
    152.8 KB · Views: 128
  • Seat2.JPG
    Seat2.JPG
    142.4 KB · Views: 130
  • Seat3.JPG
    Seat3.JPG
    162.1 KB · Views: 124
I don't think you'll need to use a form for a repair that small, but it remains to be seen since it looks like you still have more chipping out to do. I would first chip off any loose/hollow pebble and gunite, after which you'll have a better idea of the size and depth of the repairs.

Assuming it's not too huge, I'd clean everything thoroughly, spray it down, then make a slurry with portland and an acrylic masonry bonding adhesive/fortifier. Paint that slurry on to the area to be repaired to ensure a good bond. I would then use a mortar mix to do the actual repair of the gunite. You could use a standard type S mortar, but for things like this I prefer to go a little heavier on the portland. I'd also add some of the bonding adhesive/fortifier to the mortar mix in place of some of the water (maybe 50/50). Go light on the water when mixing the mortar and add just a little at a time until it has the consistency of room temp peanut butter. When applying the mortar, make sure you use the trowel to really squeeze it into all the little nooks, crannies, cracks, and gaps. Once you're sure it's squeezed in well, then you can use your trowel to shape it how you'd like it to look. After the initial set, mist it lightly with water, then a few hours later spray it down liberally, and continue to keep it damp as best you can for the first few days.
 
It looks like your seats were built with the rebound from the gunite which is not good. Just like Jason said, keep hammering away until you get to something solid.

To repair, use a bonding agent and patch with high PSI concrete and plastic cement. Scoop up a handful and fling it into the void until it's about 2-3 inches thick. You'll have to let that sit for 20-30 mins before you can add more. Use a wood float for the final shape.
 
Miner, that is awesome advice and sounds like a good plan. By Friday I will chip out the rest to get a good idea what I am dealing with. I have used the type S before but just what is in the bag, are you suggesting to also add some portland to the mix? I am very familiar with the fortifier as I have been using that to redo the coping.

Thanks for taking the time to reply, it is very helpful. When I first peeled away the pebble I had an upset stomach as I have a small time frame to get the pool ready, it has been down for a year, and the pool is "trashed" and the project keeps taking on different turns. What I mean to say is yes I knew about the delamination but had no idea the structure under was compromised. And I have the ability to DIY once I have a little guidance / advice....so thank you
 
It looks like your seats were built with the rebound from the gunite which is not good. Just like Jason said, keep hammering away until you get to something solid.

To repair, use a bonding agent and patch with high PSI concrete and plastic cement. Scoop up a handful and fling it into the void until it's about 2-3 inches thick. You'll have to let that sit for 20-30 mins before you can add more. Use a wood float for the final shape.

Thank you bDavis466.

Now I am determined / bent on chipping it away. What does it mean to the seat was built from the rebound from the gunite? Wait let me Google this and check it out, I suppose it is something related to the rebar / form and it is really not that important now plus I probably do not want to know lol. Google did not take long lol, I understand.

So this is one of those situations where you can slice and dice it more than one way it sounds like. The void in the picture is just one part of it, I imagine the seat will have many voids once I start removing the pebble. The picture with the red outline is the pebble I have to remove and my guess is it is going to go fairly deep where the damage is.

Let's see. I will remove everything tomorrow and then report
 
Okay I could not leave it alone. The depth of the seat is approx 17" .The first 5" damage repair is 3". The remaining 13" depth damage repair is 5.5" deep. Does this change the recommended approach for fix?
 

Attachments

  • Seat no pebble1.jpg
    Seat no pebble1.jpg
    720.5 KB · Views: 74

Enjoying this content?

Support TFP with a donation.

Give Support
What does it mean to the seat was built from the rebound from the gunite?

Because shotcrete/gunite is applied with such high force and speed, some of the particles bounce/ricochet off and land nearby. That's rebound material. Sometimes this rebound material is scooped up and used to form steps, benches, etc. It saves money because they don't need as much concrete, and they don't have a huge pile of rebound to clean up after the job is done, but the rebound material is weak and often doesn't bond to the rest of the shell very well.

Does this change the recommended approach for fix?

Nope.
 
Because shotcrete/gunite is applied with such high force and speed, some of the particles bounce/ricochet off and land nearby. That's rebound material. Sometimes this rebound material is scooped up and used to form steps, benches, etc. It saves money because they don't need as much concrete, and they don't have a huge pile of rebound to clean up after the job is done, but the rebound material is weak and often doesn't bond to the rest of the shell very well.


Nope.


Rebound is like sawdust; it’s waste.

Anyways-
So in plain English are you saying, successful placement is all about cementitious aggregate encapsulation applied at high velocities??
 
Man these pool people that try to save a buck or two, penny wise pound foolish. Thanks Miner I am sure that is what I am dealing with.
So portland cement first (higher psi I am assuming) and use the portalnd heavier / build up some the seat and then use the mortar. Does not sound too difficult. My wife is almost having a heart attack lol. "how are you going to do this?" I say it's okay babe there are these awesome people on this forum called TFP...that put her at ease, at least some :)
 
Rebound is like sawdust; it’s waste.

Anyways-
So in plain English are you saying, successful placement is all about cementitious aggregate encapsulation applied at high velocities??

Well, that and the mix. And the timing.

So portland cement first (higher psi I am assuming) and use the portalnd heavier / build up some the seat and then use the mortar.

There's no such thing as high psi portland cement. High psi concrete is generally just a concrete mix with more portland in it.

Step 1: Paint on a portland/acrylic fortifier slurry to create a bond coat.

Step 2: Apply a concrete or mortar mix, and shape it. This can be any mix you want, but I'd opt for something stronger (higher portland content) and use acrylic fortifier instead of some of the water. If you opt for concrete, I'd try to use something with smaller diameter aggregate to make shaping it on the thinner areas easier.
 
  • Like
Reactions: PoolguyinCT
Well, that and the mix. And the timing.


There's no such thing as high psi portland cement. High psi concrete is generally just a concrete mix with more portland in it.

Step 1: Paint on a portland/acrylic fortifier slurry to create a bond coat.

Step 2: Apply a concrete or mortar mix, and shape it. This can be any mix you want, but I'd opt for something stronger (higher portland content) and use acrylic fortifier instead of some of the water. If you opt for concrete, I'd try to use something with smaller diameter aggregate to make shaping it on the thinner areas easier.

Okay going to give this a shot this weekend, as soon as this illness is gone. So preference is portland then? And regardless I need to create a bond coat
 
Well I didn't get the pool done in time for the graduation, ended up renting another house for the party lol. I will be finishing the pool coping today and then early next week will mix the mortar for the coping, and then on to the seat!

Just to make sure I am clear
Step 1. Paint on a portland/acrylic fortifier slurry to create a bond coat.
1. Is the portland you are referring to the mortar?
Step 2 Apply a concrete or mortar mix, and shape it.
2. Do I need to wait to apply the mortar mix for step 1 to dry or can it be done directly after the bond coat. My understanding is it can be done immediately after.

I hope everyone is enjoying their pools now that Summer time is here

1. No, I'm referring to portland cement. Mortar is a mixture of portland cement, sand, lime, and water.

2. No need to wait, in fact it's best if applied within 3 hrs of the bond coat.

Good luck!
 

Enjoying this content?

Support TFP with a donation.

Give Support
Thread Status
Hello , This thread has been inactive for over 60 days. New postings here are unlikely to be seen or responded to by other members. For better visibility, consider Starting A New Thread.