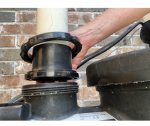
The ring that secures the PVC to my waterfalls pump busted over the winter. Some of you may remember my panicked post upon waking in the morning to find my pool completely empty. Being the falls pump I simply excluded it from the system and emptied it. Now it's time to fix it properly. I've included two pictures. One is a close up of the break. I have what I think is the correct replacement ring/thread but I need to figure out where I should be cutting the PVC to remove the old ring and put on the new one. In the second picture does cutting and splicing in new PVC make more sense in one of these locations over another? Should I be addressing this from a different perspective? Thanks in advance!!

Where/How would you fix this?
- Thread starter ChristiK
- Start date
You are using an out of date browser. It may not display this or other websites correctly.
You should upgrade or use an alternative browser.
You should upgrade or use an alternative browser.
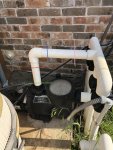
My gut is saying I should cut the old pipe at about the green line and just use a coupler/join to put a new section with the new coupler on.
Randrx2
Bronze Supporter
- Dec 13, 2018
- 436
- Pool Size
- 30000
- Surface
- Vinyl
- Chlorine
- Salt Water Generator
- SWG Type
- Pentair Intellichlor IC-60
You can cut the PVC back and add a coupler and section of PVC to the correct length to add in the union fitting.
OR
This is tricky if you have never done it. You can heat the pipe and black union fitting with a heat gun, being careful not to melt or deform the plastic. This may melt the PVC glue and loosen the solvent weld and allow the union to be pulled off. Again, this is a tricky and delicate process. Then you clean up the pipe and fitting and reassemble with primer and glue. Don’t forget to put the new ring on! You may or may not have success with this. If not, then you will have to cut back anyway. BEWARE THE PVC FUMES! Thinking about this a little more. You could heat the pipe at the black fitting and remove the black fitting. Then heat the pipe at the elbow and remove. Then use a new piece of pipe the same size as the old pipe. There a few YouTube videos on how to this if these instructions are not clear.
Last edited:
Ohhh I have a heat gun and I can do delicate. Worse comes to worse I end up cutting it off anyway and using a new PVC section and a coupler. I thought once it was "welded" on it was pretty permanent. I'm off to search YouTube.
Randrx2
Bronze Supporter
- Dec 13, 2018
- 436
- Pool Size
- 30000
- Surface
- Vinyl
- Chlorine
- Salt Water Generator
- SWG Type
- Pentair Intellichlor IC-60
Yep. It is “welded”, but only the top layers. If you do this, sacrifice the pipe so you can reuse the fittings. One of the tricks is to use a hole saw slightly smaller than the pipe and heat the hole saw and insert into pipe. You would cut back the pipe about 1/2” from the fittings. Make sure you leave enough to pull out the pipe. Here is a good example:Ohhh I have a heat gun and I can do delicate. Worse comes to worse I end up cutting it off anyway and using a new PVC section and a coupler. I thought once it was "welded" on it was pretty permanent. I'm off to search YouTube.
Ahh I thought you were saying I could use the heat to remove the fitting. I really can't access the inside of the PVC pipe as the pump is right there. I don't need to reuse the coupling as that is the part that broke and I bought a replacement.
djdonte
Well-known member
- Mar 25, 2019
- 554
- Pool Size
- 11300
- Surface
- Plaster
- Chlorine
- Salt Water Generator
- SWG Type
- CircuPool RJ-30 Plus
The problem with the "ungluing" part is that its best done on a bench or somewhere other than right over your pump. It is not as easy as it sounds and generates awful fumes. Doesn't look like there will be much wiggle room either and I see no way to remove the piping there so I would just cut around the red line, put a coupler and the correct length of pipe with a new union on it.

Randrx2
Bronze Supporter
- Dec 13, 2018
- 436
- Pool Size
- 30000
- Surface
- Vinyl
- Chlorine
- Salt Water Generator
- SWG Type
- Pentair Intellichlor IC-60
Sorry. I meant that you cut the pipe off then heat to remove the pieces from inside the fittings.Ahh I thought you were saying I could use the heat to remove the fitting. I really can't access the inside of the PVC pipe as the pump is right there. I don't need to reuse the coupling as that is the part that broke and I bought a replacement.
But since you have a whole new fitting, just cut it back, add a coupler, and a new piece of pipe.
sktn77a
Gold Supporter
Looks like the old collar split because the fitting and the pump connection aren't aligned. You should level the pump. You may be able to connect them together as-is but you may be faced with the same problem again down the road.
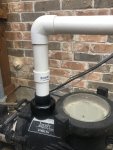
We have a connection and we have falls. Thank you everyone. Sktn, they are ever so slightly out of alignment but frankly I don’t have the faith in my ability to correct the approximately 2 mm they’re out of alignment without actually making the problem worse so I went with what was there already.
Attachments
Randrx2
Bronze Supporter
- Dec 13, 2018
- 436
- Pool Size
- 30000
- Surface
- Vinyl
- Chlorine
- Salt Water Generator
- SWG Type
- Pentair Intellichlor IC-60
Looks like a fine job! Nice work!We have a connection and we have falls. Thank you everyone. Sktn, they are ever so slightly out of alignment but frankly I don’t have the faith in my ability to correct the approximately 2 mm they’re out of alignment without actually making the problem worse so I went with what was there already.
Thread Status
Hello , This thread has been inactive for over 60 days. New postings here are unlikely to be seen or responded to by other members. For better visibility, consider Starting A New Thread.