What are my options for fixing plumbing for this new pump that doesn't quite fit?

kchinger

Well-known member
Aug 20, 2017
325
Southeast PA
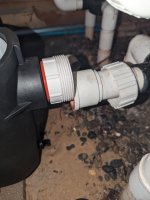
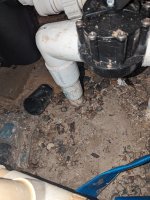
So my new Calimar 3HP finally got here, and I was just crossing my fingers that the plumbing would work, but it doesn't. The suction side is about an inch higher, and the pressure side is just a smidge different. The pressure side I think I can just get a new 1.5 inch union for my multiport side and build back to where I have some space in the run to join to the existing 2 inch pipe, but I might need another 2 inch union. Anyway, that's all fine and reachable.

For the suction side though, I'm not sure what to do. Everything is really tight with the valves and lots of old repairs taking all the virgin pipe. I can't see where I can insert anything to raise the entire valve set up the inch I need. What are my options here? I guess I can dig underground and find virgin stuff below the T and below the dirt on the two skimmers and work from there, but that sounds annoying. I could just extend the 2inch suction side with a union instead of the pump, but I only have about nine inches behind the pump before my heater, and I need to leave air space, so I might only have 6 inches to work with, which I don't think is enough to make that happen. Ideas?


PXL_20240521_171312219.jpgPXL_20240521_171322762.jpgPXL_20240521_171334073.jpgPXL_20240521_171338822.jpg


PXL_20240521_171401105.jpg
 
Two 45-degree fittings glued with a short pipe to make an "S" shape will allow you remove that union and, essentially, raise the suction pipe without doing anything to the valves, etc.
You will have to move the pump either left or right and then redo the plumbing to the filter.
All 45s have a mold line on the sides. Just line them up when gluing them together using a 2.5" piece of 2" pipe (usually) and the two ports will be parallel.

Awesome idea, I didn't think about going left or right. So coming out of the final valve is a stub of 1.5", then some virgin 2" after the 1.5 to 2" adapter, then the 2" union. So you're saying to cut at the 2" union, make a 2" S-shape with two 2" 45 and a bit of 2" pipe to join them, and then a new 2" union for that side, and I can raise it and move it one direction or the other to make it fit. Then rebuild the pressure side to the filter like I had to do anyway (unless this happens to make it line up, lol, wouldn't that be nice).

While you're here, as you can see the unions aren't screwing all the way in to the new pump, the o-rings aren't quite touching, but it's very, very tight and I don't want to break the pump. Is this ok? I tried with and without teflon tape, didn't make a difference, it's not bottoming out in the new pump threads for some reason. I currently have it without teflon. Should I grease the threads with silicon first to make it fit more? Or is it binding and I just leave it and hope it's tight enough?
Is there a "stop" on the inside of the suction port (have never used a Calimar pump)? Did the union come with an O ring? If so, it must be tight (slightly "squished") as that is the seal. Have never see one with an orange O ring. Many wraps of Teflon tape on the suction side can seal it, but likely won't on the output side.
High temp pump unions seal with an O ring as they don't actually have pipe threads on them, though they will tighten into a pump. While pipe threads are tapered and "expand" as they go farther into a pump's matching tapered port, union threads are straight and don't. Its the matching expansion into a tapered female thread that seals plumbing (with some thread seal like Teflon tape).

The o-rings came with the unions (I'm pretty sure, it was a few years ago, they came with my old pump, a Vgreen165). The pump has threads and then the threads end and it's flat and smaller diameter, if that's what you mean by a stop. I can't get to that stop though, certainly not by hand, and it says to do only do one turn past hand tight, which isn't gonna get it there either.
 
I hate to say it but I would try to cut out as much of the past repairs and redo what needs to be redone. You could use a PVC pipe reamer save some of the fittings or valves.

I have my pump raised up on a concrete pavers to keep it off the ground (stays a little cleaner and dryer) and to also allow easier swapping out of pumps if needed down the road. If the next pump inlet is a little higher or lower I can change to paver or shim it up and not have to mess with the lines in the ground.
 
The o-rings came with the unions (I'm pretty sure, it was a few years ago, they came with my old pump, a Vgreen165). The pump has threads and then the threads end and it's flat and smaller diameter, if that's what you mean by a stop. I can't get to that stop though, certainly not by hand, and it says to do only do one turn past hand tight, which isn't gonna get it there either.
V-Green 165 is a motor, not a pump. Calimar made your new pump, but not likely the motor, they buy those. Actually marketed the pump as they are available as Calimar, Black & Decker, Circupool, Blue Torrent as well, same pump different names.

You may want to get a new set of 2" Hi-Temp pump unions (guessing you have a 3hp Calimar), cut the plumbing between the pump and valve flush with the valve and use the 2" 45s OVER the outside of the valve port. It appears you have 1.5" X 2" valves and that is possible. Gets rid of reducers, 1.5" pipe, couplers, etc. in front of the pump.
 
I hate to say it but I would try to cut out as much of the past repairs and redo what needs to be redone. You could use a PVC pipe reamer save some of the fittings or valves.

I have my pump raised up on a concrete pavers to keep it off the ground (stays a little cleaner and dryer) and to also allow easier swapping out of pumps if needed down the road. If the next pump inlet is a little higher or lower I can change to paver or shim it up and not have to mess with the lines in the ground.
Mine is on a paver, I kinda forgot. So I could maybe just dig the paver down a bit farther to make it work. Everything might just line up then, even if the paver is a little below the ground level. Future me with the next pump (which if I'm lucky is in like 5 years) will mess with it to make it better.
 
V-Green 165 is a motor, not a pump. Calimar made your new pump, but not likely the motor, they buy those. Actually marketed the pump as they are available as Calimar, Black & Decker, Circupool, Blue Torrent as well, same pump different names.

You may want to get a new set of 2" Hi-Temp pump unions (guessing you have a 3hp Calimar), cut the plumbing between the pump and valve flush with the valve and use the 2" 45s OVER the outside of the valve port. It appears you have 1.5" X 2" valves and that is possible. Gets rid of reducers, 1.5" pipe, couplers, etc. in front of the pump.

Sorry, I meant Pureline Prime VSP 1.65 from INYO.

If I can't dig the paver down enough, I'll try your solution on the outside of the valve, makes sense to clean it up.
 
Sorry, I meant Pureline Prime VSP 1.65 from INYO.

If I can't dig the paver down enough, I'll try your solution on the outside of the valve, makes sense to clean it up.
Your picture is completely different from the one on Inyo's site. Don't lower the height of the pump if it means getting the motor into an area that it might be in contact with water or wet soil for long periods of time. It will rust and debris can get into the cooling fan on the back of the motor.
 
  • Like
Reactions: Darin

Enjoying this content?

Support TFP with a donation.

Give Support
Your picture is completely different from the one on Inyo's site. Don't lower the height of the pump if it means getting the motor into an area that it might be in contact with water or wet soil for long periods of time. It will rust and debris can get into the cooling fan on the back of the motor.
I meant Pureline instead of the VGreen 165, for the existing pump. The pictures don't show the old pump, just the new Calimar 3HP. Yeah, I suppose dropping it down might get it too close to the sand/dirt/water in the pool house.
 
Turned out not too bad. Had to avoid a union on the pressure side, but it wasn't terrible. I do have a very small leak from the multiport where I put my new piece. I think maybe it's cracked? I didn't tighten anything more than hand plus a smidge, and only hand until it was leaking. The crack looks dirty, so I don't think it's new, but maybe the old one had enough putty and tape and stuff that it was fine? It was very messy getting it off. I also noticed that the fitting I used had much shorter threads than the old one. Is there a particular 1.5" slip to thread fitting I need for the multiport, and would that stop the leak? Or is it just cracked and I need to figure out a way to stop the leak (or get a new multiport, but that seems overkill for a small drip).PXL_20240528_181226241.jpg


PXL_20240527_192304162.jpg
 
Turned out not too bad. Had to avoid a union on the pressure side, but it wasn't terrible. I do have a very small leak from the multiport where I put my new piece. I think maybe it's cracked? I didn't tighten anything more than hand plus a smidge, and only hand until it was leaking. The crack looks dirty, so I don't think it's new, but maybe the old one had enough putty and tape and stuff that it was fine? It was very messy getting it off. I also noticed that the fitting I used had much shorter threads than the old one. Is there a particular 1.5" slip to thread fitting I need for the multiport, and would that stop the leak? Or is it just cracked and I need to figure out a way to stop the leak (or get a new multiport, but that seems overkill for a small drip).View attachment 578153


View attachment 578152
Cracks on the pressure side, especially right out of the pump or into the filter where the pressure usually is highest in the system are difficult/impossible to repair with any longevity, sorry.
It likely cracked because that, or the original, fitting was threaded in completely, not good practice. The wedge shape of pipe threads will crack the plastic fitting they are threaded into.
There should always be 3-5 threads showing on a properly tightened pipe fitting. The one used looks to be a DWV (drain, waste, vent) fitting, not a pressure fitting. They might hold, but again, not good practice.
Regular, schedule 40 PVC fitting may be labeled as DWV as well, but a DWV fitting doesn't have to hold the pressure of schedule 40, so the threads may not be as long.
You might try a coating of Plast-aid over the crack. It will etch into the valve and may hold a while. Cracks usually continue to crack.
1717026634079.png
 
Cracks on the pressure side, especially right out of the pump or into the filter where the pressure usually is highest in the system are difficult/impossible to repair with any longevity, sorry.
It likely cracked because that, or the original, fitting was threaded in completely, not good practice. The wedge shape of pipe threads will crack the plastic fitting they are threaded into.
There should always be 3-5 threads showing on a properly tightened pipe fitting. The one used looks to be a DWV (drain, waste, vent) fitting, not a pressure fitting. They might hold, but again, not good practice.
Regular, schedule 40 PVC fitting may be labeled as DWV as well, but a DWV fitting doesn't have to hold the pressure of schedule 40, so the threads may not be as long.
You might try a coating of Plast-aid over the crack. It will etch into the valve and may hold a while. Cracks usually continue to crack.
View attachment 578794

I don't remember if the other one was bottomed out or not. It was longer though, I forgot about DWV differences. I'll try to swing by the pool store today and get a proper fitting with the longer threads and hope that works to stop the leak.
 
Remove the fitting from the multiport and clean off all tape and sealant from the threads.

Glue in a schedule 80 nipple or regular male adaptor.

Put glue on both threads but not so much that it puddles.

Screw in the fitting until it is snug, but not so much that the crack opens.

Allow 24 hours to dry.

Thanks. I might try building it up with a regular sch 40 adapter, and if that still leaks after drying the PVC I'll glue it in.
 
With glue, the fix is permanent.

This is why I might use a 6" nipple with the room to be able to glue twice if necessary.

So, this means the space past the threads is about 3".

Cut at the red line.

1717083336186.png
 
Apply the glue and screw in smoothly and completely without getting it supertight.

Basically bottom out and stop where it begins to get tight.

Don't stop turning until you bottom out or the fitting might get locked.

Once you get significant resistance, stop turning.

Then allow 12 hours to dry before disturbing the fitting.

Do not apply too much glue to the female threads or it can end up in the multiport.
 

Enjoying this content?

Support TFP with a donation.

Give Support
Thread Status
Hello , This thread has been inactive for over 60 days. New postings here are unlikely to be seen or responded to by other members. For better visibility, consider Starting A New Thread.