Water stuck in solar panels

Forgot to mention:

1. You've wondered about various work-arounds, like moving the valve after the pump goes off, or drilling a hole, or adding isolation valves, etc. I can't speak to any of those, for the most part, because I only have experience with my system, which doesn't utilize any of those things. That's not to say some of the alternate options couldn't be worked out, I just don't know how to help with that. If it turns out you only need to swap your solar valve, that's easy and cheap(ish) and that would solve the issue without work-arounds, leaving you with a properly plumbed system. So that's my recommendation.

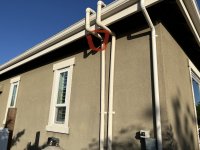
2. If it turns out you have trouble with the VRV, you could use this idea. I didn't install mine on the roof. They don't need to be up there. Mine is tucked under my eve, hidden from the sun. I figured it was PVC and going to be subjected to too much UV up there, so mine's in the shade 24/7. Plus it's much easier to service should I ever need to, I can get at it with a small ladder. So if a new VRV is in your future, you could consider moving it...
 
How can one determine whether an installed 3-way solar valve with actuator has drain-down or not?
I can think of only three ways:
1. If a model number is on the body somewhere
2. By taking it apart and looking
3. If the water drains backwards through it when the pump is off (you might be able to hear it, or see it if you have a clear check valve in a handy spot).

But... #3 wouldn't reveal if you have a true drain-down valve, or if you have a standard one that someone drilled a hole in.

It takes about two minutes to disassemble the actuator and the valve, less if it's not the first time you tried it. I'd be inclined to open it up and make sure. It's also a good opportunity to inspect the o-rings, as they go bad periodically. Two birds...
 
  • Like
Reactions: Rocket J Squirrel
I took apart the valve and verified it is a Jandy one. There is no hole in the diverter and appears to be the Neverlube version. I couldn’t find a drain down valve by Jandy and assume the Pentair one won’t fit, so drilling a hole seems to be the best option here.

I actually added the Flovis to be able to tune my VSP. Originally the pump was running at 80% giving me 70GPM when solar was running, but after reading other threads I lowered it to 70% to get to 60GPM. Any lower and I get air coming in from the solar.
 
If you move the VRV to the supply side of the panel header, you should be able to lower RPM even further. Also, not as much water needs to drain on the supply side.
 
If you move the VRV to the supply side of the panel header, you should be able to lower RPM even further. Also, not as much water needs to drain on the supply side.
Not sure I trust myself doing all of that plumbing on the roof, but good to know. After taking a closer look it looks like the VRV has a small leak so probably going to have to replace it. Guess I’ll hop on the roof next week when it’s cooler to take a closer look.
 
Alright! Progress!! Sounds like you're working through it.

If you wanted to move the VRV, to lower the RPM and/or to protect the new one better, you probably only need to do some plumbing at the new location. Depending on your existing VRV, chances are you can just put a PVC plug where the old one was, and maybe slap a little latex paint over that.

And it sounds like you got the FlowVis down, cool. I have eight 4x12 panels, and run at 40GPM. I got the math for that from the manufacturer's installation manual (5GPM min. per panel x 8 = 40). Perhaps you could find your panel manufacturer's spec and compare that with what you're running. Theoretically, for best heat production, you want to run as much flow as possible, up to the pressure the panels can physically handle. But there is a point of diminishing returns when you factor in how much the cost of electricity it takes, and the long-term wear and tear on the panels. So I run at the minimum recommended flow rate, because I figure that's the cheapest I should go, and since the pool gets warm enough for my liking, I'm good-to-go.
 
Guess I’ll hop on the roof next week when it’s cooler to take a closer look.
My pool got to 70 today, without solar. Spring sprang!! I was tempted to turn it on, and might tomorrow just to see what happens. But yah, cooling way off next week so I'm not sure if it'll be worth it for one or two days only...
 

Enjoying this content?

Support TFP with a donation.

Give Support
My pool got to 70 today, without solar. Spring sprang!! I was tempted to turn it on, and might tomorrow just to see what happens. But yah, cooling way off next week so I'm not sure if it'll be worth it for one or two days only...
Got mine up to 78 with the solar running, but my wife and kids are too spoiled and it was still too cold. I thought it was nice since it was so hot out, but another hot day tomorrow so maybe I can get it up a little more. I'll leave it off after tomorrow since it is going to cool down quite a bit in northern California.

Now I know why some of the contractors around here don't like Fafco, their parts are expensive. Was going to go ahead and just buy a new VRV since the current one has a small leak around the seal but they are double the price of other ones. I could just get a generic one, but then I'd have to buy one of their expensive couplers to connect it.
 
  • Like
Reactions: Dirk
Huh, I think mine has 3/4" threads, just screws in ezpz. Similar to this one:
shopping.png
Do you have the kind that fits into the end of the panel manifold?

Yah, if I wanted to swim Saturday I should have turned it on today. Takes a while to build up and you do get some residual from the day before. I like 85, but I'll get in at 70 if I work hard enough in the garden! But at that temp it's more about how you feel after you get out, not while you're in! 🥶
 
I guess Fafco had their own mounting system. This is what it looks like, so to use that type I would need to buy one of their couplers so I could use standard PVC.

Sungrabber Vacuum Relief Valve Fafco - Solar Swimming Pool Heating Panels - Amazon.com : Sungrabber Vacuum Relief Valve Fafco - Solar Swimming Pool Heating Panels - : Swimming Pool Heaters : Patio, Lawn & Garden

CPVC Pipe Connector for Fafco Sunsaver Solar Panel - 2 Pack Amazon.com: CPVC Pipe Connector for Fafco Sunsaver Solar Panel - 2 Pack : Patio, Lawn & Garden
 
Yep, that's the one I thought it might be. Is that what's up on your roof now? What about just replacing the existing VRV with a Fafco end cap? And then mounting the style I have under your eve? It should last longer there, you might be able to run at a lower flow rate if you wanted to,* and if you did have to replace it again it's a 5 minute job from a short ladder.

Amazon.com: SunSaver Fafco End Cap Black : Patio, Lawn & Garden (or whatever is needed)


There are probably less expensive options of these components, I just grabbed three to give you the gist...

One thing to consider: my VRV is somewhat noisy. It croaks/burbs when it's doing its thing, and it goes on for 15-20 minutes. I can hear it inside my house, and I can hear it while at the pool. My pump/solar heating usually stops at about 4pm, which is usually when we're out there. I'm not sure it would have been any less of a bother up on my roof, but it's something to know about, if you decide to give that a go. Is yours noisy up where it is?

* The minimum RPM/flow you can run and how it relates to the location of the VRV is something I just barely understand from reading explanations written by Mark (@mas985). A little over my head type stuff. And running as low as you can go is not necessarily the goal, the most cost effective heating is. But it's an option to consider.
 
Thanks for the suggestion! Would a good place be to put it under the eave on the supply side going up toward the roof? It probably won’t end up being under the eave if I put it in the middle of that section though. Also does the direction of the valve matter? Should it pointing up, down or sideways?
 

Attachments

  • CFE54571-E016-4FB3-AD10-7A007D308628.jpeg
    CFE54571-E016-4FB3-AD10-7A007D308628.jpeg
    576.5 KB · Views: 7
Last edited:
You can just move the VRV you have to the supply side of the panels and save yourself some work. At least, I would do that before replacing it as well as fixing the drain down valve.
 
You can just move the VRV you have to the supply side of the panels and save yourself some work. At least, I would do that before replacing it as well as fixing the drain down valve.
I think he said his VRV is leaking and needs replacing.
 
Thanks for the suggestion! Would a good place be to put it under the eave on the supply side going up toward the roof? It probably won’t end up being under the eave if I put it in the middle of that section though. Also does the direction of the valve matter? Should it pointing up, down or sideways?
That's exactly where I have mine (supply side). I pointed mine up, I'm not sure it matters, but perhaps a new one would come with some installation instructions stating whether it needs to be oriented or not. I believe they are spring-activated, so gravity shouldn't matter. Just a guess.

If you don't have room to go straight up like I did, you don't have to put the tee on the horizontal piece. It can go at the top of the vertical pipe that runs along the wall, then an elbow, then a short run of PVC and finally a slip-to-female coupler. That would orient the VRV vertically and it would be tucked into that corner to minimize or eliminate its hours in the sun. I wouldn't put feet of pipe between the VRV and the supply pipe, but I don't think an elbow and an inch or two of PVC would affect its performance.

vrv.jpg

I special ordered that stainless steel strapping. I used it up on the roof, too. And if you look close you'll see the last of my zip ties, supposedly "UV rated." All the ones on the roof busted and I replaced them with SS wire. This stuff, it's all I use outside now:


Now that I think about it, it's sort of a proof of concept. The zip ties on the roof didn't make it, but the ones here in the shade are still OK. I'd like to think that my VRV is also going to benefit from living in the shade.

The pipe came black, UV rated (hope that's better than the zip ties!). I used sweep elbows, but those only came in white. I primed and painted those. I just read an article that black pipe does not heat the water better than white. I can't imagine that's true. Granted it's the panels that exchange the heat, but they're black! Anyway, I like the aesthetic, even if they don't add a little extra heat.

You can see the wire to the temp sensor on the roof. There's a second wire to a second sensor just under the eve. That's my air temp sensor. Originally, the automation installer put that in the shade of my automation controller, but it produced wild temperature readings. I think because of the nearby stucco, which is not shaded. When I moved the temp sensor up into the shade of the eves, the readings stabilized. As much as I could, I hid the wires in the shade of the pipes, to keep them out of the sun as much as possible, too.

More than you needed to know about my setup, but maybe there's a tip or two you can use in there somewhere...
 
Last edited:
  • Like
Reactions: dailo
You can just move the VRV you have to the supply side of the panels and save yourself some work. At least, I would do that before replacing it as well as fixing the drain down valve.
Don’t think I’d be able to easily move it as it’s currently plumbed up like this. I guess I could extend where the spigot is and add some pipe to tee in the VRV.
 

Attachments

  • 61D38CEB-AAE4-4AAD-B1A2-26A934E8F6D5.jpeg
    61D38CEB-AAE4-4AAD-B1A2-26A934E8F6D5.jpeg
    363.2 KB · Views: 8

Enjoying this content?

Support TFP with a donation.

Give Support
Thread Status
Hello , This thread has been inactive for over 60 days. New postings here are unlikely to be seen or responded to by other members. For better visibility, consider Starting A New Thread.