EDIT: Update 4/8/22. Failed to update this in July last year because I wanted the fire bowls in first, then forgot about it over the fall and winter, so here it is, a bit late! Latest pics are on the last page.
*Original post:*
We have finally started making some headway on our 1993 pool/backyard renovation and I figured it was time to start documenting things. General plan is
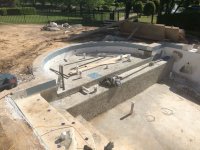
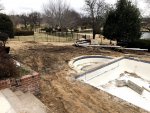
1. Fill in the old non functioning spa, take down the wall between it and the pool and turn it into a ledge with a bubbler or two, put a new 18' raised spa along the far wall.
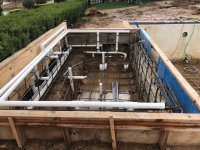
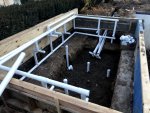
2. Core drill some wall returns (previously only return was the infloor) and add new lights.
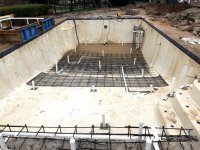
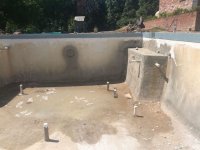
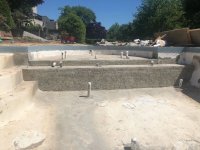
3. Redo the depth profile to add more shallow end, eliminate diving board. Planning on about 6.5-7ft of deep end from 8.5 or so right now.
4. Abandon the old nonfunctional autocover. $$$ to replace, probably a maintenance nightmare, didn't like it much when it did work.
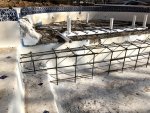
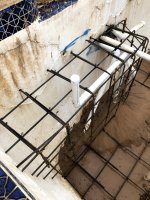
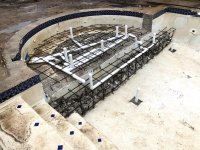
5. Update the infloor system with new heads, couple new zones, new debris catching main drain. I was iffy about that, as my dolphin does a swell job and I am aware of the mixed feelings about in floors, but most of the plumbing is already in place so the builder said it would be pretty cheap to do, and should keep the benches, steps, and spa clean, which the bot can't do.
6. Add a deep end bench to match the existing, which will, cleverly, be used to run the new main drain and infloor plumbing in the new raised deep end.
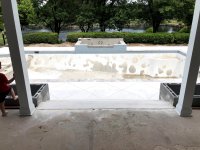
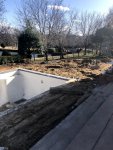
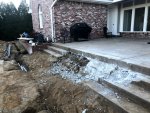
7. Tear out existing steps to patio, which are steep and short, and and routinely try to break old hips and murder small children. 35 ft of steps is hard to patrol during a pool party.
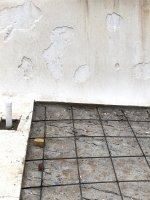
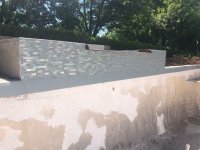
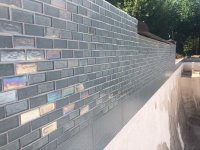
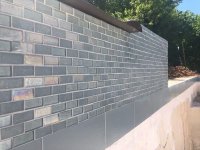
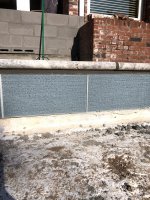
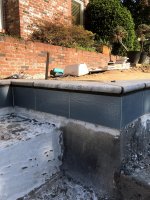
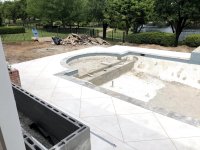
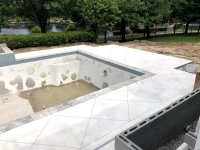
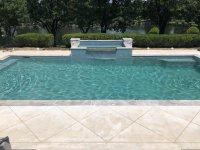
8. New concrete deck, new coping, plaster, tile.
9. Use the debris to level off the yard on the deep end side, for an eventual fire pit and some seating. Maybe level off some additional area so the kids have a nice flat play area. Saves on the dump fees for all the old deck.
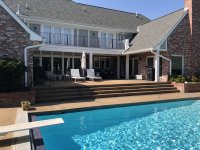
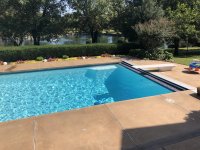
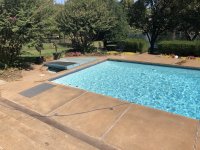
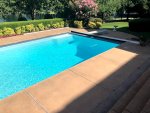
Current pool:
18x36, 3.5-8.5 depth profile
3 skimmers and a main drain, in floor returns only. No debris catching main drain
36" triton II sand filter that is eccentrically placed on the equipment pad and weighs probably a ton, and is slowly collapsing the pad into the earth
intelliflo VSF ( my best decision on moving in, although I should have saved some dough and got the VS)
2 old busted pool/spa lights
New equipment:
New pad
Pentair Clean and Clear 420
Intellicenter i8ps w/ IC40
Mastertemp 400
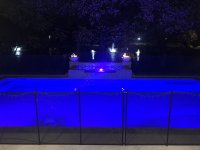
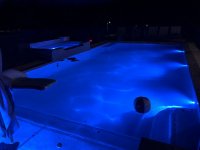
3 pool lights facing away from house on the near wall, 1 ledge/1 spa lights. Microbrites vs CMP vs paraglow, not sure yet.
2nd pump for in floor/bubblers
spa blower
2 fire bowls on pillars flanking the spa for some bling
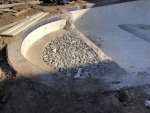
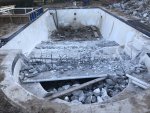
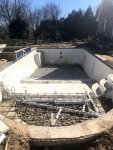
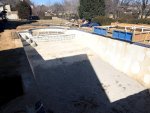
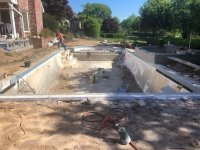
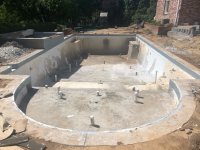
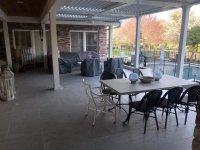
Before and current pics attached. Attached a rough concept design as well, although the deck will be different, and the spa will be raised 18". Currently finishing plumbing, big items still include old spa demo, grade the dirt/debris in the pool bottom, then rebar the spa and new floor. The stairs proved resistant to the hand held jackhammer, so they are renting a bobcat with a jackhammer to knock that out.
Couple questions for the more knowledgeable folks around here.
1. The soil under the previous deck was pretty well compacted. They have so far just filled the trenches for the new plumbing/electric with the dirt they removed. Should I be pushing for some sort of gravel or sand backfill, or in this case is it fine?
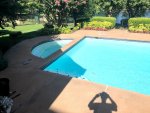
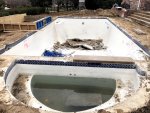
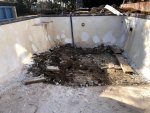
2. All the punched out holes in the plaster you see in the current pics are the hollow spots we have knocked out. I have quite a few as you can see. Builder said nowadays rather than chip everything out the plaster companies tend to just remove the hollow spots, put on a bond coat, and plaster over the existing good plaster. From what I've read around here the consensus has always been full chip out, but is the bond coat method acceptable? They warranty it just the same (whatever that's worth).
3. Would you stick the tanning ledge light at the apex of the half moon, or along the curve facing away from the house? The former will more uniformly light the shelf, but may be visible from the house at certain angles. The latter would position it similarly to the 3 pool lights and wouldnt be visible from the house, but the shelf lighting would be uneven.
4. Skimmers are a bit beat up, from the demo but no cracks. Builder doesn't see any reason to dig them out and replace. They have been there since 93. Should I push for replacement or stick with the "ain't broke don't fix it" methodology?
Appreciate anyone's input!
*Original post:*
We have finally started making some headway on our 1993 pool/backyard renovation and I figured it was time to start documenting things. General plan is
1. Fill in the old non functioning spa, take down the wall between it and the pool and turn it into a ledge with a bubbler or two, put a new 18' raised spa along the far wall.
2. Core drill some wall returns (previously only return was the infloor) and add new lights.
3. Redo the depth profile to add more shallow end, eliminate diving board. Planning on about 6.5-7ft of deep end from 8.5 or so right now.
4. Abandon the old nonfunctional autocover. $$$ to replace, probably a maintenance nightmare, didn't like it much when it did work.
5. Update the infloor system with new heads, couple new zones, new debris catching main drain. I was iffy about that, as my dolphin does a swell job and I am aware of the mixed feelings about in floors, but most of the plumbing is already in place so the builder said it would be pretty cheap to do, and should keep the benches, steps, and spa clean, which the bot can't do.
6. Add a deep end bench to match the existing, which will, cleverly, be used to run the new main drain and infloor plumbing in the new raised deep end.
7. Tear out existing steps to patio, which are steep and short, and and routinely try to break old hips and murder small children. 35 ft of steps is hard to patrol during a pool party.
8. New concrete deck, new coping, plaster, tile.
9. Use the debris to level off the yard on the deep end side, for an eventual fire pit and some seating. Maybe level off some additional area so the kids have a nice flat play area. Saves on the dump fees for all the old deck.
Current pool:
18x36, 3.5-8.5 depth profile
3 skimmers and a main drain, in floor returns only. No debris catching main drain
36" triton II sand filter that is eccentrically placed on the equipment pad and weighs probably a ton, and is slowly collapsing the pad into the earth
intelliflo VSF ( my best decision on moving in, although I should have saved some dough and got the VS)
2 old busted pool/spa lights
New equipment:
New pad
Pentair Clean and Clear 420
Intellicenter i8ps w/ IC40
Mastertemp 400
3 pool lights facing away from house on the near wall, 1 ledge/1 spa lights. Microbrites vs CMP vs paraglow, not sure yet.
2nd pump for in floor/bubblers
spa blower
2 fire bowls on pillars flanking the spa for some bling
Before and current pics attached. Attached a rough concept design as well, although the deck will be different, and the spa will be raised 18". Currently finishing plumbing, big items still include old spa demo, grade the dirt/debris in the pool bottom, then rebar the spa and new floor. The stairs proved resistant to the hand held jackhammer, so they are renting a bobcat with a jackhammer to knock that out.
Couple questions for the more knowledgeable folks around here.
1. The soil under the previous deck was pretty well compacted. They have so far just filled the trenches for the new plumbing/electric with the dirt they removed. Should I be pushing for some sort of gravel or sand backfill, or in this case is it fine?
2. All the punched out holes in the plaster you see in the current pics are the hollow spots we have knocked out. I have quite a few as you can see. Builder said nowadays rather than chip everything out the plaster companies tend to just remove the hollow spots, put on a bond coat, and plaster over the existing good plaster. From what I've read around here the consensus has always been full chip out, but is the bond coat method acceptable? They warranty it just the same (whatever that's worth).
3. Would you stick the tanning ledge light at the apex of the half moon, or along the curve facing away from the house? The former will more uniformly light the shelf, but may be visible from the house at certain angles. The latter would position it similarly to the 3 pool lights and wouldnt be visible from the house, but the shelf lighting would be uneven.
4. Skimmers are a bit beat up, from the demo but no cracks. Builder doesn't see any reason to dig them out and replace. They have been there since 93. Should I push for replacement or stick with the "ain't broke don't fix it" methodology?
Appreciate anyone's input!
Attachments
-
 IMG_6046.jpg328.5 KB · Views: 132
 -
 IMG_6047.jpg359.8 KB · Views: 125
 -
 IMG_8928.jpg750.8 KB · Views: 118
 -
 IMG_8931.jpg831.1 KB · Views: 116
 -
 IMG_8932.jpg750.3 KB · Views: 117
 -
 IMG_8933.jpg616.8 KB · Views: 119
 -
 IMG_8946.jpg805.6 KB · Views: 121
 -
 IMG_8948.jpg610.4 KB · Views: 123
 -
 IMG_8964.jpg695.8 KB · Views: 135
 -
 design1.PNG786.4 KB · Views: 136
Last edited: