Texas Saltwater LX Semi Inground

I'm not sure you mentioned it but did you get and overlap liner or a beaded liner. Beaded liners are cut to account for the thickness sand being there. An overlap liner is more forgiving especially since you are planning to make the center of the pool deeper.

Using those mats I would still give them and inch or two of smooth sand to sit on as added cushion for the liner. The sand should help you get a smoother and more consistent look on the floor of the pool. I don't know how big the foam cove is but with sand the coving is banked into the pool wall at a 45 degree angle and the sand reaching 4-5 inches up the wall.

With the foam make sure the top edge is adhered to the wall really well and there are no gaps the liner can squeeze into. It also need to be supported fully at the bottom so the liner doesn't try to pry the foam off the wall.

Time and effort put into making every thing as smooth as possible now will be worth it in the finished product. There is no way to fix it once the pool is full. If you maintain your water like we teach you to here the water is going to be so clear you will be able to see the outline of everything under the liner.


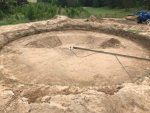
It is a overlap liner. My soil is sand with no rocks or debris. The local supplier of dirt, etc wouldn't bring me anything different than I already have. I have a really smooth sand base right now. It's just level with the pavers. Was hoping to not have to go back in once the pool wall is up and add another layer to that because I've got the current base almost perfectly level all the way across. Kinda torn now as to whether the extra two inches of sand is needed. If its only to make sure that there is a smooth cushion to sit on then I think I have that covered. If it's because the liner needs more height against the wall I don't have that covered. I think the foam coves I ordered are 3 or 4 inches tall and the mats are 1/2" tall so that would be somewhere between 3.5 -4" against the wall. I'm open to suggestions and appreciate everyone's help. I want to do this right the first time, but don't want to add work that's not needed.
 
In that case just run with the mats and the foam cove and keep everything nice and tight.

You will have some backpressure on the bottom of the wall from the backfill as well.

Sometimes I like to go on a long rant to make sure people understand why they say to build it a certain way so that like in cases like this you can feel comfortable making changes because what you are doing is equal to what was originally in the plans.
 
Great! I really appreciate the explanations and you taking the time to post them for me. It helps a lot. Hopefully I will have more progress pictures this weekend. I still need to figure out the depth and slopes of the deep spot. That's where I'm stuck right now. I'm having trouble finding information on the subject of the deep spot (slope/depth) that say the same thing. I have the "72" expandable overlap all swirl 25 gauge" liner. It says on the description that it's designed to "increase pool depths up to a total of 72 inches."

I'm probably overthinking this, but here are the three options.
1.
72" deeper than the top with 3" of sand on top (deep spot 15" below the level base for a water level of 5.25 feet)
2. 72" from the top (deep spot 18" below the level base for a water level of 5.5 feet)
3. 72" from the water level (deep spot 24" below the level base for a water level of 6 feet)

My deep spot will start at the centerline of the pool and slope to the deepest spot. I've read to leave 1.5 or more feet level around the walls so I will probably shoot for 2-3 ft level around the wall before the slope starts. Half of the pool will be level at the paver level and should be around 48" inches of water.

As for the slope angle as of right now I am going to go with what looks right and not too steep unless I find more info between then and now.

Sorry for the long post, just want to provide as much information as possible. Any advice on depth and slope would be greatly appreciated.
 
1.jpg

- - - Updated - - -

Tried to upload the other pictures, but couldn't get them to load. I have the walls up and hope to install the liner this evening. Having trouble finding information on how to install the overlap expandable liner. Seems there aren't many DIY above grounds with deep ends. Any tips or tricks?
 
That's a lotta digging. Looking good so far.

Do you turn the sprinkler on to keep the dust down or to keep you cool while digging?

I don't think the installation for an expandable liner is any different than a standard liner. You want the liner to lay out smooth and wrinkle free. You want it touching as much of the ground as possible so it doesn't stretch more than it has to. Use a shopvac to suck the air out from behind the liner to help it set down into place. That will help you see any wrinkles that might want to form. Keep the shopvac going until you get water up a few inches on the wall. You can use the skimmer hole sealed off with duct tape to put the shopvac hose down behind the liner.

The sprinkler was for a little bit of both. Made the packing easier too. I have the top rails on right now because there was quite a bit of wind yesterday and I didn't want it to blow away. I found this page about expandable liners, but they filled the liner and dropped it as it filled.
Expandable Liner Installation[pageGallery]/6/
I also found another video of a doughboy installation that did the same thing. If I use the vacuum will I have to remove all of the top rails to do this? The videos I watched left the top rails on and then removed them a few at a time after some water was in the pool.

Using the vacuum seems like I can get the wrinkles out easier, but I wasn't sure which method to choose. If I have to remove all of the top rails to use the vacuum I am a little concerned with the wind.
 
The way that guy describes doing the liner sounds like a good way to do it as well. You should be able to get a nice smooth liner that way and get it to seat nicely into the deep area you dug out.
 
The way in the link you posted is the correct way to do an expandable liner with a hopper (deep area). That is exactly how it was done with our first pool back in 1994. As it filled the liner was slowly released inward so it stretched into place evenly.
 

Enjoying this content?

Support TFP with a donation.

Give Support


- - - Updated - - -

dbtgallery.php
 
5EN3kFu.jpg


- - - Updated - - -

Pretty skies and clear water

fzQibAt.jpg


- - - Updated - - -

Also started on this little deck to use to get in and out of the pool. Too hot to build a big deck now so this will have to do until it gets cooler and I decide on a more permanent solution for a big area for people to hang out.

n6CJneI.jpg
 
Thread Status
Hello , This thread has been inactive for over 60 days. New postings here are unlikely to be seen or responded to by other members. For better visibility, consider Starting A New Thread.