Replacing valves

CraigChing

Gold Supporter
Jun 15, 2019
202
Plymouth, Minnesota
Pool Size
22000
Surface
Vinyl
Chlorine
Salt Water Generator
SWG Type
Pentair Intellichlor IC-40
I think I have water chemistry under control, so it’s time I get into my equipment more 😀

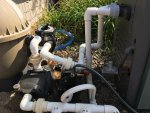
I definitely have a suction side leak in the valve labeled “md”. When closing for the winter, we closed the md valve and air was coming out the main drain when blowing out the skimmer lines. First, what type of valve do I have and, second, what should I replace them with?

I’m not much of a DIY type, but I’ve heard PVC isn’t too bad and might be willing to tackle it if the TPF community encourages me to! Any good videos anyone can recommend? Are there any concerns with how the lines are laid out? It looks like I don’t have a lot of room for mistakes here.

Thanks for any help and advice!E26AD3E0-4651-466F-AF6F-6D067F72705D.jpeg
 
  • Like
Reactions: jonpcar
You have cheap ball valves. They eventually fail and can't be repaired.


I would replace the trident from the union on the left to the elbows going into the ground with 2-way diverter valves that can be repaired.


Is that two skimmers and a main drain?

The pipe leading into a pump should be about 5 times as long as its diameter, so probably 10" to 12" in your case. That's better for the pump's performance than having a 90° elbow right in front of the pump inlet.

And I would replace all three ball valves with two three-way valves. Allen has given you great recommendations for the brand of valves to look for. With three two-way valves (like you have now), you can inadvertently close all three and cause the pump to choke (close off all flow to the pump). You can imagine how that is not too great for the pump. With two three-way valves, you can achieve the same balance of flow between all three lines, but without any way to deadhead the pump. This is the preferred, safer way to plumb your suction manifold. Here's a diagram that explains what I mean. You can ignore the check valve just before the pump in this drawing.

valves.jpg
 
  • Like
Reactions: Dozenmonkeyz
Is that two skimmers and a main drain?

The pipe leading into a pump should be about 5 times as long as its diameter, so probably 10" to 12" in your case. That's better for the pump's performance than having a 90° elbow right in front of the pump inlet.

And I would replace all three ball valves with two three-way valves. Allen has given you great recommendations for the brand of valves to look for. With three two-way valves (like you have now), you can inadvertently close all three and cause the pump to choke (close off all flow to the pump). You can imagine how that is not too great for the pump. With two three-way valves, you can achieve the same balance of flow between all three lines, but without any way to deadhead the pump. This is the preferred, safer way to plumb your suction manifold. Here's a diagram that explains what I mean. You can ignore the check valve just before the pump in this drawing.

View attachment 170971

@CraigChing winterizes his pipes and having 2-way valves makes it much easier to blow out and air lock each pipe individually.

Using 3-way valves the way you describe is best in areas that never have to winterize. Winterizing with 3 way valves the way you describe makes it a complex dance.
 
  • Like
Reactions: Dozenmonkeyz
Thanks both Allen and Dirk, it helps to hear different perspectives! I do need to winterize, though I don’t understand the problem with Dirk’s suggestion, I’ll stick with what Allen is suggesting 🙂 Is that because I would have no way of having all three lines closed simultaneously which I’d want to avoid anything getting back in the lines when winterizing?

So 3 two way Jandy valves, cut below the elbows on the three intake lines, remove and replace the whole trident, is that right? This is pretty much what I expected, are there any concerns about shortening the height of the intake lines, do I need to do anything special about that?

Anything else I should be concerned about?
 
Like I said, I have to defer to Allen's experience about the winterizing. But I stick by half of my suggestion, if you have the room. Here's a graphic from a Pentair pump manual:

pump.png

The other thing I would suggest, wherever you have room, is to leave at least 3" of pipe in-between everything: all fittings and components, whatever you glue. If you compact everything together, and glue things right next to each other, then replacing anything becomes much more involved, sometimes requiring that you replace perfectly fine adjacent components. Your current setup has examples of this. Picture one of your glue joints going bad, or a valve housing cracking, whatever. So you have to be able to cut that defective part out, and then glue in a new one. But if you've got the bad part jammed up next to a good one, what are you going to do? You can cut out the bad part, but then you don't have any pipe left to use a PVC coupler to glue in the new one. So you have to cut out the next part, and maybe the next part next to that one, etc, to get to a run of pipe you can use to glue things back together. Hope that makes sense.

Also, it's always advised to use unions before and after your pump, so you can easily remove/replace it should the need arise, without having to cut apart your plumbing. That's why you've got that existing union there now. Recreate that nicety in your new setup.
 
  • Like
Reactions: SlipperyPete
While we're at it! That garden hose is probably the next thing to go. That run should look more like the PVC flex pipe that is feeding your booster pump. You could put replacing that correctly on the list. Then paint all your PVC. That adds a layer of UV protection to all your pipes. Not everybody supports that step, but technically PVC is not rated for sun exposure, an painting it is standard practice by a lot of pool plumbers. Plus it hides all the dirt and printing and glue mess and tidies up your pad nice and neat!
 
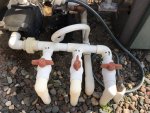
Thanks Dirk, you’re making this project bigger than I was thinking! I really just wanted to fix the suction side air leak, but your points are well taken. I will have to replace pump and motor before too long, maybe a setup that minimizes that in the future is worth thinking about. I’m attaching an image with more of my equipment to see if you have further advice. I don’t have a ton of room right and left, but I do forward and back if you get my meaning.

I do want to get clarification for sure, though, start by cutting under the three elbows up front and making them shorter? I worry about having to cut them down again in the future making them even shorter and having to dig up some of the line.

Good call on the garden hose too, it never occurred to me, but that could explain the wonky behavior of the Polaris this last summer!2325EB44-9C36-4261-AC66-8D6D1E6F60A5.jpeg
 
I wonder if I turned the pump 90 degrees out front of the filter if that would provide the run you’re suggesting and minimize changes I need to make. Bonus would be better access to the pump and motor. I am not sure, though, how to create more space between the valves, that’s dictated by the intake lines, isn’t it?
 

Enjoying this content?

Support TFP with a donation.

Give Support
I would cut the pipes coming out of the ground at the 90s, glue a coupler, then 4 to 6” of pipe, then the 2way valve, connect to Ts coming out of the valves. That gives you a new section of pipe to cut a valve out in the future. Although diverter valves are repairable and it is rare when they need to be cut out and replaced.

You can also stagger the placement of the diverter valves so they are not side by side if the pipes are too close together.

Basically build the trident vertical. Then come to the left and down with 90s as needed to connect to the pump. That gives you a longer straight run into the pump.

Schedule 40 PVC hubs are 3/4” deep. So that is what you lose on cutting out a joint.

Lets see if @jimmythegreek has any pro tops on the layout.

@Dirk usually makes projects bigger. That’s why he disappears for weeks at a time with his projects.
 
Last edited:
Well, you can do as little or as much of the suggestions you get from here. We're just arming you with the options.

I just zoomed in on your pic, that booster pump return hose has a nice kink in it (by the pump). That might be part of the vac performance problem.

You're right, you're not always going to have room to allow a lot of extra pipe between components. That's actually the fault of the original PB's plumber, and how he spaced those pipes. They don't worry too much about what you'll have to deal with later, unfortunately. That is actually pretty typical. I just mentioned it for the instances where you have a choice, leave what gaps you can.

Regarding where you cut those three pipes... yes, you don't want to get caught short, nor do you want the three new valves to be too close to the ground. But you can always extend those pipes with PVC couplers, now, or the next time. There's probably at east a foot of pipe underground, maybe 2', so you likely have a lot to play with.

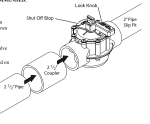
Regarding the valves being too close together to inhibit future replacement... I didn't mention this before to keep my post from getting even more confusing, but a Jandy valve is one of the few components that has a built-in solution for this potential problem. The ports are sized such that PVC can fit on both the inside AND the outside of the port. So say you had two jammed close together, connected with 2" PVC glued to the inside of the valves' ports. And then one needed to be replaced. So you cut between the two and now the original 2" PVC left in the good one is too short to use. Well, you can glue a 2.5" PVC coupler to the outside of the Jandy port! So with those three valves, you get an "extra shot" at it should you ever need one.

jandy.png

Spend some time imagining the plumbing. Then lay it all out and dry fit it. See how it can work. Make adjustments as needed. Don't glue anything until you have all of it the way you want it.
 
  • Like
Reactions: SlipperyPete
Haha! Thanks to both of you, this helps a lot!

Dirk, I like that you’ve got me thinking about the future, I *am* going to need new equipment at some point, so thinking that out is worth it.

Allen, thanks for that clarification, I definitely see where you’re going and it makes sense and probably also helps with future changes as well.

I have some things to think through now 🙂 I really appreciate the advice!
 
While we're at it! That garden hose is probably the next thing to go. That run should look more like the PVC flex pipe that is feeding your booster pump.

That garden hose is not pressure rated and will burst one day and make a real mess draining your pool.

You should use the softtube hose that comes with a Polaris booster pump or plumb it with hard PVC.

 
I agree, I will fix that this coming year for sure, thanks!
Just for clarification, that was the previous owner. Now that I see it after you’ve pointed it out, I can’t unsee it!
 
Just for clarification, that was the previous owner. Now that I see it and you’ve pointed it out, I can’t unsee it!

To me replacing that garden hose is a higher priority then the valves. Should it burst you can have a big mess on your hands.
 
Allen's right. The booster pump increases the water pressure higher than what is flowing in the rest of your plumbing. You should move that task to the very top of the list.

Edit: Allen and I were having the same thought at the same time!! Danger, danger, Will Robinson!!
 
Ha, I know just the thread you should look at!

 
  • Like
Reactions: Newdude
Yep, I’m with both of you, that booster pump line can be fixed regardless of what I do with the valves and it will be top priority. With it acting all weird last summer (it is also old and needs to be rebuilt anyway) I preferred to vacuum, but it would be nice to have it back in good shape again.
 
OMG, that thread was funny! An even better story is that almost happened to me last summer when my pump drain plugs blew out. Luckily the skimmers and that suction side air leak prevented my pump from dumping the whole pool and I only lost to just below the skimmers 😝. Maybe I don’t want this air leak fixed after all, if the skimmers are closed my pump loses prime as the water gets to a few inches above the returns 😁
 

Enjoying this content?

Support TFP with a donation.

Give Support
Thread Status
Hello , This thread has been inactive for over 60 days. New postings here are unlikely to be seen or responded to by other members. For better visibility, consider Starting A New Thread.