Hi everyone,
I’m trying to assist a friend with some plumbing leaks on the pressure side of his system, after the water leaves the filter and heads back to the pool.
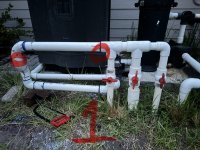
1. Picture #1 shows the overall piping system with the two leaks circled.
2. Pictures #2 and #3 are close-ups of the two leaks.
My questions are:
• I assume these areas need to be cut out and replaced. If so, do you have any suggestions on how to handle the leak in Picture #2, before it enters the three pipes and heads back to the pool? I’m unsure where to cut and replace and am concerned about potentially damaging the three pipes that head into the ground.
• In Picture #3, it appears the piping might be slightly misaligned. My friend mentioned he had difficulty aligning all the 45 and 90-degree bends. Would it be best to cut out all those bends and try again from the two long horizontal pieces? They’re parallel to each other but not aligned. Is there a more effective way to connect them than using all those bends?
He let all this glue and primer sit for about an hour before putting water through the system. That might not have been long enough maybe?
Thanks
I’m trying to assist a friend with some plumbing leaks on the pressure side of his system, after the water leaves the filter and heads back to the pool.
1. Picture #1 shows the overall piping system with the two leaks circled.
2. Pictures #2 and #3 are close-ups of the two leaks.
My questions are:
• I assume these areas need to be cut out and replaced. If so, do you have any suggestions on how to handle the leak in Picture #2, before it enters the three pipes and heads back to the pool? I’m unsure where to cut and replace and am concerned about potentially damaging the three pipes that head into the ground.
• In Picture #3, it appears the piping might be slightly misaligned. My friend mentioned he had difficulty aligning all the 45 and 90-degree bends. Would it be best to cut out all those bends and try again from the two long horizontal pieces? They’re parallel to each other but not aligned. Is there a more effective way to connect them than using all those bends?
He let all this glue and primer sit for about an hour before putting water through the system. That might not have been long enough maybe?
Thanks