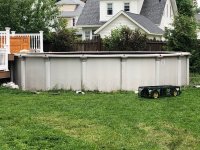
Pool wall crinkle

jblatham

Member
May 22, 2019
23
West Springfield, MA
I purchased a 24' round pool in 2019 and had a local installer put it in (I am capable, but at the time, my back was giving me grief). He did an awful job so I am full of regret on it. The pool ended up with a visible lean to it; uprights were 3-4" out of plumb. He drained it once and unsuccessfully tried to fix the problem. After that, he gave me a replacement pool and walked away. The replacement has been sitting in boxes in my garage for more than a year because I was not messing with the kids' main source of entertainment during the pandemic.

This spring, I've decided to tackle rebuilding my pool. It was clear to me that the true source of the issue was that the post bases were not level, and were not in a perfect circle. My plan was to empty the pool, fix the level and shape of the wall, and replace the liner since it's already been stretched more than once and is 2 years old at this point. I was hoping to reuse the pool already there and not completely start over (the pool in the garage isn't as nice a model). Unfortunately, one of my helpers got distracted while I was taking the liner down and the pool wall fell inwards - this is what happens when your helpers are under the age of 10. :) Photo is below.

So is this wrinkle fatal to the pool? Should I just bang this ding out to flatten it?
What else should I look for as I re-level the post bases? All the tracks appear to be in one piece, but the wall wasn't sitting in the track all the way around.
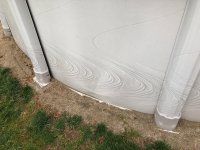

image1 (7).jpeg
 
I would not say that is a fatal crease. You can lay the wall flat and sandwich the crease between a couple of pieces of 2x4 and flatten it with a mallet. You need to also clear the sand out of and away from the track so that the wall can be fully seated.
 
  • Like
Reactions: jblatham
Thank you. I appreciate your advice. When you say lay it flat, you are suggesting I unbolt the pool wall and unroll it? I was hoping to leave the wall upright and already bolted together if I could... the less disassembly I do the less there is to potentially get damaged.

I do plan to clear away the sand that's both in and directly around the track to ensure the wall is perfectly in there, as you suggest.

In case anybody's searching and reads this thread, I will mention that I found a better process for removing my liner after the above happened. I had taken off all the top rails and proceeded to remove the liner from inside the pool, with my helpers holding the walls up. I have since figured out that I should have probably removed the top rails one or two pieces at a time and screwed them back on with that section of the liner removed... the top rails add stability to the pool wall so it doesn't want to tip over under its own weight. Keeping as many top rails installed as possible at any moment makes the wall more stable.
 
We saw some similar ones last year and a 9 inch paint roller on the inside did really good to straighten the wall out.
 
  • Like
Reactions: jblatham
Laying it flat on the ground is going to give you a solid surface to work against, so the wall takes the force of the blow from the mallet. Pounding it out with the wall standing is going to require a lot of trust between the one swinging the mallet and the one holding the board in place, as it’s going to take more force to knock out the crease on a standing, flexing wall.
 
  • Like
Reactions: jblatham
My initial plan had been to gently dig out under the uprights that were higher without taking the whole pool down, and nudge the track into a perfect circle. As they say, no plan survives first contact with the enemy... as I pulled the cove sand back, I could see that large sections of the wall were out of the track, so I decided to just take the whole thing down to start over. Looking at the situation now, all the pavers under the uprights were out of level (in addition to not being level with each other), so I think it was the right choice.

I have a few additional questions:
-there is one spot where the upright is on top of two pavers stacked on top of each other rather than being on top of a single paver. I do not know why this was done, but is this OK? If not, how would you suggest that I address this?
-the track wasn't set on undisturbed ground but appeared to be set on a bed of sand. Do I need to excavate down and lower the whole pool an inch to have the track sitting on undisturbed ground? Or do you think this sand is sufficiently compacted now that there's been a pool on top of it once already to consider it undisturbed ground?

Thanks.
 
The fact that it was set up on sand may be why none of the pavers are level with each other. Stacking pavers is not the way to level the ground either. That must of been the lowest point in the yard, or they over dug and decided to layer pavers instead of doing it correctly. You will have the best results if you dig down to undistirbed soil to level the site.
 
The fact that it was set up on sand may be why none of the pavers are level with each other. Stacking pavers is not the way to level the ground either. That must of been the lowest point in the yard, or they over dug and decided to layer pavers instead of doing it correctly. You will have the best results if you dig down to undistirbed soil to level the site.
Where I'd need to dig down approximately 6" - 8", would that suggest that I need to have a pool that is suitable to be partially buried?

I am cringing a little at the thought of this being the solution because I have a deck that was built along one side of the pool. Digging down's going to make the deck too high.
 
If its one spot that is significantly lower than the others, like a hole they over dug you could fill in with crusher or decomposed granite to bring it to level. You can also build a 26' square box that is 6-8" deep and fill it with leveled, compacted 1" runs of crusher or decomposed granite and use that as a level base for the pool.
 

Enjoying this content?

Support TFP with a donation.

Give Support
It sounds to me like you should start completely over again. The very first step is having a perfectly level pad to start with. In order to do that you need to disassemble everything that was there. If you don't go all the way now you are going to be disappointed with the results. The paver bases need to be sitting on undisturbed, well packed ground. Use a good straight 12' two by four to sit your level on with one end in the center of the pool and the other at the outer diameter. Just swing the two by four in an arc around the perimeter to take your level readings. There are several good and some not so good YouTube videos showing the whole process from digging to filling with water. Good luck!
 
So I figured out why they did what they did with the doubling up of the pavers. I'm sure they worked like I did, starting at what was then the lowest point, and working around leveling each paver to the prior one. As I went one direction from my lowest post, all the posts had double pavers under them... until I found the one that was the highest point of the old pool.

The highest post had only 1 paver instead of 2 and it had a pretty big lean to it because it has a giant root going right under it. My guess is they were working away leveling the pavers, found this, and then just went back and dropped extra pavers and extra sand rather than digging out this tree root.

In the end, it appears as though the upright bases were 3.5" out of level with each other from the highest one to the lowest one, and the ring was 4" out of round (i.e. north-south measurement was 4" smaller than the east-west measurement). Lots of digging left to do.....but it is at least satisfying to know that no matter how bad of a job I do, it won't be THAT bad.
 
  • Sad
  • Wow
Reactions: zea3 and kellyfair
A belated thank you for the advice in this thread.

After determining that even if I did everything right, I would have needed to add a bunch of sand to the middle, I decided to dig down and lower the whole pool track by the ~2" equivalent to about the thickness of a paver. After leveling each paver to its adjacent pavers, I went out after dark with my laser level and a tripod. I compared all the pavers to each other and the lowest one was within 1/8" or so of the highest one, which I felt was a reasonable tolerance... at the 24' diameter of the pool, the laser was about 1/8" wide, so this was about as accurate as I could get. I have a few parts of track where there is a tiny bit of sand (<3/8") on top of the bare dirt to make it level, but I compacted it very tightly. It's also in an area that was dug down, so it's at least not going to get washed out.

As for the crinkle, I tried a few different approaches. What worked best was unrolling the damaged section on my lawn on top of a sheet of plywood and using a rolling pin on the inside. I unfortunately left the wall unrolled on my lawn for a little too long so the grass ended up damaged under there (I think from the heat since it was a sunny day). However, it was worth it. The wall went up today. It ended up being too cold to do the liner, so I just screwed everything together as if the liner was there so it is stable until the next sunny day.

It was great to see all the prep work pay off. The wall set into the track with relative ease - it didn't seem to want to continuously jump out like before I took it down. I'd set an upright in place on a base plate, and without even screwing it in, it would just stay there without tipping over. The top rails are all magically level. I had to tap the whole ring out a little bit in order to get the wall's bolts to line up, so from here I'll have to re-check that it's a perfect ring since the bases may have moved different amounts. After that, it's just compact the sand in the pool, put down my cove and bottom armor thingy, and then it's liner time!

I did end up with the pool top rail that will be about 1" to 1.5" lower than my deck now. However, where the decking used to be flush with the top of the pool's rail, and I have 5/4" decking that ran perpendicular to the pool rails, I will just replace that last course of decking and run full pieces over the rail instead of mitering pieces that are flush to it. I will just need to do cutouts around the cuffs. Thanks again folks. I will post another picture when it's done done.
IMG_3217.JPG
 
Thread Status
Hello , This thread has been inactive for over 60 days. New postings here are unlikely to be seen or responded to by other members. For better visibility, consider Starting A New Thread.