- Jul 21, 2013
- 65,062
- Pool Size
- 35000
- Surface
- Plaster
- Chlorine
- Salt Water Generator
- SWG Type
- Pentair Intellichlor IC-60
I decided I had nothing to lose by digging into the heater and seeing if the manifold can be removed. First discovery was the bolt heads were so rusted that the edges crumbled with a socket on them. Wrenching them out was not going to work.

After considering options the decision was to cut the bolt heads off using a grinding wheel.

This problem demonstrated the advantage of having a heater bypass. I was pleasantly surprised to see that the diverter valve and check valve did not leak when the pump was running.
It is interesting that if the filter pump stops the check valve flap loses its seal and begins leaking. The water pressure on the flap is what maintains the water tight seal.The spring tension is not adequate when the pump shuts off and air can be sucked in from the open check valve.
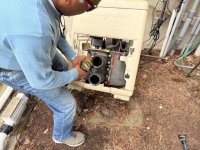
I disconnected the pipe unions, electrical wires, and gas line so we could move the heater to get better access to the bolts. It also showed how much crud is under the heater and will get a cleanout. You will notice I removed the actuator from the heater bypass diverter. I did not want the actuator to inadvertently turn which would send water out the open pipe.
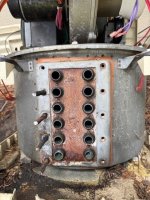
One bolt head is off in the picture below.

It took about an hour with the grinder and went through three grinding wheels to remove the four bolt heads. The other bolts wrenched out without any problem.
Kroil Penetrating Oil was used liberally on all the bolts to loosen them,. Highly recommended...

 www.kroil.com
A pipe wrench was used to grip the bolt stems. With patience and force three unscrewed cleanly.

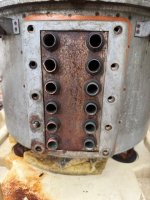
The second bolt from the bottom broke and you can see the stem in the picture below. I think there is enough to grip it with the right tool and more soaking with Kroil.

This is as far as I got today. I think it was a success getting the manifold removed. A new 77707-0016 GENUINE Pentair Manifold Kit Max-E-Therm MasterTemp 400 is on order and it comes with new sensors, bolts and O-rings.
There is no scale on the 10 year old heater and the copper heat exchanger stubs look in excellent condition with little wear. The burner can and lid show no signs of rust.
It looks like I can get a few more years out of this heater. I am optimistic we can get the broken bolt out of that hole. And if we cannot get the bolt out my plan is install the new manifold with nine bolts and hope it holds sufficiently tight that one is not missed.
Stay tuned for updates. This has become an interesting project.
After considering options the decision was to cut the bolt heads off using a grinding wheel.

This problem demonstrated the advantage of having a heater bypass. I was pleasantly surprised to see that the diverter valve and check valve did not leak when the pump was running.
It is interesting that if the filter pump stops the check valve flap loses its seal and begins leaking. The water pressure on the flap is what maintains the water tight seal.The spring tension is not adequate when the pump shuts off and air can be sucked in from the open check valve.
I disconnected the pipe unions, electrical wires, and gas line so we could move the heater to get better access to the bolts. It also showed how much crud is under the heater and will get a cleanout. You will notice I removed the actuator from the heater bypass diverter. I did not want the actuator to inadvertently turn which would send water out the open pipe.
One bolt head is off in the picture below.

It took about an hour with the grinder and went through three grinding wheels to remove the four bolt heads. The other bolts wrenched out without any problem.
Kroil Penetrating Oil was used liberally on all the bolts to loosen them,. Highly recommended...

Kroil - The Best Penetrating Oil, Degreaser, and Fuel Additive
Kroil Original - The most trusted penetrating oil since 1939! Choose from Kroil Original Penetrant, Kroil Original Penetrant Aerosol FormAT (AeroKroil), or Silikroil (Kroil Penetrant with Silicone).
A pipe wrench was used to grip the bolt stems. With patience and force three unscrewed cleanly.

The second bolt from the bottom broke and you can see the stem in the picture below. I think there is enough to grip it with the right tool and more soaking with Kroil.

This is as far as I got today. I think it was a success getting the manifold removed. A new 77707-0016 GENUINE Pentair Manifold Kit Max-E-Therm MasterTemp 400 is on order and it comes with new sensors, bolts and O-rings.
There is no scale on the 10 year old heater and the copper heat exchanger stubs look in excellent condition with little wear. The burner can and lid show no signs of rust.
It looks like I can get a few more years out of this heater. I am optimistic we can get the broken bolt out of that hole. And if we cannot get the bolt out my plan is install the new manifold with nine bolts and hope it holds sufficiently tight that one is not missed.
Stay tuned for updates. This has become an interesting project.


