Plumbing configuration check (new SWG install)

Pauls234

Silver Supporter
LifeTime Supporter
Jul 4, 2012
801
Chicago, IL
Pool Size
21000
Surface
Vinyl
Chlorine
Salt Water Generator
SWG Type
CircuPool RJ-60 Plus
Good Morning!

Pool replacement done, finally found someone with many years repairing pool heaters to look at mine and well, both heat exchange and burner tray were in bad shape so new one on the way (getting same ray pak 406a).

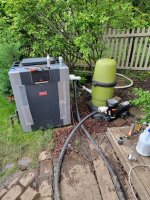
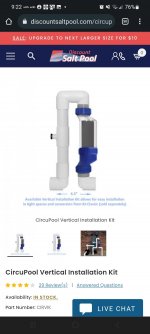
Turning my attention to SWG (RJ60+) install. I'm also planning to re-plumb everything with 1.5" hard pvc. Pics of equipment area below, but thinking my best option is doing a vertical install between heater and pump/filter. My plan is to bury suction side and return for a straight shot to pool. Previously skimmer and return were behind stair railing (previous owner handy work!) so was using flex pvc routed under the stairs, and hitting my head twice a year. With new pool, I had them locate skimmer and return so they were more accessible, as you see.

I thought I recall reading here that a straight run of x" was needed before swg, but did not see that in the instructions, so just a best practice but not required, or....?

Any thoughts or other ideas as to configuration?

This will be my first time doing a pvc job like this.

Thanks for the help!

Paul
 

Attachments

  • 20220528_190659.jpg
    20220528_190659.jpg
    840.9 KB · Views: 65
  • 20220528_190721.jpg
    20220528_190721.jpg
    713.5 KB · Views: 65
I thought I recall reading here that a straight run of x" was needed before swg, but did not see that in the instructions, so just a best practice but not required, or....?
The straight pipe is required before the flow switch...

"IMPORTANT: When positioning the Flow Switch, there must be at least 6 to 12” (30cm) of straight pipe before the Flow Switch. If installed after the Electrolytic Cell, the Cell can be counted as straight pipe."

my best option is doing a vertical install between heater and pump/filter.
The SWG needs to be installed after the heater.

"The Cell and Flow Switch are to be fitted into the return line as the last pieces of equipment the water passes through before returning to the pool: always after the pump, filter, heater"

That's gonna be a monster of a SWG in your pool. You may be able to chlorinate a few of your neighbors' pools.
 
  • Like
Reactions: Pauls234
The straight pipe is required before the flow switch...

"IMPORTANT: When positioning the Flow Switch, there must be at least 6 to 12” (30cm) of straight pipe before the Flow Switch. If installed after the Electrolytic Cell, the Cell can be counted as straight pipe."
This is incredibly helpful in a complex system with a spa, water features, check valves, etc. But in a simple system it likely won't matter, even with the heater. (y)

Don't forget when planning to go vertical that the Flow switch needs 'up flow' so gravity doesn't close it when it fails.
 
  • Like
Reactions: Pauls234
Rancho - let me clarify, when I said installed between heater and filter I meant it would be located there, not that it would be plumbed between the two, I see how it is confusing the way I worded that.

So, in other words, I would have it plumbed after it goes through heater, but that plumbing section of the vertical install would be physically located in the space between heat and filter.

That sound reasonable?

Here is the vertical install kit, if that isn't 6" already there before the flow switch I can extend.

Newdude, thanks for the reminder on orientation of flow switch, looks like kit is designed with that in mind.
 

Attachments

  • Screenshot_20220601-092243_Chrome.jpg
    Screenshot_20220601-092243_Chrome.jpg
    132.6 KB · Views: 18
That's gonna be a monster of a SWG in your pool. You may be able to chlorinate a few of your neighbors' pools.
Yes it is! Following the mantra around here for filters, heaters and SWGs - get the largest you can afford. I think it was just a few hundred more than the rj45.
 
So, in other words, I would have it plumbed after it goes through heater, but that plumbing section of the vertical install would be physically located in the space between heat and filter.
(y)

Here is the vertical install kit, if that isn't 6" already there before the flow switch I can extend.
That's fine by their own say so, so. :)
thanks for the reminder on orientation of flow switch, looks like kit is designed with that in mind.
That's great for the self contained units. Do not use the down pipe for the ones with external flow switches. Choose anywhere horizontal instead that can only have flow when the SWG does too. Easy to find on your simple setup without all kinds of diverters to waste/waterfalls/spa/ etc.
 
That's great for the self contained units. Do not use the down pipe for the ones with external flow switches. Choose anywhere horizontal instead that can only have flow when the SWG does too. Easy to find on your simple setup without all kinds of diverters to waste/waterfalls/spa/ etc.

In the picture of the vertical install kit, it shows the flow switch on the up pipe and then SWG is on the downpipe so that is what I plan to do. That is consistent with what you are describing I believe?
 
Also, like I said, I am new to PVC pipe projects so I am sure the measure twice cut once is a key principal but a few general design questions for the group:
  • Am I going to want to put unions on either side of the SWG so it can be easily removed and brought in for winter?
  • I was also thinking that it would make sense to have unions just above where suction and return pipes enter and exit the ground for easy winter removal of all but underground sections... or is that overkill and why we have a thing called winterization?
  • For shut off valve unions, I have always used the Hayward ball valves that are around $25-$30, they seem to have held up but I do notice at least one of them no longer completely shuts off - are there other valves that are more substantial that I should use?
  • lots of 1.5" pipe, shut off valves, unions, 90 elbows, and glue.... any other parts I will need that are not mentioned?
Thank you for the time!
 

Enjoying this content?

Support TFP with a donation.

Give Support
flow switch on the up pipe and then SWG is on the downpipe so that is what I plan to do. That is consistent with what you are describing I believe?
Yes I was looking at it backwards. My mistake. (y)
Am I going to want to put unions on either side of the SWG so it can be easily removed and brought in for winter?
The cell has unions so it already comes out easy.
I was also thinking that it would make sense to have unions just above where suction and return pipes enter and exit the ground for easy winter removal of all but underground sections... or is that overkill and why we have a thing called winterization
Up to you. It sure is nice to remove pipes, turn them sideways to empty them, and store them empty.
are there other valves that are more substantial that I should use
Pentair or Jandy neverlube. My Hayward clones appear to work as well, but aren't as beefy. Ball valves fail and cannot be repaired. The others can be opened and the guts replaced.
lots of 1.5" pipe, shut off valves, unions, 90 elbows, and glue.... any other parts I will need that are not mentioned?
Draw us a diagram once you have a final layout.
 
  • Like
Reactions: Pauls234
OK, slight change in plans. After I received the vertical install kit and held it up to equipment I realized that would put the cell and flow switch higher than heat exhaust. I don't mean above it, just higher and 12" away as required by raypak. But why have it adjacent to hot exhaust if not neccesary, right?

Now, I'm thinking that I run a 12" pipe straight out of the heater to get my clearance, then 90 elbow into the flow switch run, that will now be horizontal, then straight down to vertically mounted cell, 90 out of that back to pool return.

The pic where I am holding it about in place should help you visualize. (I know it looks tight in there w the auction line but I can easily move or pivot pump/filter so they are out of the way.) I may, for now just splice it into the currently existing flex pvc return and save the full re- plumb for later this season (or maybe next). I need to get salt in this pool and get my.swg going already!

Any concerns w this configuration?
I assume the connections that go direct to the heater are not salvageable for refitting new pipe? Believe they came with the heater...

Any place I should be adding unions or valves? Maybe a union right before the flow switch assembly that I am holding so I can completely remove that section and the cell for winter.

See pics.

Thank you!
Paul
 

Attachments

  • 20220605_160421.jpg
    20220605_160421.jpg
    614.1 KB · Views: 29
  • 20220605_160241.jpg
    20220605_160241.jpg
    662.8 KB · Views: 29
Any concerns w this configuration
I like the new orientation. You will need a new heater union as the exit one has no extra to cut/glue onto. The enter side can remain for now and has plenty to glue a new coupler or 90 down the road.

No reason for an extra union as you can take the whole thing right from the heater and bring it inside.
 
  • Like
Reactions: Pauls234
You will need a new heater union as the exit one has no extra to cut/glue onto.
You may be able to save the union with a Magicmend fitting. This one is designed to slip into 2" PVC pipe and accepts a 2" fitting/coupler/elbow on the other side. Cut the pipe flush at the union, insert the Magicmend, then attach a coupler/fitting. Here's a couple pics I took for another thread of some scrap I had laying around that demonstrate how it works:

1653331270967.png


The fittings are not seated in the next pic for effect:

1653331345535.png


You may find these in stock at a local Ace Hardware...

Magic Plastics MagicMend Schedule 40 2 in. IPS X 2 in. D Spigot PVC Pipe Extender - Ace Hardware

Save valuable fittings and time with the Magic Mend pipe extenders. The Magic Mend is extremely effective and easy to use. Simply cut the defective fitting from the system, remove it and install the extender. The Magic Mend will work at any glued plumbing joint, providing a permanent, invisible...
www.acehardware.com
 
Thanks guys. Somehow I forgot that my replacement ray pak heater is being delivered Thursday so that will give me my new heat union.

So, out of the heat union, a length of 2" straight pipe, it will go right into the installation kit piping/flow switch/salt cell (also 2"), then use the 1.5" inch connecter at the bottom of the cell, into a shorth length 1.5" straight pipe, into a 1.5" 90 degree elbow, then straight run back to the return.

I think I have all of that on hand other than PVC glue and a 1.5" elbow. Anything I missed?
 
  • Like
Reactions: Newdude
Good question. I just checked and based on pictures, they are.

I'm on my way out of town for work so won't have an opportunity to start any actual work on this til Saturday, but I'll double check that configuration before I cut anything.

Thx
 
  • Like
Reactions: Rancho Cost-a-Lotta
Got the plumbing pretty well done. I don't know how some of you have these jobs look so clean with this purple and blue pvc primer and glue, but good on ya! I did end up pivoting the filter/ pump a bit to create some space which worked well.

Purchased this plug from HD so I can convert to 120V so that is next step, hopefully they are idiot proof for wiring.


Question on salt levels and testing. I added 280 lbs yesterday (new fill so had near zero to start) which should have given a measurement of around 1500 based on efrects of adding. Tested last night and this AM and got 2200 both times. It has not been 24 hours since I added, but getting there. Could that cause the discrepancy? I suppose with 1 drop = 220 the error range is wider. So just add a few bags at a time and retest from here so I don't overshoot?

Thx, so close to being fully converted!
 

Attachments

  • 20220611_150248.jpg
    20220611_150248.jpg
    742.6 KB · Views: 26
  • Like
Reactions: Newdude
It has not been 24 hours since I added, but getting there. Could that cause the discrepancy?
Could be. Brush the floor well just in case there are any lumps left.

After that, creep up to target as planned. Whether that's 2 more adds or 4 is up to you.

Nice job with the plumbing !! Next time use clear primer. I suck at keeping it pretty too. :)
 
  • Like
Reactions: Pauls234

Enjoying this content?

Support TFP with a donation.

Give Support
Thread Status
Hello , This thread has been inactive for over 60 days. New postings here are unlikely to be seen or responded to by other members. For better visibility, consider Starting A New Thread.