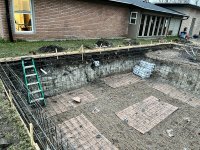
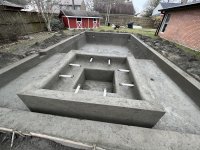
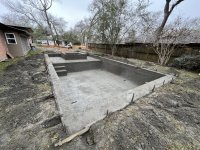
Owner-built pool build

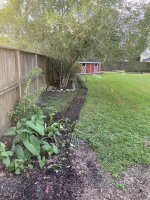
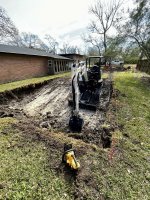
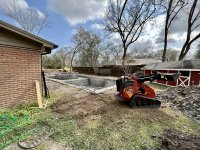
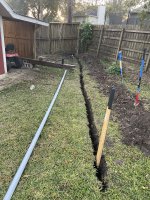
My overhead electrical service is too close to the pool edge, so I've begun moving it underground. There are a number of standards by my energy provider on running the conduit up the pole. I have a lot of private utilities crossing where the new line will go - CW supply, an electrical branch to the shed, the public NG line, my private NG line, and a branch sanitary line. While digging, I also discovered (2) unknown direct-burial electrical lines that appear to go towards my rear fence line, but have no live circuits. Made digging very difficult.

Overall, I'm frustrated that it took 5x longer and 2x more money than-expected. This is the only MEP work I'm contracting-out, and feel that's for good-reason.

Timeline
  • Total = 35d
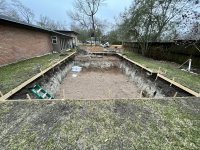
  • (6) days trenching to 21" (~15 lineal ft/day)
  • (12) days trenching deeper to 26"
  • (13) days waiting for electrician
  • (1) day disconnect and wire pull
  • (3) days pending re-inspection (no power)
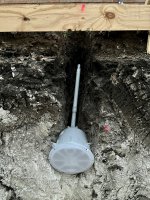
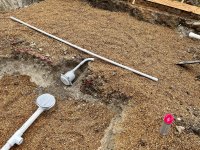
Technical
Cost
  • Total = $3,311
  • Conduit, fittings, and strapping = $422
  • Mule tape (not used) = $39
  • Electrician = $2850
Lessons Learned/Concerns
  • Trench so that the highest point meets your below-grade requirement: I trenched 21" (which gave me 1" more than necessary to meet code), but when the rigid PVC was laid-in I discovered my grade was far from level. I had to pull the pipe, and re-trench 5" more - which was back-breaking. My trenching shovels weren't well-suited for this depth, and the ground got suddenly much harder. Much of these 5" were done w/ a post-hole digger and small garden shovel!
  • I could've never pulled the wire. Watching the two, bigger electricians pull the (3) 4/0 wires made me realize how I'd never of been able to do it. Although I was unexpectedly without power for (4) days (on a job that a more seasoned service-main installer could've done in 1d), it would've been worse had I attempted to pull the wire myself. This is causing me to put together a contingency plan for the 110ft of #2 wire I need to pull for the pool run - I'll share those details in a future post.
  • I was frustrated with the quality of work and materials the electrician used. I won't belabor the point, but there were some broken pieces I discovered later, and some lower-quality materials that I would've paid extra to have used better versions.

UPDATE 12/22/2021: updated with final figures and notes.
 

Attachments

  • IMG_5567.JPEG
    IMG_5567.JPEG
    1,023.4 KB · Views: 65
Last edited:
My main CW line ran right through where the pool would be. I had Bloodhound approximately locate it, then I spent a week digging near a number of spots to exactly locate the depth and start/end of the new line - it took a week because I found some tee fittings that made me backtrack the located line, and I found out that Bloodhound was roughly approximate on location - often only finding a few points, then assuming a straight line between those points. Bloodhound was about $300 (for all my private utility location), and is excluded from the roll-up below.
Timeline
  • Total = 9d
  • (7) days line location
  • 1d trench
  • 1d install, test, then backfill
Technical
  • (E) 3/4" PVC cut-and-left
  • (N) 3/4" PEX-B, 130ft, 12" below-grade (min.)
  • Backfilled with sand until top of pipe, then soil backfill
Cost
  • Total = $667
  • 200ft pipe = $134
  • Pipe fittings and SS clamps = $34
  • 1d Trencher rental and delivery = $499
Lessons Learned/Concerns
  • Don't get the cheapest trencher rental at Sunbelt, it's a POS.
  • Proper stainless clamps should be used for direct-burial - e.g. 316, 410. SS304 isn't good enough for direct burial; however, I failed to find any material spec for the clamps I purchased. They were rated "appropriate for direct burial", but 304 SS is considered "good enough". It's a calculated risk I took, but would prefer spending more time sourcing appropriately.
 

Attachments

  • 6 Side layout.JPEG
    6 Side layout.JPEG
    983.2 KB · Views: 36
I've bought the IntelliCenter i5PS instead of the i8PS, because I got a great deal on a NIB part that someone needed to offload. I'd planned on the i8PS in case we ever wanted to add additional pumps or major features, but the i5PS deal ($950) was too good to pass up!

A note about prices over the last (2) months:
Hayward W3C4030 Swimclear filter has gone up 51% to $1814
Pentair IntelliCenter i8PS w/ IC40 has gone 5% to $3100
Pentair IntelliValve has gone up 9% to $226
Hayward W3H200FDN heater has gone up 8% to $2500
AirSupply Silencer 1.5HP has gone up 20% to $200
GFCI breakers have gone up about 13%
Pressure-treated lumber has gone up 20%
KD lumber has gone up 15%
Double-hung windows have gone up 12% (note: Jeld-wen picture windows steady!)

I use a separate app to track prices, which alerts me when items begin to drop. I'm purchasing items about a month in advance to keep materials ready; however, I buy PT lumber about (2) months advance to sticker and air-dry. I've been holding-off buying the PT lumber I need, and plan to pull from the (small) stock I already have dried. Let's all hope these prices are temporary!
 
  • Wow
Reactions: TampaKathy
I've secured the majority of my supply chain for materials. Being new to Houston, it's been quite a bit of calling and driving around to see distributors. The only major roadblock I'm running in to is a local source for 2-1/2" diameter PVC pipe and fittings.
Right now, engineering is my bottleneck. Structural was supposed to have delivered drawings over a month ago, but I'm running into "get what you pay for".
By the end of this year, I'll mark the site layout for excavation. After that, I'll be waiting on engineering and permitting in order to break ground.
 
  • Like
Reactions: TampaKathy
I've secured the majority of my supply chain for materials. Being new to Houston, it's been quite a bit of calling and driving around to see distributors. The only major roadblock I'm running in to is a local source for 2-1/2" diameter PVC pipe and fittings.
Right now, engineering is my bottleneck. Structural was supposed to have delivered drawings over a month ago, but I'm running into "get what you pay for".
By the end of this year, I'll mark the site layout for excavation. After that, I'll be waiting on engineering and permitting in order to break ground.
Hi ShadyPool, thanks for sharing all your experiences. I am a new owner-builder of my home and I am planning to build a pool. I am new to pool construction. I want to build a 20x40 gunite pool and I am still researching on equipment.

What's a best place to get a pool design/schematics/engineering done? I really want to make sure everything is designed before I talk to any of the sub contractors
 
What's a best place to get a pool design/schematics/engineering done? I really want to make sure everything is designed before I talk to any of the sub contractors
I suggest searching for "Structural Engineering" in your local area, and look for people that list "pool" in their offered services. Typically, you can work w/ your SE to find the MEP engineering (or vice-versa). My experience is only a handful of SE will do pools.

All that said, I'm an engineer that's done MEP engineering before. I did my own MEP engineering, schematics, and did all the 3D modeling. I hired a SE to meet the permit requirements and to double-check my structural work. I'm paying $1900 for SE, $1150 for topographical & land survey.
 
  • Like
Reactions: HermanTX
I suggest searching for "Structural Engineering" in your local area, and look for people that list "pool" in their offered services. Typically, you can work w/ your SE to find the MEP engineering (or vice-versa). My experience is only a handful of SE will do pools.

All that said, I'm an engineer that's done MEP engineering before. I did my own MEP engineering, schematics, and did all the 3D modeling. I hired a SE to meet the permit requirements and to double-check my structural work. I'm paying $1900 for SE, $1150 for topographical & land survey.
Thanks and I will search for SE and MEP in my area.
 
I've completed site layout and applied for permit. I've been purchasing materials (2) months in-advance, to combat supply-chain delays, and enable me to get familiar with some items long before they're needed.

Site layout is simple work, but needs to be accurate. To prevent foundation issues, it's best not to dig within 5ft of an existing foundation. My pool is 6-1/2ft from my existing home, so accuracy of my layout is critical. I'm also building a workshop expansion simultaneous to the pool. It took me about (3) hours to layout by myself.

Timeline
  • (3) hours for site layout
  • (2) days to remove my existing fence
  • Mowed the lawn extra-short beforehand.
  • Completed prior to getting quotes from foundation and excavator subcontractors, to enable a site visit.
Technical
  • Using my laser transit level, I found the highest point and set grade off there. I then checked my strings w/ string levels. I marked string locations w/ Sharpie after finalizing.
  • Laid-out exterior walls of WorkShop off existing building, then measured off that to triangulate the pool.
  • Since the excavator will dig the line I mark, my layout was:
    • Pool walls OD, excluding bond beam (which will be dug by-hand)
    • Spa walls ID
    • Ledge wall OD
  • I took down the fence by-hand, and saved the pickets for reuse
Costs
  • Flags, spray paint, string, (2x) fiberglass tape measures = $62
  • Temporary fencing = $37
  • Total = $99
Lessons Learned/Comments
  • Because I'm both the designer and builder, I have the luxury of printing all the CAD dims beforehand. Otherwise, I'd of had to do a lot more field-math.
  • I've began drying the pressure-treated lumber for the Workshop build. Off-the-rack, the driest board was 35% - but most boards were higher than my meter's max range. In the summer, I can get two-by's down 15 percentage-points in ~2 months. I'll be challenged to get the same results by the time this lumber is needed.
 

Attachments

  • 10 Pool.Spa.JPEG
    10 Pool.Spa.JPEG
    1,017.3 KB · Views: 35
  • Like
Reactions: HermanTX
I finally have the approved permit! The (minor) design changes have been retro-edited into the older posts. By the end of next week, I expect to have the gunite shot. Between now-and-then, there's the layout inspection, pool excavation, underground plumbing & electrical rough-in, bonding, rebar, and rebar inspection.

Timeline
  • Total = 17 weeks*
  • NOTE: Some drawings were started parallel, and before others were finished; the below individual timelines add up to more than 17 weeks.
  • (7) weeks architectural drawings
  • (8) weeks structural drawings
  • (3) weeks MEP drawings
  • (3) weeks for permit office review
Technical
Intentionally left blank.

Cost
  • Total = $4592
  • Land survey = $450
  • Topo survey = $700
  • Architect = $900
  • Structural engineer = $1938
    • Stamped structural drawings not required in my county, although they do require structural drawings.
    • I hired an SE primarily for the workshop expansion, with secondary to provide pool structural drawings.
  • MEP engineer = $0 (self-performed)
    • Stamped MEP drawings not required in my county.
  • Permit = $550 (flat-fee in my county)
  • On-site prints = $54 (Arch D full size required by permit office; all construction prints on Arch A letter layouts)
Lessons Learned/Comments
  • As mentioned, I performed the design & MEP engineering - hence the cheap $900 Architect and $0 MEP engineering.
    • Leveraging this, I thought using a low-cost engineering firm wouldn't be difficult. I thought I could guide them easily and quickly. This plan failed miserably. I wouldn't do it this way again, and would strongly recommend anyone w/ less engineering experience to hire a very reputable firm.
    • Although I was able to guide the architect, their drawing quality was poor. I didn't discover those issues until they delivered final *dwg files. Ultimately, I used my own Architectural drawings - negating the (7) weeks and $900 I'd hired.
    • The SE had clearly misled me - they had no experience in either residential or gunite pool construction. One quote from them comes to mind, "why would a pool need a bond beam?"
  • My county's permit office isn't used to owner-built projects. This caused many delays due to confusion (from both parties). That said, many of my neighbor's doing different renovation projects have reported much longer (8+ weeks) lead-times.
 

Enjoying this content?

Support TFP with a donation.

Give Support
Excavation over the weekend. I've started some of the underground parallel to finishing a bit of formwork & excavation clean-up.

Timeline:
  • Total = 3d+
  • Excavation = 2d+
  • Formwork, stairs, base = 1d
Technical:
  • Transit level was set and not moved throughout. Every day I confirmed grade from the existing home exterior door sill. One patio connects to both the pool coping and the new building, so elevation calcs had to be consistent. I pre-calculated a few important elevations, and marked them on the grade stick w/ tape:
    • PTE (Pool Top) = 2" (desired drop b/w threshold and top of patio) + 1" (1/8" patio slope) + 1.25" coping + 1/2" mortar <- Top of formwork marks this
    • PBE (Pool Bottom) = PTE + 5ft (pool depth) + 8" gunite + 6" base
    • LBE (Ledge Bottom) = PTE + 1ft (ledge depth) + 8" slab + 6" gravel
    • SBE (Spa Bottom) = LBE + 18" bench
  • Throughout excavation, I marked at-grade w/ paint.
  • After one wall was cut-in, I began marking 5" back (4" bond beam + 1" grace). Ran a string. I hand-dug the bond beam.
  • I determined the highest existing grade, and began building my formwork at that point. The top of coping will be slightly above existing grass, which prevents drainage into the pool. Furthermore, I will (later) excavate all around the pool for astroturf + base.
    • Formwork was leveled as each piece was added.
    • I used 3/4" plywood, cut into equal strips using my tracksaw.
    • 1-5/8" deck screws w/ piloted holes to stakes.
    • 36"L stakes, occasionally supported by rebar (as necessary).
  • The skimmer formwork is 18"W x 20"L. This is slightly less than recommended by Hayward.
  • We backfilled w/ 3/8" washed pea gravel. This will make under-slab plumbing easier, provide a self-compacting base, and eat-up some of the discrepancies in excavation.
    • I used my snow shovels to move the pea gravel around.
  • I made stairs using fillable sand bags.
Cost:
  • Total = $10,191
  • Soil removal = $5k
  • Excavation contractor = $3.5k
  • 3/8" pea gravel (17CY) = $1.5k
  • Formwork, stakes = $173
  • Rebar = $0 (had some from previous projects on-hand)
  • Rebar ties, sand bags = $24
Lessons Learned/Comments:
  • Mark the dig line 1-2" further out from needed. Excavator is imprecise, and you'll loose your dig line quickly.
  • I have a good collection of hand digging tools, which all earned their keep: small garden shovel, short D-handle shovel, sharp trenching shovel, french drain shovel, typical shovel, transfer shovel, mattock, and snow shovel.
  • Because the excavator could only attack from the south side, some walls couldn't be as nicely shaped. I had to do a lot of manual cut-in to clean those edges up.
    • This resulted in overdig on the South wall perimeter. Because I cannot increase that dimension, I've decided to eliminate the bond beam on the South wall. This only supports the ledge, and determine as low-risk. I'll need to build deeper formwork in that area.
  • The weight of the skid steer and excavator driving over my lawn did more damage than I expected. We discovered (and broke) a plumbing cleanout that was previously buried.
  • The weight of the dump trucks did more damage than expected to my driveway. We have an asphalt driveway with a portion of (poorly-installed) pavers. This joint is very prone to crumbling. This was exacerbated by the dump trucks.
  • The base clay is very compacted, and I don't think the pea gravel was necessary. A few CY would've been fine for general backfilling, but no need to do the 6" base.
  • I didn't excavate the plumbing trench because I was concerned about rain. I believe this could've been done during excavation, and rain wouldn't have been a major issue. I'll update this post at that time.
 

Attachments

  • IMG_6012.JPEG
    IMG_6012.JPEG
    1.1 MB · Views: 66
  • IMG_6039.JPEG
    IMG_6039.JPEG
    868.9 KB · Views: 67
  • IMG_6016.JPEG
    IMG_6016.JPEG
    1 MB · Views: 66
I've been simultaneously doing the electrical and plumbing underground. This post concerns electrical underground, which is complete.

Timeline:
  • Total = 1/2d
Technical:
  • Only the spa and pool light niche's were in-scope.
  • I marked the pool niche vertical location w/ a spray mark, then excavated to that point. I excavated a bit large, to enable some adjustment after rebar is placed.
  • The spa light niche will go in the sidewall of the 18" T bench. I approximated that height to excavate. Once at the bench height, the conduit will run through the pea gravel under the tanning ledge floor - so no excavation was needed there. Once rebar is installed, I'll set the final spa niche height.
  • A poor conduit joint can make the (later) job of chasing cables very difficult. To combat this:
    • Pre-planned conduit route, not to exceed 360* bends
    • Used 45* rather than 90*
    • Chamfer both inside and outside edges of conduit prior to glue-up
    • Don't overapply glue
    • Push fittings together completely - no gaps are where things get caught
    • Hold fittings together for 10-20s (to prevent push-out), after glue-up
Costs:
  • Total = $248
  • Pentair 79206700 pool light niche = $96
  • Pentair 79206600 spa light niche = $83
  • 1" conduit & fittings = $69
Lessons Learned/Comments:
  • I've stubbed the conduit outside the bond beam, then capped (w/ tape) the opening. This allows me to move quicker towards gunite, but also requires me to come back later to catch these stubs (and may not be best plan for everyone). Because my workshop expansion, I need a large trench on either of the long sides of the pool. This trench is planned in a few weeks - at which time, I'll catch these stubs.
  • I cannot decide if it was better to excavate for the lights after the bond beam formwork was done, or if it would've been easier before. The formwork helped me better mark the location, and visualize based on the pool walls. But I was also having to work around the formwork w/ the shovel.
 

Attachments

  • 4 Pool niche.JPEG
    4 Pool niche.JPEG
    749.1 KB · Views: 32
  • 5 Spa niche.JPEG
    5 Spa niche.JPEG
    1.2 MB · Views: 33
Rebar was completed a day early, and has already passed inspection. Gunite is scheduled for tomorrow, which is 8d since excavation began. I will create a separate post about the rebar and gunite (together). The post is concerning plumbing rough-in.

Timeline:
  • Total = 4d
  • Returns = 1/2d
  • Spa drains = 1/2d
  • Skimmers = 1d
  • Spa = 2d
Technical:
  • Returns:
    • I measured and sprayed both the horizontal and vertical locations of the returns, then excavated.
    • Similar to electrical rough-in, I'm stubbing all lines outside the bond beam and capping them - allowing me to move more quickly towards gunite.
  • Spa drains:
    • Plugged both side-and-bottom inlets from the interior (so the plugs could be removed in the future). This will enable pressure-testing.
    • Measured 30" separation from edge-to-edge. Installed lines, then hammered rebar into the ground to tie-off.
    • Marked the vertical location of the drains on the rebar (sharpie), then installed line between the two. Leveled them while PVC set-up.
    • Tied-off to rebar, and finished plumbing to edge of bond beam.
  • Skimmers:
    • Plugged the outlet not used.
    • One skimmer has the Burndy BWB680LG water bond kit installed.
    • One skimmer has a 1" line in the auxiliary port (near the top of the skimmer) installed-and-capped outside of the skimmer's formwork. This is for a future overflow line, if I find the pool consistently overflowing after rain.
    • Tied a #4 rebar to the top, across the bond beam formwork, and leveled. Tied-off to formwork.
    • Plumbed outside skimmer formwork.
  • Spa:
    • Pre-assembled the 2" outlet of the venturi's.
    • Marked the venturi horizontal locations w/ paint.
    • Determined the jet outlet height, and marked that location.
    • Plumbed the line between (3) sides of the spa.
      • Tied-off the venturi's, loosely, to later-installed rebar.
      • Leveled the line, and leveled jet returns w/ rebar ties.
    • Plumbed between each wall.
    • At the final wall, teed together and finished plumbing to outside of bond beam. Capped.
Cost:
  • Total = $823
  • (2) Hayward SP1072 skimmers = $232
  • (5) CMP 25524-200-000 return fittings = $49
  • (8) CMP 25580-290-000 spa venturi's = $144
  • (1) Hayward WG1053AVPAK2 spa drains = $30
  • 2" PVC = $382
  • 1-1/2" PVC = $95
  • 1" PVC = $10
Lessons Learned/Comments:
  • My spa venturi's have both air and water plumbed. I plumbed two venturi's together. I should've leveled both outlets together - I found later that there was enough twist that the two outlet's weren't true to each other.
  • Use regular PVC cement, rather than the "hot" cement. The blue "hot" cement dries much too quickly for my likes - this is the first project I've tried it.
  • Leveling the returns was very tricky without a main loop already plumbed. It was manageable.
  • I won't pressure-test before gunite. I only think this is risky for the spa - but this is a gamble I've convinced myself to take.
  • Spa drains should've been plumbed from the bottom. Using the side outlets encases the drain line in gunite, but reduced the number of bends.
  • I planned 3d to complete plumbing, but cold and rain extended that to 4d.
 

Attachments

  • 1 Skimmer bond.JPEG
    1 Skimmer bond.JPEG
    189.1 KB · Views: 48
  • 2 Skimmer bond.JPEG
    2 Skimmer bond.JPEG
    559.7 KB · Views: 44
  • 2 Spa.JPEG
    2 Spa.JPEG
    610.8 KB · Views: 53
  • 7 Spa.JPEG
    7 Spa.JPEG
    1 MB · Views: 54
  • Like
Reactions: TKpoolOH
I'm planning to self-build a pool in Houston. Here's some details. I'm looking for feedback, suggestions, advice - open conversation (at this point).
Pool Basics
  • 22" W x 25' L x 4-1/2' (water level) D Pool (actual 5' depth)
    • + 22'W x 14'L x 6" D tanning ledge
    • with a 8'x8' x 38"D infinity-edge spa
  • Gunite construction
  • Pool equipment pad will be added alongside a workshop expansion slab, about 10' from the pool
  • Planned build Jan '22-Jun '22
  • No decking on long sides of pool - I'll be putting astroturf.
  • The short edges will have wood patios. (this is the inspiration).
Pool Equipment
  • Pump: Pentair IntelliFlo 011056
  • Filter: Hayward W3C4030 Pentair CCP520
  • Heater: Hayward W3H200FDN Pentair MasterTemp 200k or 250k (depending on availability & price)
  • UV sanitizer: DeltaUV ES46
  • SWG: IntelliChlor IC40
  • Spa blower: Air Supply Silencer 1.5HP 240V
  • Automation: Pentair IntelliCenter i5PS w/ valve expansion 522038Z
  • (2) Bubblers: CMP Brilliant Wonders 4"
  • (2) Skimmers: Hayward SP1072S2
  • (2) Spa drains: Hayward 1053AVPAK2
  • (4) Pool returns, (1) Spa: CMP 25524-200-000
  • (8) Spa venturi's: CMP 25580-290-000
  • (1) Pool lights: Florida Sunseeker Pooltone Std Color, 12V 18W
  • (1) Spa light: Florida Sunseeker Pooltone Std Color Spa, 12V
No main drain.

The work I won't be doing myself ("what's contracted out"), and why
  • Structural engineering: required by Texas
  • Land & topographical survey: required for permitting
  • Private utilities location: I lack equipment
  • Plaster: I've always been frustrated by mudding drywall, and suspect this would be a similar frustration
  • Bricklaying (for pool bath): similar to plaster, I expect frustration
  • Slab pouring and smoothing: cheap enough
  • Rebar: cheap enough, and because I'll be racing the clock at that point
  • Gunite: I lack the tools and experience
(Actual) Timeline* and cost (last updated: 2/25)
  • TOTAL = 32d, $19,931
  • Overhead electrical moved underground = 35d, $3,311
  • Relocate DCW main line = 9d, $667
  • Site layout = 2d, $99
  • Permit = 17w, $4,592
  • Excavation = 3d, $10,191
  • Electrical rough-in = 1/2d, $248
  • Plumbing rough-in = 4d, $823
*NOTE: total timeline < summation, because many items happen in-parallel. This timeline indicates overall start-to-finish.
I'm in process of gathering equipment for my pool reno. Where did you get your equipment? I heard they're hard to come by now, especially Pentair.
 
Rebar was completed a day early, and has already passed inspection. Gunite is scheduled for tomorrow, which is 8d since excavation began. I will create a separate post about the rebar and gunite (together). The post is concerning plumbing rough-in.

Timeline:
  • Total = 4d
  • Returns = 1/2d
  • Spa drains = 1/2d
  • Skimmers = 1d
  • Spa = 2d
Technical:
  • Returns:
    • I measured and sprayed both the horizontal and vertical locations of the returns, then excavated.
    • Similar to electrical rough-in, I'm stubbing all lines outside the bond beam and capping them - allowing me to move more quickly towards gunite.
  • Spa drains:
    • Plugged both side-and-bottom inlets from the interior (so the plugs could be removed in the future). This will enable pressure-testing.
    • Measured 30" separation from edge-to-edge. Installed lines, then hammered rebar into the ground to tie-off.
    • Marked the vertical location of the drains on the rebar (sharpie), then installed line between the two. Leveled them while PVC set-up.
    • Tied-off to rebar, and finished plumbing to edge of bond beam.
  • Skimmers:
    • Plugged the outlet not used.
    • One skimmer has the Burndy BWB680LG water bond kit installed.
    • One skimmer has a 1" line in the auxiliary port (near the top of the skimmer) installed-and-capped outside of the skimmer's formwork. This is for a future overflow line, if I find the pool consistently overflowing after rain.
    • Tied a #4 rebar to the top, across the bond beam formwork, and leveled. Tied-off to formwork.
    • Plumbed outside skimmer formwork.
  • Spa:
    • Pre-assembled the 2" outlet of the venturi's.
    • Marked the venturi horizontal locations w/ paint.
    • Determined the jet outlet height, and marked that location.
    • Plumbed the line between (3) sides of the spa.
      • Tied-off the venturi's, loosely, to later-installed rebar.
      • Leveled the line, and leveled jet returns w/ rebar ties.
    • Plumbed between each wall.
    • At the final wall, teed together and finished plumbing to outside of bond beam. Capped.
Cost:
  • Total = $823
  • (2) Hayward SP1072 skimmers = $232
  • (5) CMP 25524-200-000 return fittings = $49
  • (8) CMP 25580-290-000 spa venturi's = $144
  • (1) Hayward WG1053AVPAK2 spa drains = $30
  • 2" PVC = $382
  • 1-1/2" PVC = $95
  • 1" PVC = $10
Lessons Learned/Comments:
  • My spa venturi's have both air and water plumbed. I plumbed two venturi's together. I should've leveled both outlets together - I found later that there was enough twist that the two outlet's weren't true to each other.
  • Use regular PVC cement, rather than the "hot" cement. The blue "hot" cement dries much too quickly for my likes - this is the first project I've tried it.
  • Leveling the returns was very tricky without a main loop already plumbed. It was manageable.
  • I won't pressure-test before gunite. I only think this is risky for the spa - but this is a gamble I've convinced myself to take.
  • Spa drains should've been plumbed from the bottom. Using the side outlets encases the drain line in gunite, but reduced the number of bends.
  • I planned 3d to complete plumbing, but cold and rain extended that to 4d.
So jealous of someone who can DIY! Wish I had that motivation/skill/drive/etc. Looks like you're doing awesome!
 
I'm in process of gathering equipment for my pool reno. Where did you get your equipment? I heard they're hard to come by now, especially Pentair.
I also had difficulty sourcing. I used a couple of apps to do so, here's the final playlist:
EquipmentSupplierCost
Pool lightFlorida Sunseeker$508
Spa lightFlorida Sunseeker$497
Pentair CCP520 filterFB Marketplace (used)$400
Flowvis FV-2Amazon$112
Pentair IntellifloAmazon$1802
Pentair IntellicenterFB Marketplace (NOS)$1081
IntelliChlor IC40FB Marketplace (used)$250
Pentair IntelliValveAZPoolSupplies.com$215/ea
Pentair 200k MasterTempAZPoolSupplies.com$2171
Air Supply Silencer (spa blower)FB Marketplace (NOS)$126

I didn't list the white goods, because they were generally easier to find. There were also way more options in white good suppliers (although, I used 95% CMP).
 
  • Like
Reactions: nowright
I sub-contracted the pool rebar, in order to move quickly from excavation --> gunite.

Timeline:
  • Total = 1/2d
Technical:
  • Sub laid down masonite on top of pea gravel to give an easier work surface, and to lay spacer bricks on.
  • Before sub arrived, I leveled all plumbing & electrical, and tied them off to stakes and partially buried them.
  • After rebar was completed, I connected (4) bonding wires approximately equidistant around the perimeter, and stubbed them up outside the bond-beam formwork.
    • I also bonded the skimmer water-bond to rebar and light niches.
Cost:
  • Total = $3393
  • Rebar contractor = $3040
  • Bonding wire, terminating connector, and skimmer water-bond = $353
Lessons Learned/Comments:
  • It would've been better to level and secure the plumbing & electrical conduit after rebar completed, since it was all disturbed during rebar. I had to go back and redo, which was made more difficult by me having done such a thorough securing job earlier.
  • If the rebar sub doesn't frame something out in rebar, it's unlikely gunite will be sprayed.
    • Case-in-point: I wanted a 3rd, short step off the ledge. I didn't sandbag (because of thickness), and rebar contractor didn't rebar for same reason. It ended up never getting shot.
  • I suspect doing rebar myself would've taken (1) week, and $5-700 in tooling and materials.
  • We should've cut-down the masonite after install was done, rather than leave 4x8 sheets (which were later Gunite'd)
 

Attachments

  • 3 complete.JPEG
    3 complete.JPEG
    801.9 KB · Views: 47
  • 6 complete.JPEG
    6 complete.JPEG
    999.1 KB · Views: 46
  • Like
Reactions: TKpoolOH
Gunite was done (2) days after the rebar inspection passed (about 12 days ago).
Timeline:
  • Total = 1d
Technical:
  • The crew started by checking & correcting all the rebar, formwork, and dims.
  • They also pulled metal layout lines to mark bond beam, ledge, etc.
  • Throughout, we discussed: bond beam dims, stair height, spa dims, and spa negative edge.
  • After completion, watered the pool ~4-5 times/day for a week.
Cost:
  • Total = $12,670
  • Gunite sub = $12,370
  • Mini skid steer rental = $300
Lessons Learned/Comments:
  • As many have described, gunite shooting is very noisy and messy. A thin film of overspray gets everywhere, regardless of drop clothes.
  • Gunite has gone way up in price since my October quote ($205/CY), and because the excavation wasn't sharp in all areas, there was a lot of extra needed. This resulted in gunite being $4k more expensive.
  • I didn't realize there'd be so much gunite overshoot ("rebound") and waste material left at the end. This became a huge headache later:
    • I suspect the rebound would typically be used to form pool decking (no concrete decking in my design).
    • I should've prepared a hauling plan, or at least consolidated the piles while still wet.
    • Once dried, I had to jackhammer the piles into manageable rocks. I then rented a mini skid steer to consolidate in a location that I can conveniently load for disposal.
    • I don't want to underplay how strenuous this all was - and could've been made much easier had I prepared a disposal plan the day-of gunite.
 

Attachments

  • 2 line layout.JPEG
    2 line layout.JPEG
    955.6 KB · Views: 50
  • 13 Finished.JPEG
    13 Finished.JPEG
    654.2 KB · Views: 53
  • 15 Finished.JPEG
    15 Finished.JPEG
    890 KB · Views: 51
  • 9 Complete.JPEG
    9 Complete.JPEG
    941.3 KB · Views: 49
The pool has been paused since gunite was shot (12) days ago, while I work on the foundation for the workshop. I expect to start trenching the pool plumbing, natural gas, and main electrical subpanel next week. I'm about (1) week ahead of schedule, and nearly right-on budget (despite inflation and tons of overages on gunite).
 

Attachments

  • 10.1 Complete.JPEG
    10.1 Complete.JPEG
    904.9 KB · Views: 32
The pool has been paused since gunite was shot (12) days ago, while I work on the foundation for the workshop. I expect to start trenching the pool plumbing, natural gas, and main electrical subpanel next week. I'm about (1) week ahead of schedule, and nearly right-on budget (despite inflation and tons of overages on gunite).
On budget or "nearly right-on budget" is a small miracle in this economic environment! Looking great so far!
 
  • Like
Reactions: ShadyPool

Enjoying this content?

Support TFP with a donation.

Give Support
Thread Status
Hello , This thread has been inactive for over 60 days. New postings here are unlikely to be seen or responded to by other members. For better visibility, consider Starting A New Thread.