New Pool Build in Northern California * Completed *

Thanks, Kim!

Our dig is scheduled for this Thursday so we're finally getting moving! I've updated my design to show what (I think) will be the placement for 5 Microbrite lights, 2 skimmers and 5 returns. Our prevailing winds are often from the Southeast and West, so I tried to place them out of the way of benches and ledges, but near where they can pick up the most debris and on opposite-ends of the pool.

View attachment 138219
Very cool. That will be awesome, congrats!
 
Updates!

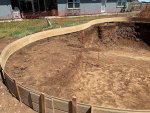
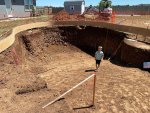
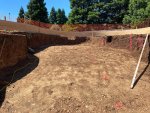
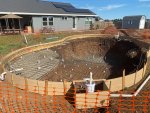
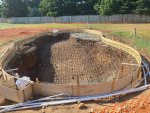
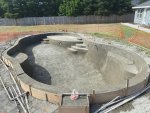
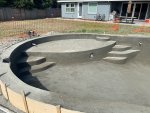
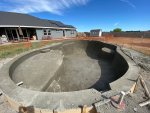
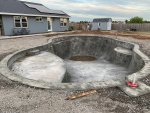
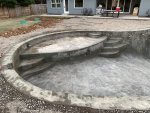
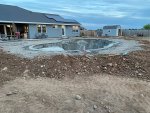
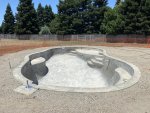
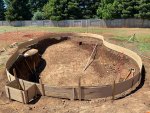
We had our pool dug early last week and then the rain showed up for 4 straight days (after not raining for months). Today, they finished trim work and forms, and begin rough plumbing and rebar tomorrow. They're starting super early as it's 102-103F this week - ouch! Gatorade and water set out for them in an ice chest, so I think they appreciated it today.

Due to elevation drop off our back patio, they're building the pool height up to match our existing flatwork so we have a nice, flat patio and pool deck. The top of the forms is where the top of the pool beam will sit. Also, we switched up lighting and ended up going with an Intellibrite 5G pool size in deep end, and an Intellibrite 5G spa size in shallow end coming off the end of the baja shelf. That should illuminate well and not have a gigantic light in the shallow end. You'll notice the bench in the deep end seems small; it was too far over towards the center of the deep end, so they cut that out and will add the extra length on the other side leaving a wider swim lane for us. Glad I caught that. Overall, we're really happy with the general layout and size of the pool - it looked small when outlined, but grew significantly once dug out!

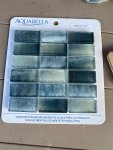
Starting the search for waterline and steps marker tile - so many options. Hope to have that narrowed down by this weekend...

pool-dig-1.jpg

pool-dig-2.jpg

pool-dig-3.jpg

pool-dig-4.jpg
 
  • Love
Reactions: kimkats
I'm debating lighting too! Do you mind telling me why you chose the Microbrites? I'm just starting a build and thinking 4 microbrites or 2 intellibrites with 1 microbrite on an 18' x 36' pool. I don't even really care about color, I'm looking more for longevity.

You plan is wonderful by the way.
 
Last edited:
Updates!

We had our pool dug early last week and then the rain showed up for 4 straight days (after not raining for months). Today, they finished trim work and forms, and begin rough plumbing and rebar tomorrow. They're starting super early as it's 102-103F this week - ouch! Gatorade and water set out for them in an ice chest, so I think they appreciated it today.

Due to elevation drop off our back patio, they're building the pool height up to match our existing flatwork so we have a nice, flat patio and pool deck. The top of the forms is where the top of the pool beam will sit. Also, we switched up lighting and ended up going with an Intellibrite 5G pool size in deep end, and an Intellibrite 5G spa size in shallow end coming off the end of the baja shelf. That should illuminate well and not have a gigantic light in the shallow end. You'll notice the bench in the deep end seems small; it was too far over towards the center of the deep end, so they cut that out and will add the extra length on the other side leaving a wider swim lane for us. Glad I caught that. Overall, we're really happy with the general layout and size of the pool - it looked small when outlined, but grew significantly once dug out!

Starting the search for waterline and steps marker tile - so many options. Hope to have that narrowed down by this weekend...

View attachment 142355

View attachment 142358

View attachment 142357

View attachment 142356
Looks great and looks like we will be getting a break in the hot weather soon. Daltile is a good place to look at samples.
 
  • Like
Reactions: gregfl2001
It is most likely just the way the pics were taken but the pool beam does look high compared to hose flat work. They still need to add coping to that elevation. There have been a few pools on here where the builder just simply made a mistake (it does happen) and the pool ended up at the wrong elevation for existing surroundings. I would simply confirm the hight is correct. You can do this yourself just by running a tight string from top of form to patio and just hold a 4' level next to the string to be sure things look correct. There should already be a clear plan on how the slopes and drainage of the deck will work.

I would also ask the PB if he is certain that Rocky material is virgin soil. In the pic of the worker in the blue t-shirt (just finishing up with the pick axe) one view of the soil looks like virgin but the other looks like it could be disturbed soil. No real way to tell from the pics and it is probably virgin soil but better safe than sorry...

You have already made a lot of great choices with this build. Looks awesome... :goodjob:
 
I'm debating lighting too! Do you mind telling me why you chose the Microbrites? I'm just starting a build and thinking 4 microbrites or 2 intellibrites with 1 microbrite on an 18' x 36' pool. I don't even really care about color, I'm looking more for longevity.

You plan is wonderful by the way.

I was able to speak to a local pool tech who deals with Pentair, and he mentioned he's been replacing some Microbrites lately. Also, since they seem to be newer, there doesn't seem to be much in the way of long-term reviews on them and it's really hard to find usage information. The 5G's have been out for a while now, so I felt a bit more comfortable going that route. I'm sure the Microbrites would work great, too, but without having a pool near me where I can see the actual light output, I chose this route.

It is most likely just the way the pics were taken but the pool beam does look high compared to hose flat work. They still need to add coping to that elevation. There have been a few pools on here where the builder just simply made a mistake (it does happen) and the pool ended up at the wrong elevation for existing surroundings. I would simply confirm the hight is correct. You can do this yourself just by running a tight string from top of form to patio and just hold a 4' level next to the string to be sure things look correct. There should already be a clear plan on how the slopes and drainage of the deck will work.

Hey Rich - yeah, it does look that way but I have confirmed it's correct, including the 4" of flatwork. The team also has a laser level out there and I've heard the beeps go off about 200 times so they are continuously checking and re-checking.

I would also ask the PB if he is certain that Rocky material is virgin soil. In the pic of the worker in the blue t-shirt (just finishing up with the pick axe) one view of the soil looks like virgin but the other looks like it could be disturbed soil. No real way to tell from the pics and it is probably virgin soil but better safe than sorry...

Yep, all soil is virgin. We have some crazy cobble layers in there!

 

Enjoying this content?

Support TFP with a donation.

Give Support
Things have been busy around here. Last week rebar was completed along with rough plumbing of main drains and returns, and finally light niches installed. This week, we had gunite installed. We ended up having to add a small step into the baja shelf, but we're actually glad we did as it makes it easier to step in. It's also out of the way of the main part of the baja shelf and inline with the other steps. PB is watering gunite in the morning and early afternoon, and I'm following up with another in the evening. Everything is looking great so far and coming together very nicely.

Pool equipment showed up (I negotiated purchasing my own equipment to save costs) mostly complete, minus one Intellibrite 5G light. I called the vendor and they confirmed through video review that they indeed forgot to include it, and I had it two days later (great service).

pool-equipment.jpg

rebar-1.jpg


rebar-3.jpg

gunite-1.jpg

gunite-2.jpg

gunite-4.jpg
 
Last edited:
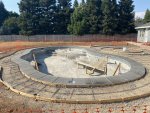
Now they have started the backfilling process of road base to build up around the pool along with general grading. Currently everything is getting compacted and prepared for flatwork. While some of the trenching was open, I was able to add future conduit runs for hot tub, landscape lighting and more which was super helpful. I'm thinking this next week looks to be completion of grading and compaction, prep for flatwork and hopefully tile install. We've selected a waterline tile but still need to select step marker tile. Lots of pics to follow below!


infill-1.jpg

infill-2.jpg

infill-3.jpg

tile-1.jpg
 
It's all looking great.. 👍

Do you have a clear plan on how the grades on the patio will work and if you need any drainage or drains? It looks a little higher over by the shed.

Let's start talking about this diving rock!!!! Looks like you're all set up for a grotto.. 🤔
 
Do you have a clear plan on how the grades on the patio will work and if you need any drainage or drains? It looks a little higher over by the shed.

Yeah, we will have slope from the pool deck back towards the existing patio and will have a linear drain there to carry water out. The north end of our fence-line has a drainage line that carries water out to a retention area so we plan to tie into that. The shed was installed recently on 6-8" of compacted gravel, so it sits a bit higher than it's surroundings at this time. We'll be building up and grading everything out over there.

Let's start talking about this diving rock!!!! Looks like you're all set up for a grotto.. 🤔

Ugh, I know! I've been to the few places we have in town and nothing has stood out. I really like the look of water-washed granite boulders (plus they are smoother for standing on) but I haven't had a chance to go down to Sacramento where there is a larger selection. If we can locate something we like, we'll do it otherwise we're fine with keeping normal flatwork, too.
 
SWEET!!! That looks great! Have you started bonding with it yet? aka watering it to help slow down the curing.

It is time for your set of links! The first set is all about what to do and ask about to get a great plaster job. The second set is all about how to care for your pool after you get the plaster.

Plaster links:
Ten Guidelines for Quality Pool Plaster Best one of all
All Plaster Finishes Should Last 20 Years
Not All Color Pigments are Good for Pools How to pick a good color for plaster.
A Plastering 'Watch List' | Professional Watershaping | Watershapes
Trouble Free Pool
Trouble Free Pool

Pool care links:
Print these out:
Pool School - Basic Pool Care Schedule
Pool School - Recommended Levels

Bookmark these:
Pool School - Recommended Pool Chemicals
Trouble Free Pool
Pool School - ABCs of Pool Water Chemistry

Now is also a good time to ask what test kit your PB will be providing so we can fill in any holes.

I love that tile!!! I way use it for your markers as well. You can put them end to end our space them out a bit. Both ways are very pretty. Make sure to NOT use grout between them. Use the plaster instead.

Kim:kim:
 
If we can locate something we like, we'll do it otherwise we're fine with keeping normal flatwork, too.
Wait.... What???? That submerged Boulder will look awesome from the house. I assume that pipe is there for some type of water feature for the boulder? You could also put a little extra lighting for the Boulder and have a beautiful focal point. I think we need a field trip to Sacramento this weekend..:poke:
 
Now is also a good time to ask what test kit your PB will be providing so we can fill in any holes.

I love that tile!!! I way use it for your markers as well. You can put them end to end our space them out a bit. Both ways are very pretty. Make sure to NOT use grout between them. Use the plaster instead.

Thanks, Kim. I'll get to reading! For the tile, I think we're leaning towards the same tile but in 2 rows of 1x1 size. Definitely going to plaster between them as that looks so much cleaner.

Wait.... What???? That submerged Boulder will look awesome from the house. I assume that pipe is there for some type of water feature for the boulder? You could also put a little extra lighting for the Boulder and have a beautiful focal point. I think we need a field trip to Sacramento this weekend..:poke:

Rich - yeah, I'm going to try and get down there in the next few days to see what I can find. It's now or never! That pipe you see is actually the auto-fill; no plans to have a waterfall over the jump rock. Will keep this thread updated with what I find out.
 
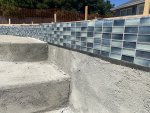
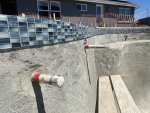
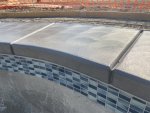
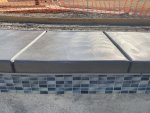
Well it's been a while since my last post, but things are progressing nicely. We had a two week or so hiatus, but then jumped straight into additional grading, coping / flatwork forming and lastly tile work. We went with the 1x2 glass tile for waterline (pics below) and the same tile in 1x1 stacked in 2 rows for steps marker tile (no pics, unfortunately, and they are all taped off for protection right now). We're very happy with how the tile came out! Additionally, the autofill and overflow units have been installed and are ready to go.

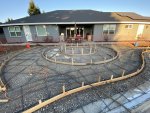
For our patio, we're doing an interesting concentric circle design and so far with forms, it looks really cool. They poured the dark gray coping yesterday and finished it with a sponge - looks awesome up against the glass tile. We're scheduled for another pour tomorrow (one circle of the patio area, equipment pad and half of the pool surround decking) and the final pour on Friday. Pretty excited to have all flatwork done by the weekend after living with a dirt backyard for the past couple of years. :)

More pics to come later in the week, but here's a few new ones.

IMG_6868.jpeg

IMG_8635.jpeg

IMG_5849.jpeg

IMG_6548.jpeg

IMG_1087.jpeg\

IMG_9180.jpeg

IMG_4774.jpeg
 

Enjoying this content?

Support TFP with a donation.

Give Support
Thread Status
Hello , This thread has been inactive for over 60 days. New postings here are unlikely to be seen or responded to by other members. For better visibility, consider Starting A New Thread.