
I am starting this thread with the hope that it may help others.
This is my install for a new Aqualeader 13ft X 20ft X 54 inch, Oval Above Ground Pool with an Aluminum Wall and resin components and a Beaded liner.
I do live in the Toronto area (Canada) just north of Niagara Falls for those who are unsure of their geography and we do get NASTY freeze and thaw cycles.
I started by laying out the pool dimensions as stated in the manual and removing the grass. I used a flat shovel to make approximately 1 foot slice lines in the grass and then again aprox 1 foot slits to slice out each piece (like square pizza slices) by pushing the flat shovel underneath the grass. That grass was transplanted to another section of the yard an took well to its new home. Using a hard rake I removed excess loose soil to make the surface even. (See Below)

Now the ground was slightly sloped but I chose not to level it as I did not want the one side of the pool sunken as water might pool in the winter causing undesired things to happen during our some times vicious freeze and thaw cycles so against the general consensus of this forum I decided to deviate from common practice and build up the grade with lime stone crushed screening. Keep in mind the screening once compacted becomes really hard and stable which is why its used for leveling interlock drive ways and roads.
The instructions call for a perfectly level 2 foot wide hard compacted (crushed stone) permanent "Base" around the perimeter of the pool about 2 inches thick.
Due to my slope the base is about 5 - 6 inches high near the back along the longer fence line. I used a motorized plate compacter for every inch of rise on the base until it was leveled within a quarter inch using a rotary laser level.
(see pics below)
 Here can see I started digging out for my Butress's the trenches as per instructions from the manual.


See above
Now that the Buttress's are in place it was time to bring in material to the center of the pool area.
You'll notice that I detach the straps so that I can use the plate compacter in the middle and then reattach once finished. Please Note that I will be using 1 inch Styrofoam sheets for my base instead of sand as well as preformed foam Cove.

Next step, (see above)
The manual states that patio blocks are OPTIONAL for the outer supports and to take notice that "heaving" may occur in freeze and thaw cycles. I did buy the pavers but decided NOT to use them.
I had just spent all this time compacting the perimeter so that its super hard and compacted and leveled. In order to sink the pavers to base height I would have to now disturb this nice hard compacted surface I spent all this time preparing.
Here is where I decided to do something different again. The pool wall is designed for outward horizontal pressure (holds the water in). There is no downward heavy weight trying to force it down other than the tension of the stretched liner. The liner and wall are holding the water in place and the ground is supporting all the weight of the water.
Knowing this I decided to use 2mm or 12 gauge thick 12x12 inch stainless steel plates under the outer supports more or less to keep the lime stone from washing away in heavy rains and it would offer some support if required to prevent sinking. The stainless steel plates are also flexible to a degree in case of any serious ground heaving during freeze and thaw cycles.
After setting up the bottom track and getting plate locations I hit the perimeter again with the rotary laser lever and fine tuned everything to an 1/8 of inch for each plate and in between where the track will rest.
Now my base is complete and soon the pool will go up.
Be advised this whole process took me a few weeks of after work and weekend work but was completed in early may Of 2021. I had no help at all.. LOL
Now I had to wait for a warm spell of whether before actually raising the pool structure and hanging the liner
****************
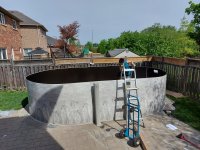
Now around May 20th instead of a warm spell we actually got a heat wave and it was time to set this pool up. With the wife and I and our 2 kids we set up the wall. Remember to use some kind of support to hold the wall in place as its basically a piece of sheet metal and the wind can take it away- I bought tent pegs and bungee cords and locked it down - its not advisable to do this on a windy day..
see below

----------
Now there is a lot questions that seems to be asked on this forum with regards to the pool base height. The manual contradicts its self here.
ASSUMING I was going to use SAND as the main base. The manual calls for a 2 inch thick crushed stone perimeter base for the wall to sit on. It also calls for approximately 2 inches of sand to brought into the middle to be used as the base for the liner to sit on.
2 inches of sand base with 2 inches of perimeter base would give you an even flat base all across assuming you leveled the dirt in the first place. (which I did not)
But in order to cover the pressure plates and straps you would actually need more than 2 inches of sand thereby decreasing the overall depth of the pool.
Because I am using the Styrofoam for my base all I did was bring in crushed lime stone and leveled the whole area uniformly flat to match the perimeter base. The Styrofoam is what's going cover my pressure plates and strapping and will also bring the pool base height up by 1 inch. I no longer have 54 inch pool- it becomes 53 now.
(Keep in mind if you are installing a round AGP you would not need to worry about any of this as they don’t use a Buttress system. No pressure plates or straps.
(see below)

Fast forward to early June and here we are.
All systems go

The install went well. The hard part was definitely the base. Really important that its level and solid. Obviously time will tell how well my base holds up but Im confident in my work..
Funny the pool company wanted $2500 for install of the pool. Thought to my self that's a pretty good price until they mentioned that didn't include the base...that's when I looked at them with disgust and said its alright I got this guys .. Ill do it my self.. thanks for offer...lol
I also knew that if any thing went wrong with the pool for a next few years they would instantly blame the "base' as the root of all evil if I paid them for the install....
The level is bang on any and every which way.. I think I bummed up the liner a little and its approximately 8 inches out of orientation but it stretch into place nicely - its only some thing I notice.. Again very poor instructions from liner manufacturer and pool company. I noticed there was a lot of guess work through the entire process due to inadequate instructions. I now can see how a round pool installation is much easier and less pone to mistakes than an Oval pool.
I was shocked as to how the Styrofoam bottom is soo soft on your feet when in the pool. I was also surprised as to how quickly the pool gets up 84 degrees without a heater and my neighbors were also shocked that have in grounds. .lol
I did buy a a gas heater but its not yet plumbed in or fed a gas supply.. coming soon
I used EPS styro foam ( the cheaper stuff) and it seems to be working out good or rather my taping job is holding very well.
I'm in the process of figuring out my chlorination schedule and amounts, almost there now . Using liquid chlorine only...
Anyway there you have it folks. Hope this can help some out with their installation.
P.S This was asked on another thread -
The measurement on my beaded liner (54 inch) from the top to the first seam was 47.5 inches prior to installation or before stretching.
This is my install for a new Aqualeader 13ft X 20ft X 54 inch, Oval Above Ground Pool with an Aluminum Wall and resin components and a Beaded liner.
I do live in the Toronto area (Canada) just north of Niagara Falls for those who are unsure of their geography and we do get NASTY freeze and thaw cycles.
I started by laying out the pool dimensions as stated in the manual and removing the grass. I used a flat shovel to make approximately 1 foot slice lines in the grass and then again aprox 1 foot slits to slice out each piece (like square pizza slices) by pushing the flat shovel underneath the grass. That grass was transplanted to another section of the yard an took well to its new home. Using a hard rake I removed excess loose soil to make the surface even. (See Below)
Now the ground was slightly sloped but I chose not to level it as I did not want the one side of the pool sunken as water might pool in the winter causing undesired things to happen during our some times vicious freeze and thaw cycles so against the general consensus of this forum I decided to deviate from common practice and build up the grade with lime stone crushed screening. Keep in mind the screening once compacted becomes really hard and stable which is why its used for leveling interlock drive ways and roads.
The instructions call for a perfectly level 2 foot wide hard compacted (crushed stone) permanent "Base" around the perimeter of the pool about 2 inches thick.
Due to my slope the base is about 5 - 6 inches high near the back along the longer fence line. I used a motorized plate compacter for every inch of rise on the base until it was leveled within a quarter inch using a rotary laser level.
(see pics below)
Here can see I started digging out for my Butress's the trenches as per instructions from the manual.See above
Now that the Buttress's are in place it was time to bring in material to the center of the pool area.
You'll notice that I detach the straps so that I can use the plate compacter in the middle and then reattach once finished. Please Note that I will be using 1 inch Styrofoam sheets for my base instead of sand as well as preformed foam Cove.
Next step, (see above)
The manual states that patio blocks are OPTIONAL for the outer supports and to take notice that "heaving" may occur in freeze and thaw cycles. I did buy the pavers but decided NOT to use them.
I had just spent all this time compacting the perimeter so that its super hard and compacted and leveled. In order to sink the pavers to base height I would have to now disturb this nice hard compacted surface I spent all this time preparing.
Here is where I decided to do something different again. The pool wall is designed for outward horizontal pressure (holds the water in). There is no downward heavy weight trying to force it down other than the tension of the stretched liner. The liner and wall are holding the water in place and the ground is supporting all the weight of the water.
Knowing this I decided to use 2mm or 12 gauge thick 12x12 inch stainless steel plates under the outer supports more or less to keep the lime stone from washing away in heavy rains and it would offer some support if required to prevent sinking. The stainless steel plates are also flexible to a degree in case of any serious ground heaving during freeze and thaw cycles.
After setting up the bottom track and getting plate locations I hit the perimeter again with the rotary laser lever and fine tuned everything to an 1/8 of inch for each plate and in between where the track will rest.
Now my base is complete and soon the pool will go up.
Be advised this whole process took me a few weeks of after work and weekend work but was completed in early may Of 2021. I had no help at all.. LOL
Now I had to wait for a warm spell of whether before actually raising the pool structure and hanging the liner
****************
Now around May 20th instead of a warm spell we actually got a heat wave and it was time to set this pool up. With the wife and I and our 2 kids we set up the wall. Remember to use some kind of support to hold the wall in place as its basically a piece of sheet metal and the wind can take it away- I bought tent pegs and bungee cords and locked it down - its not advisable to do this on a windy day..
see below
----------
Now there is a lot questions that seems to be asked on this forum with regards to the pool base height. The manual contradicts its self here.
ASSUMING I was going to use SAND as the main base. The manual calls for a 2 inch thick crushed stone perimeter base for the wall to sit on. It also calls for approximately 2 inches of sand to brought into the middle to be used as the base for the liner to sit on.
2 inches of sand base with 2 inches of perimeter base would give you an even flat base all across assuming you leveled the dirt in the first place. (which I did not)
But in order to cover the pressure plates and straps you would actually need more than 2 inches of sand thereby decreasing the overall depth of the pool.
Because I am using the Styrofoam for my base all I did was bring in crushed lime stone and leveled the whole area uniformly flat to match the perimeter base. The Styrofoam is what's going cover my pressure plates and strapping and will also bring the pool base height up by 1 inch. I no longer have 54 inch pool- it becomes 53 now.
(Keep in mind if you are installing a round AGP you would not need to worry about any of this as they don’t use a Buttress system. No pressure plates or straps.
(see below)
Fast forward to early June and here we are.
All systems go
The install went well. The hard part was definitely the base. Really important that its level and solid. Obviously time will tell how well my base holds up but Im confident in my work..
Funny the pool company wanted $2500 for install of the pool. Thought to my self that's a pretty good price until they mentioned that didn't include the base...that's when I looked at them with disgust and said its alright I got this guys .. Ill do it my self.. thanks for offer...lol
I also knew that if any thing went wrong with the pool for a next few years they would instantly blame the "base' as the root of all evil if I paid them for the install....
The level is bang on any and every which way.. I think I bummed up the liner a little and its approximately 8 inches out of orientation but it stretch into place nicely - its only some thing I notice.. Again very poor instructions from liner manufacturer and pool company. I noticed there was a lot of guess work through the entire process due to inadequate instructions. I now can see how a round pool installation is much easier and less pone to mistakes than an Oval pool.
I was shocked as to how the Styrofoam bottom is soo soft on your feet when in the pool. I was also surprised as to how quickly the pool gets up 84 degrees without a heater and my neighbors were also shocked that have in grounds. .lol
I did buy a a gas heater but its not yet plumbed in or fed a gas supply.. coming soon
I used EPS styro foam ( the cheaper stuff) and it seems to be working out good or rather my taping job is holding very well.
I'm in the process of figuring out my chlorination schedule and amounts, almost there now . Using liquid chlorine only...
Anyway there you have it folks. Hope this can help some out with their installation.
P.S This was asked on another thread -
The measurement on my beaded liner (54 inch) from the top to the first seam was 47.5 inches prior to installation or before stretching.

 Thanks for sharing. Great pics.