So I followed the instruction in this post for the past couple seasons to filter iron from my pool :
 www.troublefreepool.com
The iron here in Central Indiana is BAD so I end up having to do this a few times a season when I top up the pool. It was a hassle for me to rinse all the loose fiberfill, however, because it trapped SO much iron (and bugs). So I wanted to post a modified version that I've worked up over the past year. I finished a round of filtering today and was able to clean everything up from start to finish within 15 minutes! So I wanted to share my modifications and parts too since my method for an inground pool is slightly different than OP's for an aboveground.
Anyway pics tell the story best so look at those while reading:
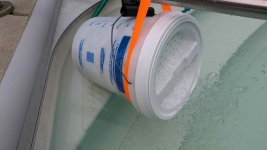
Pic #1) The bucket: A standard translucent 5-gallon bucket (so you can see when it's time to rinse). I switched to a screw-top lid because the regular lid popped off all the time even when strapped down. (Leaktite lid from Lowes)
Pic #2) The setup: I connect the bucket to my cover pump and place the pump and bucket on the top step. The bucket has to be strapped to something like the railing to keep it in place and it's fine if most of it hangs off the step as the strap will keep it securely suspended (cam straps work great). This Wayne WAPC250 cover pump costs about $165 but has been a workhorse.
Pic #3) The adapter: a 3/4" PVC Male Adapter from Menards worked perfectly to connect the bucket to the hose. You'll also need a 3/4" hole cutting bit. Once you cut the hole in the bottom of the bucket, the adapter will screw in pretty tightly. You can seal it if your bucket will be on your deck or patio, but I didn't bother because my bucket sits in the pool and doesn't have to be leakproof. I also splurged and put a quick connect onto the hose adapter after fitting it into the bucket (and the other end is on the hose from the pump).
Pic #4) The lid with holes drilled in: this might take some trial and error. You want the water to flow through with some pressure or the water won't reach all the fiberfill which will be less efficient. So just drill holes in the part that will be on the top of the bucket. If the pressure is too much, then drill some more. Also sand the plastic bits hanging off the holes or they will catch and snag the fabric underneath.
Pic #5) Fiberfill pillows: Get some super cheap, square cotton shop rags and sew little pillows for the fiber fill. Don't sew like a professional and turn the edges inside. These rags catch a lot of iron too and are easier to rinse if you leave the edges out. Trace a circle onto the top rag using the lid and then sew two rags together a little outside the line leaving an opening for the stuffing. Then stuff them with the fiberfill, and pop them back into the machine to close them up. It took me less than 15 minutes to make about 5.
Pic #6) Stuffing and emptying the bucket: Fill the bucket by placing an extra rag along the bottom (it will catch the bugs), then the 5 pillows, then another rag on top (if any holes do snag the fabric it will only get the rag and not rip a pillow). When emptying the bucket dump it out and lay all the pillows out. Rinse with the hose while stomping on them until the water coming out is mostly clear. Then dunk each pillow in a bucket of water and Iron Out. Swirl it around and squeeze a few times then give another quick rinse with the hose. Repack the bucket if you need to filter some more or throw everything in the washing machine if you are done. The rags are so effective at grabbing iron, you can layer one between each pillow if you have extra. It's more items to rinse out when cleaning though.
Pic #7) I also put skimmer socks over all 4 return jets to speed the process along. They are thin enough that they can be slipped into the ring, folded over, and screwed right back on with the eye inside.
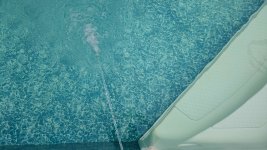
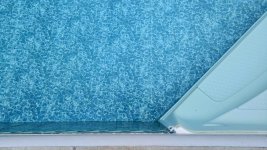
Pics #8)/9) Before and After shots: this is from topping up my pool with about 4-5" inches of water and then 24 hours of filtering. (I ran the setup for 12 hrs, rinsed the pillows, ran for 12 more hrs, then washed the pillows in the washing machine and put them away).
Notes:
--I have lowered the water level about 2 feet a couple times and the water turns a hideous brown. This method will get all that out but will obviously take longer.
--This was about $20 in parts (bucket, lid, rags, strap, adapter). I am not including the pool cover pump because I need to keep one on hand for the automatic cover anyway. You can reuse fiberfill from some old throw pillows.
--I go through this whole ordeal because I have an aversion to extra chemicals and spending money and I do not want to use a sequestration chemical every week. After the pool is completely clear I crush some Vitamin C tablets in a sock and scrub the steps, skimmer, etc. They turn white again almost instantly.
--I did try stuffing skimmer socks for the pillows but they got brittle in storage and tore easily after the second round of use.
Credit and thanks to lightmaster for the instructions and inspiration!


If you’ve got iron in your fill water, use Polyfill to remove it
EDIT: Found out this method only works if your iron is oxidized already, meaning it’s got a dull or bright green tint to the water, or a nasty brown tint. If you know you have iron in your fill water, but it isn’t oxidized yet, bring your pool to shock level and it’ll turn the telltale green...
The iron here in Central Indiana is BAD so I end up having to do this a few times a season when I top up the pool. It was a hassle for me to rinse all the loose fiberfill, however, because it trapped SO much iron (and bugs). So I wanted to post a modified version that I've worked up over the past year. I finished a round of filtering today and was able to clean everything up from start to finish within 15 minutes! So I wanted to share my modifications and parts too since my method for an inground pool is slightly different than OP's for an aboveground.
Anyway pics tell the story best so look at those while reading:
Pic #1) The bucket: A standard translucent 5-gallon bucket (so you can see when it's time to rinse). I switched to a screw-top lid because the regular lid popped off all the time even when strapped down. (Leaktite lid from Lowes)
Pic #2) The setup: I connect the bucket to my cover pump and place the pump and bucket on the top step. The bucket has to be strapped to something like the railing to keep it in place and it's fine if most of it hangs off the step as the strap will keep it securely suspended (cam straps work great). This Wayne WAPC250 cover pump costs about $165 but has been a workhorse.
Pic #3) The adapter: a 3/4" PVC Male Adapter from Menards worked perfectly to connect the bucket to the hose. You'll also need a 3/4" hole cutting bit. Once you cut the hole in the bottom of the bucket, the adapter will screw in pretty tightly. You can seal it if your bucket will be on your deck or patio, but I didn't bother because my bucket sits in the pool and doesn't have to be leakproof. I also splurged and put a quick connect onto the hose adapter after fitting it into the bucket (and the other end is on the hose from the pump).
Pic #4) The lid with holes drilled in: this might take some trial and error. You want the water to flow through with some pressure or the water won't reach all the fiberfill which will be less efficient. So just drill holes in the part that will be on the top of the bucket. If the pressure is too much, then drill some more. Also sand the plastic bits hanging off the holes or they will catch and snag the fabric underneath.
Pic #5) Fiberfill pillows: Get some super cheap, square cotton shop rags and sew little pillows for the fiber fill. Don't sew like a professional and turn the edges inside. These rags catch a lot of iron too and are easier to rinse if you leave the edges out. Trace a circle onto the top rag using the lid and then sew two rags together a little outside the line leaving an opening for the stuffing. Then stuff them with the fiberfill, and pop them back into the machine to close them up. It took me less than 15 minutes to make about 5.
Pic #6) Stuffing and emptying the bucket: Fill the bucket by placing an extra rag along the bottom (it will catch the bugs), then the 5 pillows, then another rag on top (if any holes do snag the fabric it will only get the rag and not rip a pillow). When emptying the bucket dump it out and lay all the pillows out. Rinse with the hose while stomping on them until the water coming out is mostly clear. Then dunk each pillow in a bucket of water and Iron Out. Swirl it around and squeeze a few times then give another quick rinse with the hose. Repack the bucket if you need to filter some more or throw everything in the washing machine if you are done. The rags are so effective at grabbing iron, you can layer one between each pillow if you have extra. It's more items to rinse out when cleaning though.
Pic #7) I also put skimmer socks over all 4 return jets to speed the process along. They are thin enough that they can be slipped into the ring, folded over, and screwed right back on with the eye inside.
Pics #8)/9) Before and After shots: this is from topping up my pool with about 4-5" inches of water and then 24 hours of filtering. (I ran the setup for 12 hrs, rinsed the pillows, ran for 12 more hrs, then washed the pillows in the washing machine and put them away).
Notes:
--I have lowered the water level about 2 feet a couple times and the water turns a hideous brown. This method will get all that out but will obviously take longer.
--This was about $20 in parts (bucket, lid, rags, strap, adapter). I am not including the pool cover pump because I need to keep one on hand for the automatic cover anyway. You can reuse fiberfill from some old throw pillows.
--I go through this whole ordeal because I have an aversion to extra chemicals and spending money and I do not want to use a sequestration chemical every week. After the pool is completely clear I crush some Vitamin C tablets in a sock and scrub the steps, skimmer, etc. They turn white again almost instantly.
--I did try stuffing skimmer socks for the pillows but they got brittle in storage and tore easily after the second round of use.
Credit and thanks to lightmaster for the instructions and inspiration!


