Leak Intex outlet hose connections

Nduf

New member
Mar 22, 2020
2
Florida
Hi,
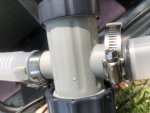
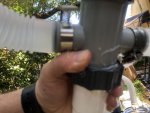
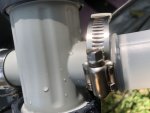
I’m filling up my Intex ultra xtr 12x24 for the first time. As the water reached the dual outlets, I have now noticed a leak where the two outlet hoses connect to the connector. Photos attached.
There is a small stream coming from each hose and I have tightened the metal clamp as much as possible. As you can see in the photos, I brought each hose only up on to the connector to where the plastic ridge in the hose was in line with the o-ring on the connector. Was that correct? Or should the hose go further up on to the connector? Directions weren’t super clear.
Anyway, any advice for correcting this leak? I’m afraid if I loosen the metal clamp, the hose may come off completely and the force of water will prevent me from reattaching the hose until the water drains down below the outlet.
Thank you!
 

Attachments

  • 59AC7A01-5D14-479F-932D-9F5C2D100255.jpeg
    59AC7A01-5D14-479F-932D-9F5C2D100255.jpeg
    159.5 KB · Views: 34
  • 77A54FD6-5DCA-4AFD-B7E4-906D72380F32.jpeg
    77A54FD6-5DCA-4AFD-B7E4-906D72380F32.jpeg
    205.5 KB · Views: 35
  • 96ACD3AE-537A-4F22-8C91-89F9D1B70EAB.jpeg
    96ACD3AE-537A-4F22-8C91-89F9D1B70EAB.jpeg
    143.3 KB · Views: 30
I have never assembled that but it looks to me like the hose needs to be pushed higher onto the connection. I think you need to drain the pool down and use some liquid soap to lubricate the pipe to slide it deeper in the hose then clamp it.
 
There should be a black O ring at each of the smaller 1.25” hose connectors. Depending on how old the part is it’s possible that the O ring has gotten brittle and cracked or even come off entirely. Remove the small hoses and make sure the O rings are in place.

If the O rings are in good shape, I’ve also had problems where installing the hose on to the connector will stretch the O ring out and part of it will come out of it’s groove. It’s hard to tell after the hose clamp is on, but since the hoses are somewhat clear you can usually look through the hose and make sure that it looks like the O ring is in place before you install the hose clamp.

Usually twisting the hose as you install it and sometimes moving it back and forth a little is enough to get the O rings to seat back in place. A little silicone grease can also help to lubricate and seal the O rings.

That said, I have two of those T connectors sitting in a box that I’m not using. If you can’t fix yours and you’re anywhere near Orlando then I’m happy to give you one of mine. I’d rather see it be used than just sit in a box and do nothing.
 
Actually, I just took a closer look at your pictures and it doesn’t look like the hoses are installed correctly. The hose should be pushed on more and the hose clamp should be installed over the flat area that I have circled in red below. Make sure that part of the hose and the hose clamp itself are over the black O ring. Again, make sure that the O rings stay seated in their little grooves as you insert the hoses and you can use some silicone grease to help lube things and make it easier to install.

45D803D2-D91D-424F-A637-2C8B42375D04.jpeg
 
And one more thing... as far as water coming out, you should have gotten little black caps for the bulkheads in the pool. You can unscrew the strainers and put the black caps over openings which will prevent water from draining as you disconnect the hose clamps and reconnect them correctly. If you don’t have the black caps you might be able to improvise with something else, or even have a helper hold their hands over the bulkheads to stop most of the water.

Or worst case, just leave them open and try to work quickly. You’ll make a bit of a mess and get water all over, so be prepared for that, but the water pressure shouldn’t be enough that it will stop you from being able to reconnect the hose. It will be a little more difficult to work with water spraying out all over though, so one of the above options might be a better plan.
 
This video may help...

I took a quick scan through the video and I didn’t really see anything there about connecting the 1.25” hoses. Most of the connections they showed were the 1.5” screw on hoses.

However they it did show how to install the little black plugs that I mentioned above at about 3:15 in the video. That will stop the water from draining out of the pool as you fix the hoses. Remember to block not only the suction ports that you are working on, but also the return port.
 
Thanks everyone! The hoses were not installed far enough and I was able to close the valve and move the hose farther up to the red circled area in the photo above. That did the trick and o-ring stayed in place. No more leaks!
many thanks!
 
Thread Status
Hello , This thread has been inactive for over 60 days. New postings here are unlikely to be seen or responded to by other members. For better visibility, consider Starting A New Thread.