How do you push foam rope into main drain line for winterizing???

MostlyCanuck

Bronze Supporter
Mar 19, 2021
186
Toronto, Ontario, Canada
Pool Size
15000
Surface
Vinyl
Chlorine
Salt Water Generator
SWG Type
Pentair Intellichlor IC-60
For those of us (minority on this forum it seems) that have main drains plumbed to skimmer, air locking the line is not an option and in freezing climates most common approach is to stuff foam rope (closed-cell, backer rod) into the line from the skimmer and then plug the line. That's what I've seen my PB do last year, too. Except..... I have no idea how you do it. Can't figure out how to push 2 ft worth of foam rope into the line (I need 2 ft to reach the frost line) as the water pressure floats it back up. Any suggestions please???? How do you all do this?
Thx!
Can’t you get an air lock on the line using the valve when you blow out the lines?
 
My main drain isn't tied into the skimmer so never needed to do it.

I think you just push it down with your fingers or use a wooden dowel to help push it down.
 
You have 4 months to practice, lol. As you know as you watched it being done, it is possible. Don't get upset when you are down to the last inch and just as you finger across for the plug the foam shoots up over you head. The bigger the foam the easier, hard to find but there is 1" out there.
 
You have 4 months to practice, lol. As you know as you watched it being done, it is possible. Don't get upset when you are down to the last inch and just as you finger across for the plug the foam shoots up over you head. The bigger the foam the easier, hard to find but there is 1" out there.
ahahah really? I mean, yes it can be done but... I've tried a bunch and I can push down maybe a foot but 2-3 ft is nuts! there's gotta be a tool out there to make it work! (also, I think trying to do it now perhaps is harder as the water level has an extra foot at least compared to when it's winterized.. I suppose that means more pressure to fight maybe) but still... I was hoping for either a v clever technic or maybe a gadget that fixes it!!!
 
Zip tie it to a 1/4 inch (?) dowel and the dowel will give it enough rigidity to be pushed down
 
  • Like
Reactions: 1Sammy
Zip tie it to a 1/4 inch (?) dowel and the dowel will give it enough rigidity to be pushed down
clever. over the weekend I actually tied something similar with a drain clog remover like the one linked here. however, it really didn't help much. beyond the first 6" or so, it's like hitting a wall!
 
Is it hitting a 90 ?
the line that runs from the skimmer basket to the main drains is flex pipe and how knows the bends in there. I'm not sure.

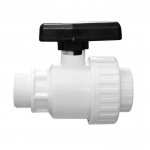
however, I had a thought!! what if I place in the skimmer basket, on top of the main drain line, a 1.5" threaded ball valve like this one (
going where you would otherwise plug the line)? that way I can blow the line with the cyclone and then close the ball valve right in the skimmer basket to create an air lock. to me is seems a smart idea but I have never seen it mentioned as an approach... which makes me think there's something very wrong with it!!!!! any thoughts anyone??


intl-leisure-prod-inc-repair-fittings-and-pipe-swimline-ball-valve-male-threaded-female-socket...jpg
 

Enjoying this content?

Support TFP with a donation.

Give Support
I have played around with such ideas over the last 43 years of closings. To do as you mentioned you would need to use the proper length of pipe to you can screw on the valve as it needs a turn radius which will have to be the skimmer mouth. Unless you come up clear of the skimmer but will be hard to cover that to keep rain and snow out. With the pipe used back in the day usually it is just a run with a slight curve from the skimmer to the main drain. It will run through the concrete "footing" poured around the walls (if done that way).. If there is a 90, my guess it they ran that line and installed the skimmer after that pour and had to go around it. Will be a good trick to get foam rope down there. Try a #12 wire and tape the foam to it at the going down end and you might get it around that bend. Remember if you get something down there it will also have to go below enough to screw the plug in. Wondering how you PB did it ?
 
For those of us (minority on this forum it seems) that have main drains plumbed to skimmer, air locking the line is not an option and in freezing climates most common approach is to stuff foam rope (closed-cell, backer rod) into the line from the skimmer and then plug the line. That's what I've seen my PB do last year, too. Except..... I have no idea how you do it. Can't figure out how to push 2 ft worth of foam rope into the line (I need 2 ft to reach the frost line) as the water pressure floats it back up. Any suggestions please???? How do you all do this?
Thx!
My skimmer is connected to my drain but they are connected via individual ball valves and a T fitting to the pump back at my pump house. However, I installed a valve on my skimmer widget that would still enable the establishment of a pressure lock at the drain for the minority of forum members you mentioned. Perhaps I would buy a quicker to open/close valve than the one I installed on the top end of my skimmer widget, though I think I could make do with what I've got too.

Here's how I've done it now four times for our N. Central Idaho winters. (I just opened only yesterday with 59 degree water, due to a long cold winter and spring but, like previous years, I still had a solid airlock and a lot of air came out as the water rushed into the drain when I opened the airlock.)

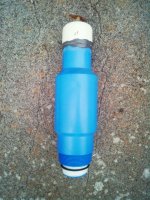
Though there are other methods and tools that would work, I modified a skimmer widget and attached a brass valve on its top end. I used this kind of valve:
https://www.amazon.com/Air-Compressor-Drain-Valve-Tank/dp/B075JP2CS7

It's not easy to attach it to the skimmer widget though, because it's tough to get an adhesive to bond to the blue polyethylene plastic (or whatever it is). I was able to rough up the blue plastic on a coarse belt sander and then bond a PVC cap to it with JB Weld, I also applied a nice fillet along the cap edge too. The PVC cap has enough meat on its end to drill and tap it for a valve. I've often thought that someone should produce a skimmer widget with a valve so maybe it already exists!

I next close my multiport valve to my returns to only enable only the the airflow/waterflow between the skimmer and the drain. I deal with the returns last. Sometimes I install a rubber plug at this time to seal the input from the skimmer/drain T-fitting to the pump, which is probably less risky to the expensive and fragile multiport "spider" o-ring seal, if too much air pressure were to be applied while clearing the water from the drain plumbing. (Worst case, only the rubber plug might blow-out, with some force though!) Other times I install the rubber plug as backup to my ball valves later.

After installing my modified widget in the skimmer port, I use a rubber-tipped air blow gun, with tip inserted strongly against the open widget valve, to clear the line of water (valve opened just enough to get good airflow with no "extra turns" open on the valve that would slow closing it). I blow the lines out until big bubbles blow out the drain and then I yell for my assistant to close the Pentair ball valve to the drain while I simultaneously close the skimmer widget's valve. To make this work having no ball valves in the system, one would fully close the valve on the skimmer widget before fully removing the air supply. I try to adjust my air compressor regulator to an adequate plumbing safe value--say 40 psi max.

Just in case my ball valves leak a little, I make sure the widget's o-ring seals at the bottom end too, but I also back it up with a good application of Teflon tape on its threads. In the case where the plumbing between the skimmer and drain remain connected, the widget's seal and its installed valve seal must remain air-tight for the entire winter to maintain the airlock in the drain plumbing, as must the connection on the pump end too. Though necessary for a system lacking the ball valves, I only endeavor to make my skimmer line air-tight for backup purposes. I also remove the pump's input side from the plumbing and I place a rubber stopper into the PVC pipe that feeds the pump. Again, I don't trust the drain ball valve to hold the pressure lock alone.

In my case, I've already drained the water level down below the skimmer so no water can enter the simmer line so there's no rush to establish these "backup" precautions.

This is our fifth season with our pool in Idaho and I lost some sleep after closing the first couple of years, but it's worked very well for me. It's also possible for me first clear the drain with the airlock at its ball valve and then dump a couple of gallons of pool antifreeze (insurance) down the skimmer plumbing. By quickly opening the drain ball valve while applying air pressure to the skimmer a second time, I can drive some antifreeze into the drain plumbing, but the timing has to be just right to stop the air flow and re-establish the pressure lock just as the bubble first come out the drain. Otherwise all, or nearly all, of the antifreeze will just be blown into the pool! It's easy to have to start all over again, if the timing is off and I don't think this "insurance" is necessary, but then again, my airlocks have always held.

The returns are a similar process, but I connect the air hose to the pump's strainer side and drive the water and then air out the returns while I plug them with rubber stoppers (still below water level...brrrr!) when they bubble well. On the last return, I call for my assistant to quickly dial the air compressor regulator to zero as I shove in the last return plug. Simply pulling the hose is too quick for my timing!

The foam method might be more reliable, especially given no "backup" seal precautions, but I hate shoving anything down my skimmer, and I'd fear that some part of the foam blockage might become dislodged and become permanent. I'd certainly not want to forget to remove it and suck it further down the line when starting the pump back up!
Thank you for the detailed suggestion. What is the “widget” you keep referring to where the valve was installed?
 
Lines usually run straight down, or have a slight curve. Push down with your fingers as far as you can go. Even if some sticks out, that is fine. A bottle of antifreeze in the skimmer housing is also recommended if not using a Gizmo.
I just found a pic of when pool was built and noticed they installed a 90 right at the skimmer and then flex pipe from there to the drain underneath the wall and footing. I think my problem might be that I’m using very thick foam rope (1”) which can’t bend through that very first 90. I’m gonna try 5/8” or smaller… though I wonder if a smaller diameter will be much effective.

Btw - @Catanzaro , i read a couple older posts of yours from several years ago recommending a rubber blow through plug with compressor at low PSI for a set up like mine instead of foam rope. Do you still think today those plugs hold enough air lock and that 20ish PSI is enough to push water out of 8’ deep MD? If this foam rope idea fails me, your set up might be next best for me….
 
Last edited:
Thank you for the detailed suggestion. What is the “widget” you keep referring to where the valve was installed?
I simply cut off the top of the blue skimmer widget and bonded the PVC cap to it. (I drilled and threaded the PVC cap 1/4" NPT size for my valve, I think, with a tap.) I recall that I purchased the valve from Harbor Freight. They are used to drain moisture from air compressor tanks. I also have one on the top of my Sandpiper sand filter to bleed-off air.

A tiny dab of Boss 820 (or other) o-ring lube on the rubber tip of my air compressor blow gun permits me to easily spin the valve closed while I'm still triggering the blow gun against the valve.

A simple lever "on"/"off" valve might be better, but this is the one I've used. An air hose quick disconnect connector might work too, but I don't trust them to last a winter and hold pressure in adverse conditions.

Be sure to use a new o-ring every year and back it up with fresh Teflon tape too. There are better adhesives than JB Weld for plastics like polyethylene and nylon--some of them are urethanes (or maybe even JB Plastic Weld would be better than the classic JB) but "high energy" plastics like polyethylene are difficult to bond. JB Weld sticks to the PVC fitting very well but the blue plastic must be aggressively sanded first.

I do shove old pool noodle foam into the strainer too, but not down the plumbing, which is held evacuated of water under pressure lock.


skimmer_widget_mod.jpg
 
Last edited:
  • Like
Reactions: lrpsrp
Thread Status
Hello , This thread has been inactive for over 60 days. New postings here are unlikely to be seen or responded to by other members. For better visibility, consider Starting A New Thread.