Going to be re-plumbing my pad...

Bama Rambler said:
With a 3-way you would be able to have 100% of either, both or a percentage of one or the other. To have 100% of both lines you just turn the gate completely to the back side of the valve (handle in line with the middle port).

I don't recommend a check valve except in special situations (i.e. solar).

Ahh...see that, i learn something new everyday (well almost everyday) so a check valve only when I decide to go with solar in the future ....any best practices for the tee's I will need to install and cap off for the supply/return for the solar for now, this way I can add the solar set up easily later down the road?
 
With PVC being so easy to work with I don't know that I'd bother doing anything special for the solar install until you're ready to install it. If you do want to stick a couple of tees in the lines, Be sure to leave enough stubbed out the branch to attach to.
 
Bama Rambler said:
With PVC being so easy to work with I don't know that I'd bother doing anything special for the solar install until you're ready to install it. If you do want to stick a couple of tees in the lines, Be sure to leave enough stubbed out the branch to attach to.

That sounds like what I'm going to do, was thinking on just putting a tee on the supply and return lines and then a valve on each as well...I'm assuming most people supply their solar after the filter and chlorine injection point , then return back to the pool return header?
 
jblizzle said:
Solar loop is typically after filter, but before adding chlorine (SWG, chlorinator, liquidator, etc).

Huh...i would have thought you would want the chlorine injection prior to the loop? But after thinking about it I guess so long as you FC levels are fine then you shouldnt have any issues with anything wanting to grow in your solar panels....Thanks Jason....
 
Looking at the Jandy 3-way neverlube valves, they have the one valve that is 1.5" on the inside and 2" using the OD of the ports, then they also have the 2" inside 2.5" using the OD...Is there that much of a benefit on getting the 2-2.5" valve since I'll be running all 2" pipe ? Compared to the 1.5-2" valve that uses the OD of the port for 2" applications?? Or am I splitting hairs at this point??
 
I just installed some of the Pentair valve and the Jandy are the same. The smaller # is the pipe size that slips inside the valve. The larger # is the pipe size that matches the port and requires a coupling to attach together.

I would recommend using the valve size that allows the pipe to slid in. Minor cost difference and actually the smaller valve does have more internal restriction than the larger valve ... this can be seen just looking inside the valves. I happen to have 2-ways for the 1.5-2 and the 2-2.5 that I just looked in. With 2 inch pipe, better to go with the larger.

I am going to try to add a photo with my phone.

ate7yby6.jpg


Posted from my Droid with Tapatalk ... sorry if my response is short ;)
 
jblizzle said:
I just installed some of the Pentair valve and the Jandy are the same. The smaller # is the pipe size that slips inside the valve. The larger # is the pipe size that matches the port and requires a coupling to attach together.

I would recommend using the valve size that allows the pipe to slid in. Minor cost difference and actually the smaller valve does have more internal restriction than the larger valve ... this can be seen just looking inside the valves. I happen to have 2-ways for the 1.5-2 and the 2-2.5 that I just looked in. With 2 inch pipe, better to go with the larger.

I am going to try to add a photo with my phone.

ate7yby6.jpg


Posted from my Droid with Tapatalk ... sorry if my response is short ;)

WOW, what a size difference ....definately going with the 2-2.5" valve, looks like it'll be worth the $2-3 more :) any specific reason you went with the Pentair rather then neverlube? Does the pentair have a lifetime warranty as well? ?
 
Just found a better deal on the Pentair valves. Warranty is the same i think.

Also Pentair is the only one that has a "solar" 3-way which had a check valve built into the diverter to allow the panels to drain even if the valve is closed. Some people just drill a small hole in the diverter. Or you can add a solar bypass that allows the solar supply side to drain out the solar return ... which I did as well.

Probably more info than you were asking for ;)

Posted from my Droid with Tapatalk ... sorry if my response is short ;)
 
Probably more info than you were asking for

Nope, NEVER too much info. I'm actually planning on adding a solar heat panel or 2 in the future (maybe next season?) and since I'm re-plumbing my whole pad and configuration all ideas are very much appreciated :) If I understand correctly from some reading on a few posts here, the solar loop tap off should be right after my filter outlet, through the panel, then right back into the filter outlet line just prior to my sodium hypo injection point ? So I guess all I would need for right now is the 1st Tee right after the filter (or can just put a 3-way valve in its place ?) then another Tee for the heated water to return to the system just a bit further down the pipe? I can worry about the rest of the loop (air release, check valve,piping, etc.) at a later date when I actually decide to do the rest...??

Now back to the valve differences,reading a bit on pentairs site they recommend air temps above 104deg to use CPVC rather then PVC ?? Is that the only difference in the 2 types of material used ? Of course the price jumps quite a bit, so now I'm curious if I need to spend the extra$$ if that's all the difference is ? I haven't looked yet but I would imagine the same goes for the Jandy neverlube valves as well, seems like the Black valves are CPVC and the Grey is regular PVC ??
 

Enjoying this content?

Support TFP with a donation.

Give Support
Yes the black is CPVC and the NeverLube only come in CPVC. I think the grey Jandy do not have the same warranty.

Out of the filter I entered the 3 way valve and then put a stub and cap on one side for future solar. The solar return entered a tee just to the other side of the 3 way. I again put a stub and cap and later added a check valve when I cut the caps off to add solar.

Posted from my Droid with Tapatalk ... sorry if my response is short ;)
 
jblizzle said:
Yes the black is CPVC and the NeverLube only come in CPVC. I think the grey Jandy do not have the same warranty.

Out of the filter I entered the 3 way valve and then put a stub and cap on one side for future solar. The solar return entered a tee just to the other side of the 3 way. I again put a stub and cap and later added a check valve when I cut the caps off to add solar.

Posted from my Droid with Tapatalk ... sorry if my response is short ;)

Excellent, sounds just like what I plan on doing except originally I wasn't planning on installing a 3 way for the solar, but now that seems like the way to go , Thanks Jason... So do most people just go with the CPVC to play it safe with the temps? Or I guess it all depends on geographic locations really, all my equipment is in a pump house, out of the elements and with a window and door for a cross breeze if needed on those somewhat 90-100 deg days sometimes here in NC...Even with the temps here that get somewhat close to the 104 limit I may just end up going with the CPVC ones anyway ??

Thanks for all the input, cant wait to get started on the ripping things apart soon, leveling the floor, installing a few 24" pavers and starting the process..Of course the pics will be coming as I get started and show some progress :)
 
The Demo begins... Finally:)
[attachment=0:1xa1xfrx]uploadfromtaptalk1364523759315.jpg[/attachment:1xa1xfrx]
[attachment=1:1xa1xfrx]uploadfromtaptalk1364523823979.jpg[/attachment:1xa1xfrx][attachment=2:1xa1xfrx]uploadfromtaptalk1364523883709.jpg[/attachment:1xa1xfrx]

Sent from my DNA using Tapatalk
 

Attachments

  • uploadfromtaptalk1364523759315.jpg
    uploadfromtaptalk1364523759315.jpg
    141 KB · Views: 85
  • uploadfromtaptalk1364523823979.jpg
    uploadfromtaptalk1364523823979.jpg
    71.4 KB · Views: 86
  • uploadfromtaptalk1364523883709.jpg
    uploadfromtaptalk1364523883709.jpg
    105.8 KB · Views: 87
Well, finally have a couple weeks off and started right in on the pool pump house, got some done today...Moved the electrical panel, actually upgraded to my old house panel that I held onto after replacing it last year :cool: a bit large but alot more room to mess with things..

I'm at the point now where I dug down a bit to my suctions and return piping and thought I had 4 flex pipes but it turns out just my skimmer and MD are flex and my return header and dedicated vac line is hard piped ? Any reason why the installers would have mixed it up like that ??

Anyhow , below are some progress pics after today and was curious if anybody had any good recommendations for the transfer from what I have to 2" PVC so I end up having all 2" Hard pipe manifold all above ground and then start working with my 3-way valves and piping over to the right corner to my new pump :cool:

1.Any best practices when converting from flex pipe to a 1-1/2 to 2" PVC adapter, specific clue or cleaner ? or just regular old PVC clue ?
2.Should I try to keep the clued adapter above grade for leak checks, or it don't matter and bury it?
3.Is it best to keep the height of the valves to a minimum or basically personal preference?

Any other tips at all is much appreciated

IMAG0591.jpg


IMAG0595.jpg


IMAG0596.jpg


IMAG0594.jpg
 
Can't see the pix. The link in the IMG tag needs to end in a .jpg I think.

Regular PVC primer and solvent should work fine on the flex to rigid connections. How far back did you dig? Wondering if only the last little bit was done with the flex.

Valve height is personal preference really. If you elevate the pump some, then the suction ones could still be below the pump intake.

Just leave yourself a lot of straight pipe between everything so that you have the ability for repairs in the future. Builders seem to pride themselves on putting all the $50 valve right next to each other with no pipe exposed ... results in simple repairs become much more difficult and expensive.
 
jblizzle said:
Valve height is personal preference really. If you elevate the pump some, then the suction ones could still be below the pump intake.

So its best for my pump suction to have my suction valve/piping at or below the pump suction fitting itself?? If I wanna raise the vavle a little I need to elevate the pump right?
 
The only reason I thought that is because if you put the suction valves above the pump, you will have to add more 90 degree turns to get back down to enter the pump, which just adds a little head loss and lower the flow rate a bit.

The fewer turns the better ... but in reality not too important.
 
jblizzle said:
The only reason I thought that is because if you put the suction valves above the pump, you will have to add more 90 degree turns to get back down to enter the pump, which just adds a little head loss and lower the flow rate a bit.

The fewer turns the better ... but in reality not too important.

Sounds good thanks, I was originally trying a new cloud storage (Box) and couldn't get it right with the pics, decided to revert back to the way (google) I know how to do with adding pics and walla...done

I'll be on it in the morning, gotta get it prepped then level the floor and lay the 2'x2' pavers down level and see where the pumps new home is going to be, then I'll be able to see the big picture with running my piping and valves..... :-D
 
Well long day playing in the dirt but got some of the hard stuff atta the way :party: 
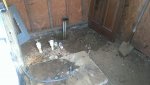
Anyhow, I fortunately ran into a HVAC contractor at Lowes this morning looking at the same type of pavers I was thinking on originally using and in our brief conversation talked me into going to the HVAC supply house he uses and go with the composite slabs they use nowadays for AC compressors, VERY GLAD I did, so much simpler with just the 2 pieces rather then the multiple pavers, and a whole lot easier on the back :lol: I was originally going to put my filter in the corner then "BAMA" made a comment a while back in this thread about maybe wanting a bit more room around the actual filter so I think the filter in the middle will work much better?? And to the right of the filter will be my 15 gal Hypo Drum and my Peristaltic pump...

Below is a few more progress pics, couple quick questions too...

1. Think its necessary to mount my pump on some rubber ?
2. Should I even screw it down as well ?? Or will the piping and weight of the filter once its tied in be enough?
3. Need to decide if I'm better off with a pressure side or suction side vac port ?? Kind of tired of the Polaris 360, may wanna try the MX-8??

Slowly but surely its coming together, now I just have to figure the best way to hook everything up with my 3-way valves and piping....Any fittings or connections I need to think about adding into the system that anyone can think of ? I'm adding a 3-way solar for future use already....

IMAG0599.jpg


IMAG0600.jpg


IMAG0601.jpg


IMAG0602.jpg


IMAG0604.jpg
 
For whatever reason, I can only see 2 of the pictures. But wanted to throw this out there: How easy is it going to be to get to the pump basket with the pump there once all the pipes are in place?

Might consider putting the pump on the right and the chlorine on the left?
 

Enjoying this content?

Support TFP with a donation.

Give Support
Thread Status
Hello , This thread has been inactive for over 60 days. New postings here are unlikely to be seen or responded to by other members. For better visibility, consider Starting A New Thread.