
Expansion joints – or more appropriately called isolation joints – are an essential part of constructing a structurally sound pool and deck. Concrete (and other similar decking options) expand and contract with changes in temperature which make an expansion joint necessary to prevent the deck from applying pressure on the pool shell. If not for the expansion joint, pressure from the deck can cause the coping and tile to crack or dislodge. Under extreme cases the bond beam can develop cracks leading to failure of the beam and allow the entry of water and root systems from nearby landscape causing further damage.
The type of expansion joint varies based on the type/style of coping used but generally should be at least ½” thick of unobstructed compressible space for vertical joints and a “decoupling” joint for horizontal joints.
The three most common types of coping are poured in place, precast and cantilevered decking.
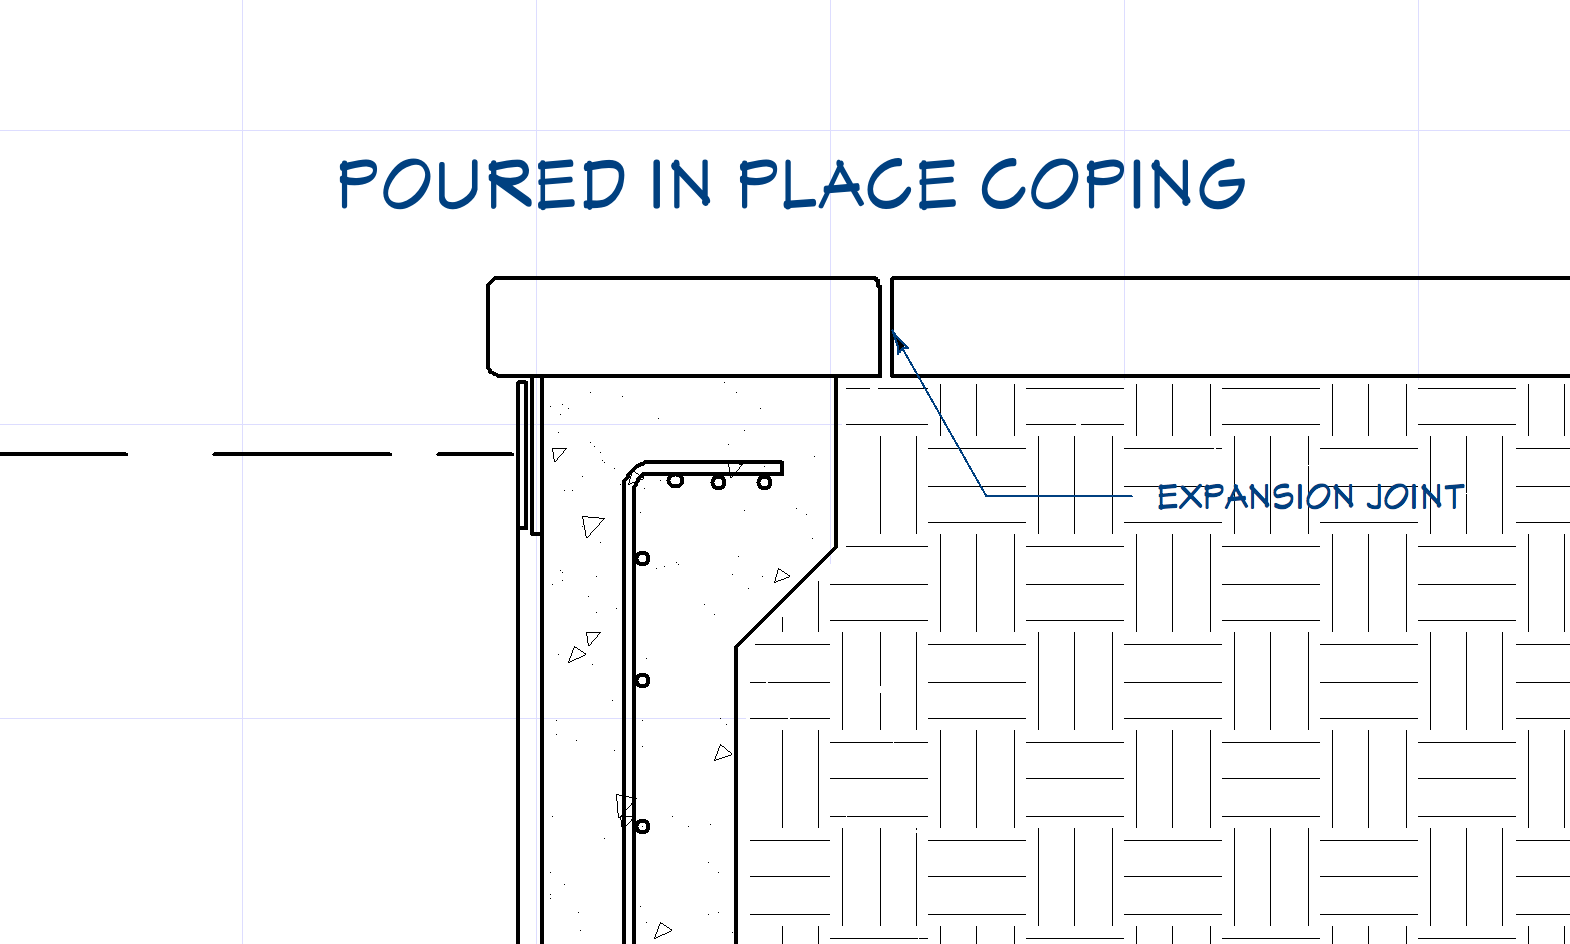
Poured in Place
Forms are placed using the shell for support and concrete is poured directly on top of the bond beam. The coping is usually as wide (or wider) than the bond beam (roughly 14”-16”). Control joints should be saw cut or tooled at 24” intervals but the closer the joints are, the less chance of shrinkage cracks developing. Tile is usually placed after the coping is poured to not interfere with the forms but can be installed prior if Stegmeier type forms are used.
The expansion joint is placed between the coping and deck and extend vertically the entire thickness of the deck and pool shell (if exposed).
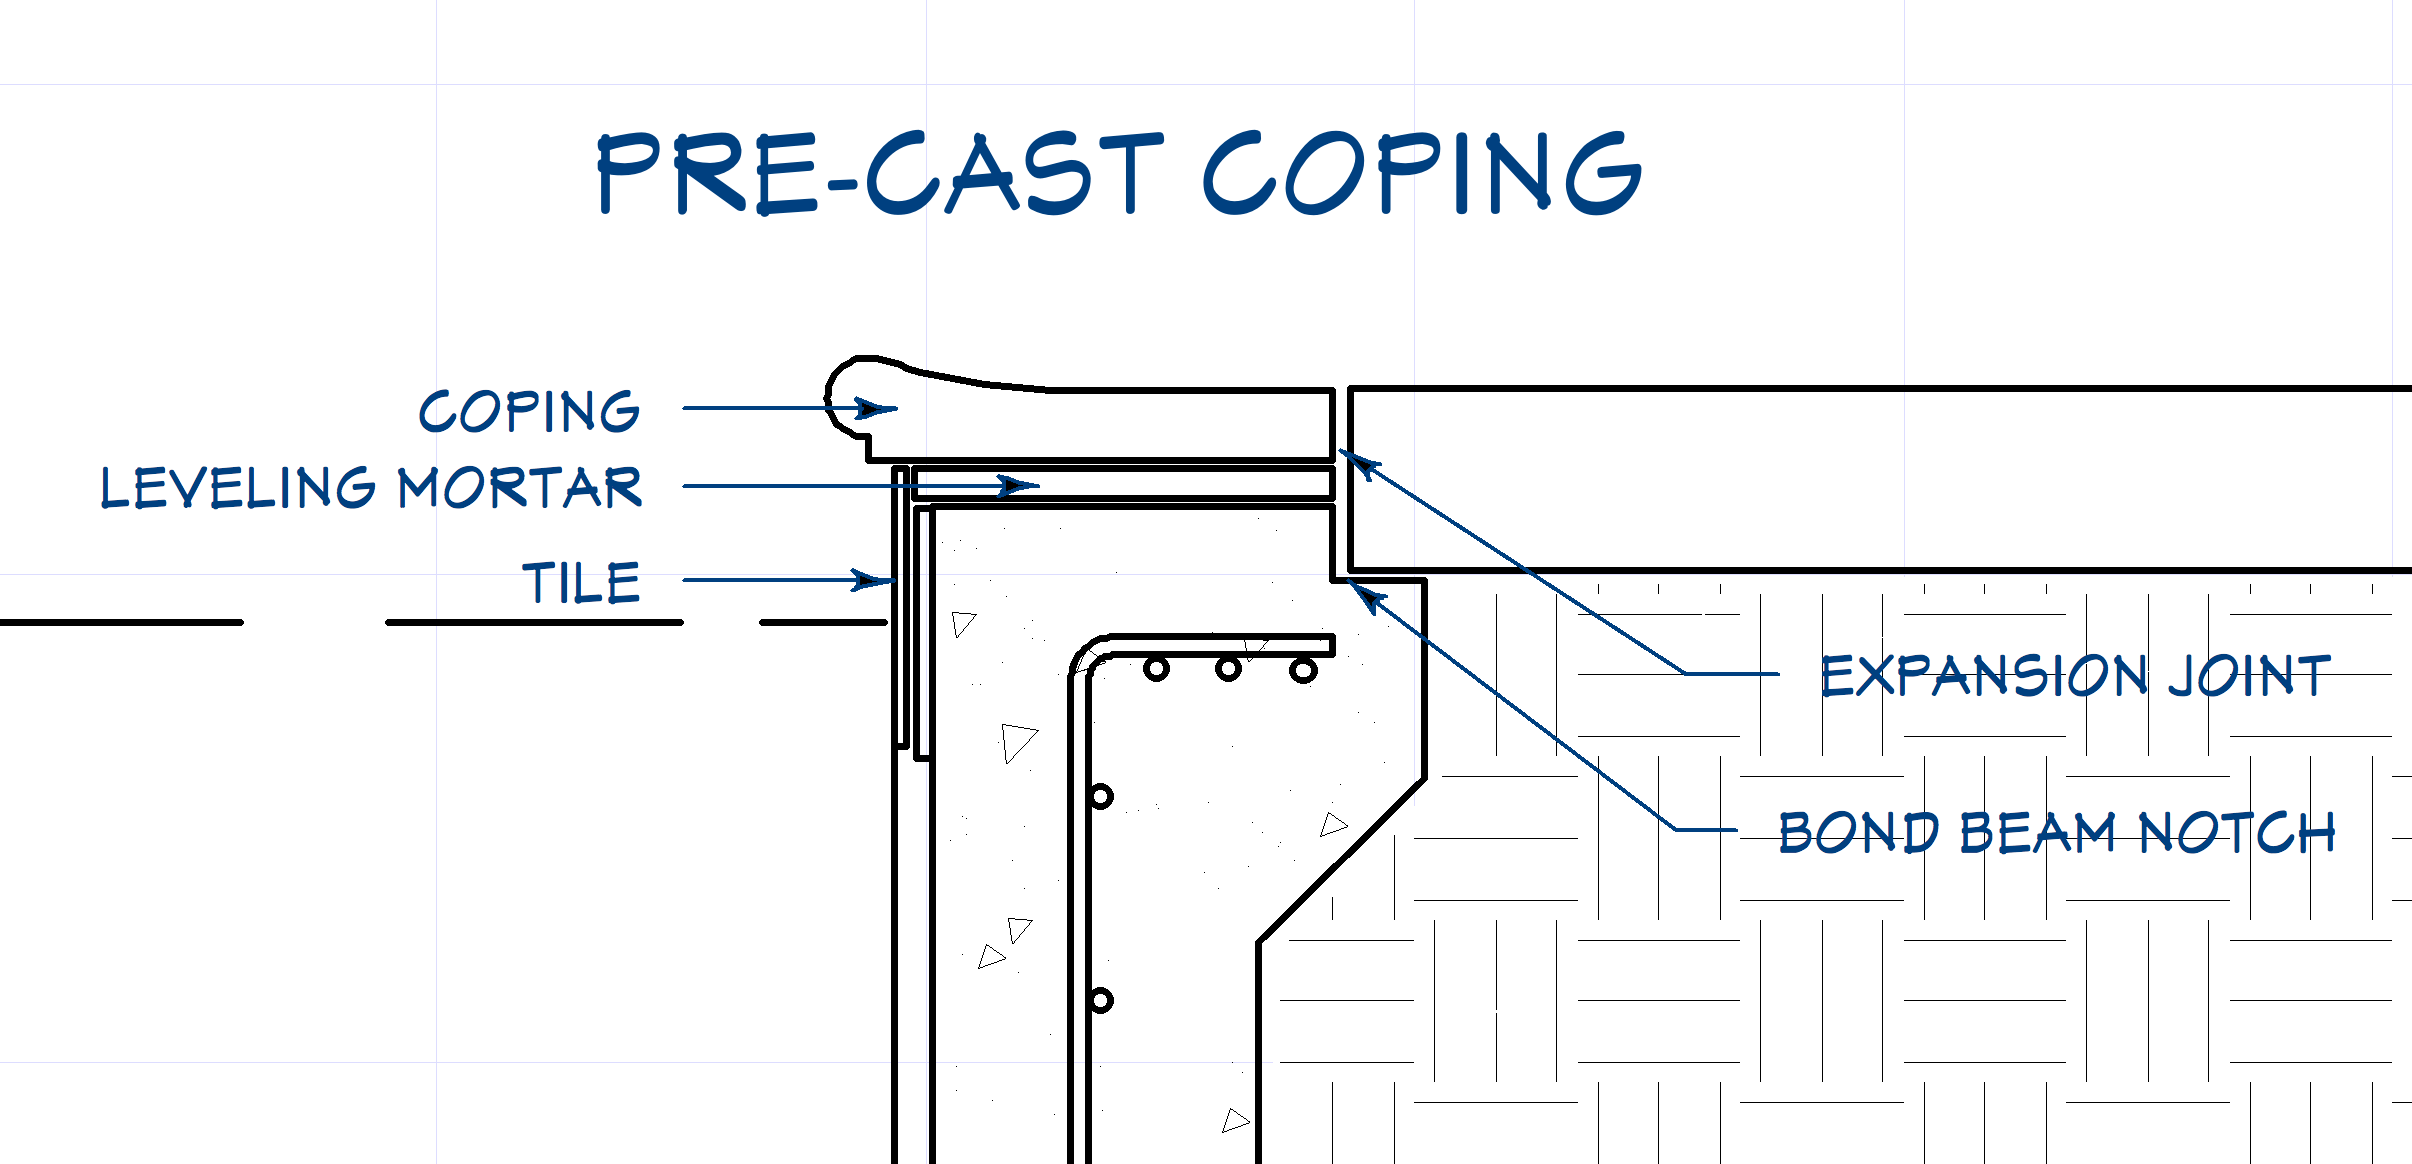
Precast Coping
Coping is pre-made separate from the pool and can be a safety type coping (pictured), stone, pavers, etc. Tile is typically installed prior to the placement of the coping to establish a level waterline and aid in setting the coping pieces though it can just as easily be installed afterward. A mortar bed is placed on top of the bond beam to level and secure the coping in place.
In some cases, the precast coping will not be as wide as the bond beam and a notch on the backside will need to be made either during the placement of the gunite/shotcrete or saw cut after it has cured.
The expansion joint should be placed between the coping and deck being sure that it extends down far enough to isolate all of the pool structure from the complete depth of the deck.
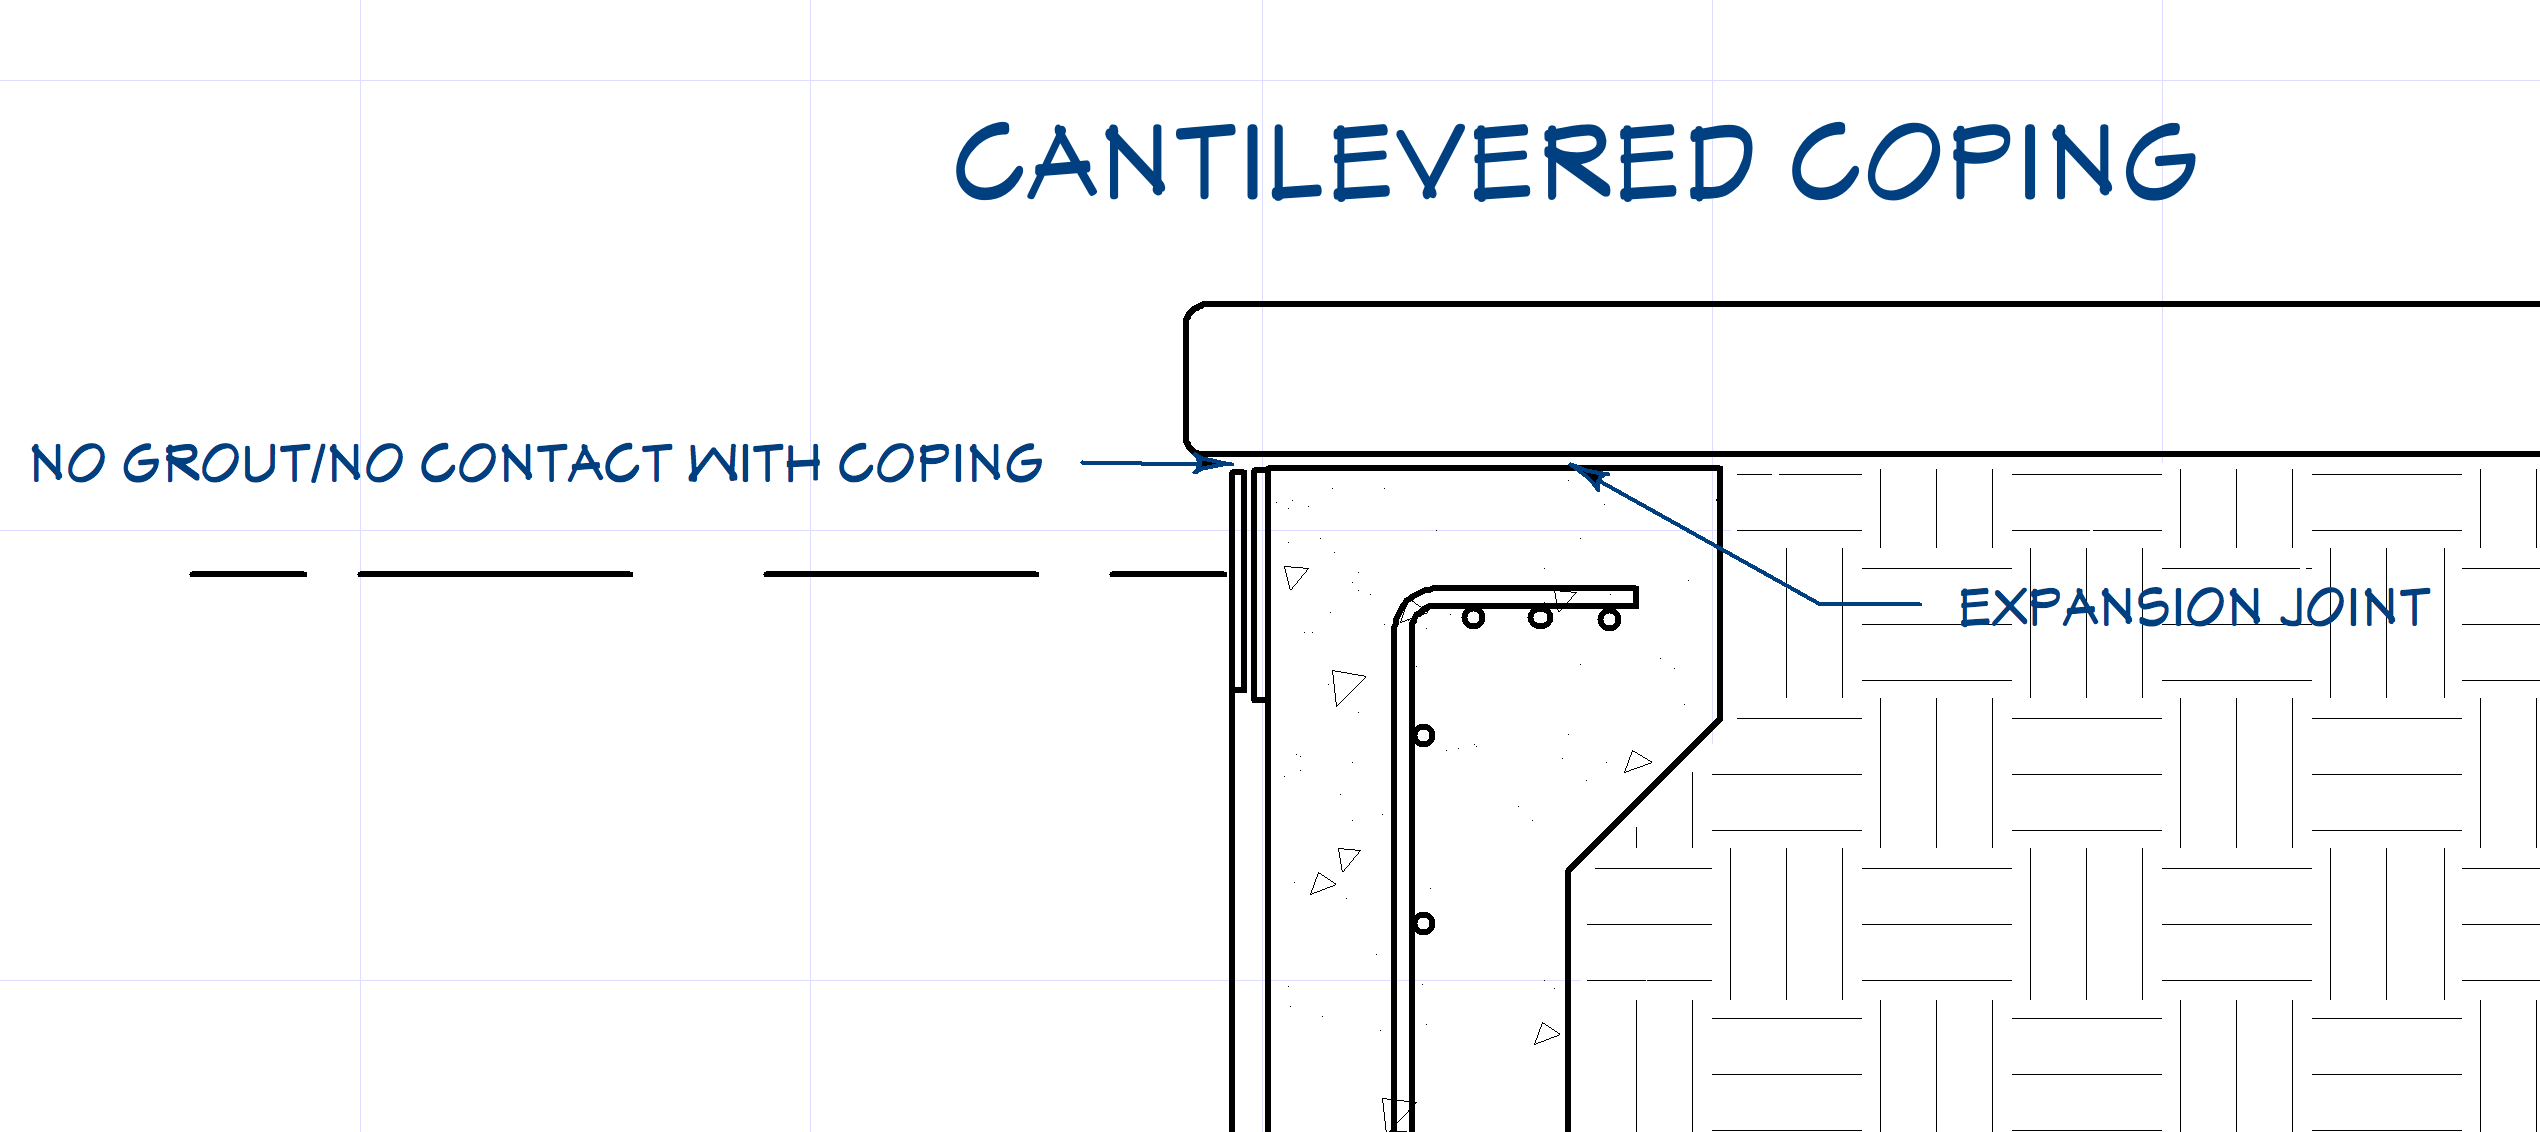
Cantilevered Deck
The decking is also used as the coping which is placed in one continuous pour to create a seamless looking deck. Prior to pouring the deck, the level of the grade should be brought up to become level with the top of the bond beam and be very well compacted.
A “decoupling” expansion joint should extend across the entire width of the top of the bond beam to allow the deck to move independent of the pool shell. This joint can be created with a 4mm plastic sheet or 2 layers of roofing felt underlayment.
It is very important that the waterline tile is installed after the deck is placed so there is no chance of the deck expanding and popping off the tile (see tile placement in the diagram). The tile can be grouted as usual but the top joint between the deck and tile should be filled with a flexible sealant that is not silicone based.
The type of expansion joint varies based on the type/style of coping used but generally should be at least ½” thick of unobstructed compressible space for vertical joints and a “decoupling” joint for horizontal joints.
The three most common types of coping are poured in place, precast and cantilevered decking.
Poured in Place
Forms are placed using the shell for support and concrete is poured directly on top of the bond beam. The coping is usually as wide (or wider) than the bond beam (roughly 14”-16”). Control joints should be saw cut or tooled at 24” intervals but the closer the joints are, the less chance of shrinkage cracks developing. Tile is usually placed after the coping is poured to not interfere with the forms but can be installed prior if Stegmeier type forms are used.
The expansion joint is placed between the coping and deck and extend vertically the entire thickness of the deck and pool shell (if exposed).
Precast Coping
Coping is pre-made separate from the pool and can be a safety type coping (pictured), stone, pavers, etc. Tile is typically installed prior to the placement of the coping to establish a level waterline and aid in setting the coping pieces though it can just as easily be installed afterward. A mortar bed is placed on top of the bond beam to level and secure the coping in place.
In some cases, the precast coping will not be as wide as the bond beam and a notch on the backside will need to be made either during the placement of the gunite/shotcrete or saw cut after it has cured.
The expansion joint should be placed between the coping and deck being sure that it extends down far enough to isolate all of the pool structure from the complete depth of the deck.
Cantilevered Deck
The decking is also used as the coping which is placed in one continuous pour to create a seamless looking deck. Prior to pouring the deck, the level of the grade should be brought up to become level with the top of the bond beam and be very well compacted.
A “decoupling” expansion joint should extend across the entire width of the top of the bond beam to allow the deck to move independent of the pool shell. This joint can be created with a 4mm plastic sheet or 2 layers of roofing felt underlayment.
It is very important that the waterline tile is installed after the deck is placed so there is no chance of the deck expanding and popping off the tile (see tile placement in the diagram). The tile can be grouted as usual but the top joint between the deck and tile should be filled with a flexible sealant that is not silicone based.
Last edited:

 Thanks much!
