CaliMar Variable Speed Pool Pump Advice

The pump ran all night and shut off shortly after the sun got onto the equipment pad. I have no idea why it takes a while to start, the temp adjustment doesn't appear to make a difference, but it did work. It isn't terribly important for me as I intend to run my pump 24/7, though at a very low rpm for most of the day. Hopefully this info is useful to others.
I woke up a couple of times during the night and checked the pump - still running as per freeze program I set @1200prm :)

I left mine set to schedule not manual overnight and was woken up 8am with the cleaning speed@ 3000rpm which I had set to speed 3 running. I looked and display showing 3000rpm PLUS the snowflake so after some thought, it seems that if it has both the schedule and freeze active the freeze takes priority unless the schedule rpm exceeds the freeze rpm setting then it goes to that speed which is cool (no pun intended!) then it reverts back to freeze rpm after it isnt higher (obviously as long as the temp is low enough to activate the freeze program).

I will recheck this theory by making a new schedule with 10s in the rpm (1010,3010,2010 etc) so its obvious that its the schedule running not the freeze program but the logic seems sound and I'm impressed

Leaving the start/stop button "off" tonight and have the freeze set to 45F and will check that it comes on when pump set to stop so we know
 
All running great with the freeze program now thanks for everyones help.

I must say that Calimar customer service/tech support have been pretty useless so far. Firstly they told me the pump DIDNT have freeze protection then when I proved to them that it did they did and asked further questions about saving the settings and would it override schedule etc. they said they "would ask their Engineer" then lazily just sent a copy of the manual which I already told them I had. Rude response to this was "you are the only one having problems with this!" more or less calling me an idiot or liar. They have still not answered my questions to date but between members M Shark, Wireform, others and myself think we are getting to the bottom of it. Disappointing!

ANOTHER question I have is regarding what people have done for the power connections to the pump?

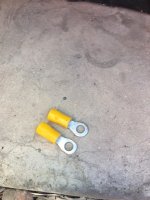
I have seen posts on this forum and elsewhere stating you should use crimped ring connectors for the connections to the pump terminals, not to just wrap the bare copper wires around/under the screws and clamp down, as this can short or deteriorate over time. I have tried to upgrade to the ring connectors today but using the correct size ones for my 12 awg wire gives me a problem. The gap between the black shoulders of the insulator where the screw fix in the pump is not wide enough to accept the metal ring. Is there a special connector with narrower shoulders on the ring part? I have filed the ring a bit smaller on both sides (see yellow ring photo below) to make it just go in the gap but I'm having 2nd thoughts as not really happy doing this and taking material away from the connector. The ground wire wouldn't be a problem, but in my set up this is a solid wire not stranded so shouldnt have a connector crimped onto it I believe? I have found connections called "compression lugs" for the red wires which have straight sides similar to some car battery connections but they seem to be in much larger sizes than 12 awg and are not insulated. Like this.....

1738188692093.png

The photos below should show better the issues - connected red wire is how I had it connected previously and the Calimar supplied screw has a square washer under it which I thought seems like the wire is simply meant to be clamped under this but I could be wrong?

What have others with the same pump done please? Any qualified electricians out there for advice?

Thanks Pete

connection to pump.jpgcalimar pump connections.jpg
 
I must say that Calimar customer service/tech support have been pretty useless so far.

They are not techs. They are sales people selling an imported pump that they have not designed or manufactured. Most of them probably don’t have a pool and have no hands on experience with the pump.

I have seen posts on this forum and elsewhere stating you should use crimped ring connectors for the connections to the pump terminals, not to just wrap the bare copper wires around/under the screws and clamp down, as this can short or deteriorate over time.

Solid wire can be slid onto the side of a screw and clamped down on it or wrapped clockwise around the screw.

Stranded wires should NOT be put straight on one side of a screw. It should be wrapped clockwise around the screw and the screw tightened. Or connectors crimped onto the wire and put under the screw.

Either make the crimp terminal fit or wrap the wire around the screw.
 
Last edited:
They are not techs. They are sales people selling an imported pump that they have not designed or manufactured. Most of them probably don’t have a pool and have no hands on experience with the pump.


Solid wire can be slid onto the side of a screw and clamped down on it or wrapped counter clockwise around the screw.

Stranded wires should NOT be put straight on one side of a screw. It should be wrapped counter clockwise around the screw and the screw tioghtened. Or connectors crimped onto the wire and put under the screw.

Either make the crimp terminal fit or wrap the wire around the screw.
Thanks for the swift reply

The guy I'm dealing with "Manuel" at Calimar has the title "Calimar Pool – Technical and Customer Service" I asked for the contact details of his Supervisor and got the predictable response "I am the Supervisor". I asked for the contact details of the"Engineer" he was supposedly asking and was told I cant have that. Its getting really old really quickly.

Thanks - With regard to the connections, I've always been told wires should always go clockwise around screws terminals not counter so as not to get pushed off/out when the screw is tightened? I didn't want to make the ring connector fit by removing material so was hoping for a better solution

Maybe I can ask Calimar Technical HAHAHAHAHA!!!
 
Article 105 of the National Fire Protection Association (NFPA) 70E Electrical Safety Code outlines the responsibilities of employers and employees for electrical safety.
110.14 Electrical Connections.
Installation Method
Exhibit 110.3 illustrates the following correct method of connection:
1. The freshly stripped end of the wire is wrapped two-thirds to three-quarters of the distance around the wire-binding screw post, as shown in Step A of Exhibit 110.3. The loop is made so that rotation of the screw during tightening will tend to wrap the wire around the post rather than unwrap it.
2. The screw is tightened until the wire is snugly in contact with the underside of the screw head and with the contact plate on the wiring device, as shown in Step B of Exhibit 110.3.
3. The screw is tightened an additional half-turn, thereby providing a firm connection, as shown in Step C of Exhibit 110.3. If a torque screwdriver is used, the screw is tightened to 12 lb-in.
4. The wires should be positioned behind the wiring device to decrease the likelihood of the terminal screws loosening when the device is positioned into the outlet box.

1738197018778.png


The convention for stranded connection is that the exposed strands should be twisted tightly counterclockwise before wrapping around the screw clockwise...

Twisting counterclockwise before wrapping will make that twist tighten as you bend the whole wire clockwise around the screw.
Thanks Poolstored it was just a typo it seems - Anyone suggest any brand of ring connectors or lugs I can crimp to the 12awg wires to make these fit in the gap - I looked at the forked type connectors if I cannot find a ring connector small enough but this would be a lot less surface area and ones Ive seen are same width as the ring connectors, of course?
 

Enjoying this content?

Support TFP with a donation.

Give Support
Use the filed connector, it will not be a problem...there is plenty of surface area.

Ground should not have a connector.
 
I've often found terminal strips don't accommodate terminal rings or spades that I have access to in local stores. I typically resort to trimming the ring as you did. The minor amount you removed doesn't significantly degrade the contact area and hence the current capacity. It does significantly improve the wire retention and security over time. The other option is to crimp a ferrule on the stranded wire then treat it as a solid wire.
 
Thread Status
Hello , This thread has been inactive for over 60 days. New postings here are unlikely to be seen or responded to by other members. For better visibility, consider Starting A New Thread.