Ya That Gorilla tape is good stuff... Is it just me or has Duct got thinner over the years?

A newbie DIY pool build
- Thread starter Butcher
- Start date
You are using an out of date browser. It may not display this or other websites correctly.
You should upgrade or use an alternative browser.
You should upgrade or use an alternative browser.
I would use this...
http://www.acehardware.com/product/inde ... =323881550
use that to fill the gap, then add your silicon. That stuff is amazing. Just dont buy it from that website. They are selling a 6 pack of them. I know Homedepot, lowes, walmart all carry it.
http://www.acehardware.com/product/inde ... =323881550
use that to fill the gap, then add your silicon. That stuff is amazing. Just dont buy it from that website. They are selling a 6 pack of them. I know Homedepot, lowes, walmart all carry it.
Thanks Matt,
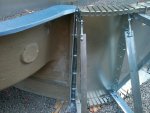
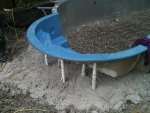
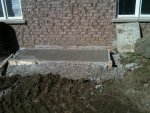
We filled the gap with some tin and used washers on the bolts between the walls and the steps. I guess I could use the putty to fill what is left of the gap and then silicone over top of that.
Here are some pics of what we did.
We filled the gap with some tin and used washers on the bolts between the walls and the steps. I guess I could use the putty to fill what is left of the gap and then silicone over top of that.
Here are some pics of what we did.
Attachments

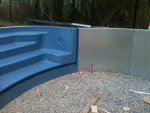
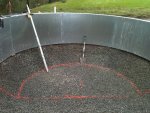
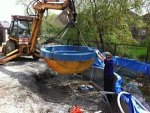
As well as getting the steps bolted to the walls and all the step supports installed we leveled and plumbed all the walls ready to pour the concrete ring beam.
This is a great build. Keep the pics and info coming. Very interesting. Good luck with the rest of it.
Thanks Dora, I will try to post as many pics as I can and give lots of info on the build.
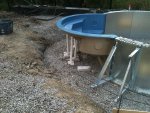
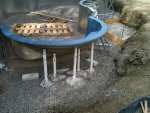
The next job was to pour the lower concrete ring beam. The info I had found on this seemed vary a lot. Some said to pour it in two separate 3 inch pours so not to push the walls out of plumb or level and some said to pour 8 inches between the braces and up to a foot where the braces were all in one pour. I decided because my pool had all radiused curves and no long spans of straight walls that doing the pour all at one time should be OK. Just to be safe we added some braces and re-bar to the inside of the walls. I went with a pour of about 6-8 inches between the braces and up to maybe 10" over the braces. Also because I had to over excavate between the pool and the retaining wall as well as around the spa that I would form parts of it with plywood so less concrete would be needed. I was also able to score some free re-bar from one of the jobs I was working on so I added re-bar to the formed sections adding strength where the concrete was not poured against a dirt bank.
Over all the pour went well with no shifting of the walls at all. It was a lot of work though and my back was pretty sore by the end of it.
Here are some pics...
Attachments
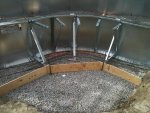
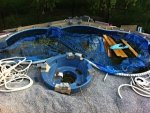
I also should mention that when we set the legs for the steps we were supposed to pour a pad of concrete then set the legs on the concrete pad. We did not do that instead we set the legs on concrete blocks and drilled holes horizontally through the legs and inserted re-bar through the holes to be anchored into the concrete.
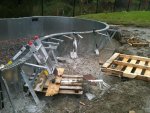
Also you can see in the pics the way we assembled the braces and deck supports, I forgot to post pics of that earlier.
more pics...
Also you can see in the pics the way we assembled the braces and deck supports, I forgot to post pics of that earlier.
more pics...
Attachments
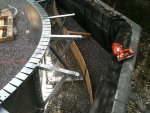
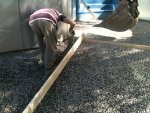
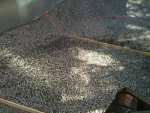
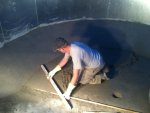
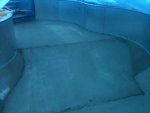
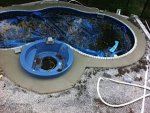
For the bottom of the pool under the liner we decided to go with a two stage method of 3" poured concrete and a 1" pool Krete top coat. This seems to be the standard for this area. In preparation for this we had to first clean out the extra stone from the deep end that we left in to support the walls while the bottom ring beam was being poured and set the grade for the shallow end as well as the slope to the deepend. We decided to use 1x6 boards at the top and bottom of the slope to the deepend so we could drag a straight edge over them and get a nice straight slope. In the deep end we drove re-bar into the ground set to the elevation we wanted and around the radius we needed.
Pics
Pics
Attachments
Next on the list was to pour the 3 inch concrete sub base for the floor of the pool. I was originally going to sub this part out but my brother felt confident we could handle it so he talked me in to giving it a go. Well, I would like to tell you that everything went as planned but I would be not exactly telling the truth. In the end it worked out OK but I have not worked like that since I was a teenager. Things I would do differently when doing this again would be don't order the concrete all in one truck for the whole pool unless you have a larger crew of workers and don't have this concrete delivered at 4:30 pm. Thankfully my wife arrived home from work shortly after the concrete arrived and was able to grab a shovel and pitch in or we would have had to waste half a load of concrete. Even with the extra help we worked till midnight under the lights before we were done and had all the concrete washed of the walls and tools. If doing this again I would order enough concrete early morning to pour and shape the deep end and slope to the walls in the deep end. Then order a second load to do the slope to the shallow end and the shallow end around noon. This would give plenty of time to work before the concrete starts to set up.
Like I said everything worked out OK and it was only the base coat so it did not have to be perfect. As long as it was close to leaving 1 inch for the final coat of vermiculite.
We also poured the equipment pad in that same pour.
I don't have pics of the process because there was no time to take any. lol
Attachments
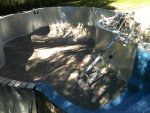
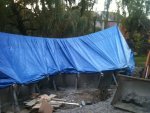
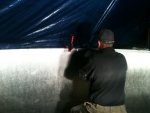
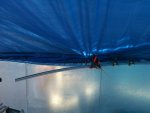
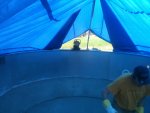
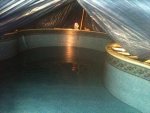
With the project taking longer than anticipated we were now getting deeper into the fall with a lot of rain and colder weather. We needed to prepare for pouring the top coat of vermiculite which was going to be difficult with all the leaves falling off the trees into the pool and the fear of rain ruining the pour before we could get the liner in. We decided to hit up my favorite store Home Depot for another tarp and we built a tent over the entire pool which would keep out the leaves as well as any rain.
Attachments
Prior to pouring the vermiculite we wanted to install the the liner coping, skimmers and the pool light niches. This was done to limit the amount that we would have to walk on the vermiculite after it was poured. I ran into a problem of how to mount a flat light niche into a radius curved steel wall so I started a new thread to address that problem which is located here.
light-niche-installation-t27417.html
Many thanks to Bama Rambler for posting the solution to this problem.
The coping I had chose to use was a cantilevered front mount aluminum double track coping. I chose the front mount so that if I wanted to change it years down the road while changing the liner to freshen up the look of the pool I could do it with out removing the stone cantilevered coping from around the pool. I chose a double track so it left open the option to use a fitted winter cover or could go with a safety cover if desired. While installing the coping around the radiuses of the pool we found it very helpful to use clamps to hold it in place for drilling and setting the screws.
Attachments
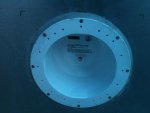
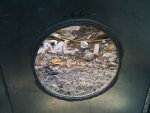
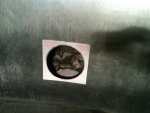
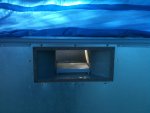
Here are some pics of the light niche install as per Bama Rambler. The first pic shows the supplied template still attached to the wall. I used a hand grinder with a steel cutting wheel to cut the hole in the heavy 18 gauge galvanized walls. The second pic is with the butyl putty applied to the wall and the last with the niche installed and the putty smoothed out to ease the liner up over the niche.
Attachments
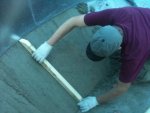
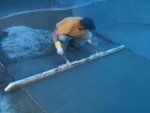
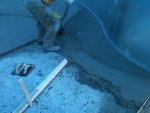
The next step was to pour the vermiculite (Pool Krete). To do this we decided to put batons on the pool floor set to the height we wanted and screed the vermiculite with a long straight piece of wood. Again I was going to farm out this job but again my brother talked me into giving it a shot ( something he now regrets ) I calculated that I would need about 25 bags of Pool Krete for the bottom of the pool and we rented a mixer from (you guessed it) Home Depot. I also bought two wood floats and two pool trowels. Now we thought this job would take us maybe two days two complete but this Pool Krete was like nothing we had worked with before. Too much water and it was soupy and it would not stay on a slope and too dry and it would flake and not screed flat. Too little troweling and it would no go smooth and too much and it would develop air pockets and start to go wavy. The only thing good I can say is if you didn't like the way it looked you could shovel it back in the mixer and start over. My hats off to the guys who do this for a living and don't climb a bell tower at the end of the week with a semi automatic weapon.LOL This is one job I would never do again. Not to say I would never build another pool I would just contract this part out. We are three days into it now and still not completely finished. We also found that with the cooler nights the Pool Krete was not setting up fast enough so we decided since we had already built a tent over the pool that it would be a good idea to add some heat. So back to Home depot we went to rent a heater. Luckily as we got talking to the HD employee he mention that in two days they were having a Contractors Day where the price of the Kerosene heaters were going to be marked down 75%. This meant that we could buy the heater for the price we would pay to rent it for only two days but I needed it now not two days later. We spoke to the manager about giving us the sale price that day which she said she could not do but that if I paid full price now and brought the bill back in the two days that they would refund me the 75%. That sounded good to me so we bought the unit.
Well that is a lot of posts to bring this thread up to date. I have been so busy building the pool that I have had little time for anything else.
Here are some pics of the Pool Krete process.
Well that is a lot of posts to bring this thread up to date. I have been so busy building the pool that I have had little time for anything else.
Here are some pics of the Pool Krete process.
Attachments
I forgot to mention that while installing the liner coping we realized that the coping would over lap the plate for the skimmers. To avoid this we notched out the coping over the skimmer which would leave enough clearance for the skimmer plate to be installed. I notched out the alu coping with a jig saw with a metal blade and smoothed out the rough edges with a file. I was not sure weather the coping was even necessary over the skimmer because the skimmer actually holds the liner in place almost up to the height of the coping track but notched it out for now and will decide if it is needed at all at the time of setting the liner.
Attachments
Well a lot has gone on since I posted here last. The pool has been up and running for a couple years and I am finally finishing off the deck, patio around the pool and water features.
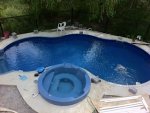
Thought I would update on some of the rest of the pool build. I left off with the bottom poured so the next step was the liner placement. Things you learn while doing your first pool… don't order the liner before the pool is built. Long story short it didn't fit so I had to do an AB plot and get the liner resized a bit. Wasn't a big deal but lost another week of time and a couple hundred $'s. Second liner install went much better than the first leaving no wrinkles. That finished the work we did that year (2010) and closed the pool after filling with water
Thought I would update on some of the rest of the pool build. I left off with the bottom poured so the next step was the liner placement. Things you learn while doing your first pool… don't order the liner before the pool is built. Long story short it didn't fit so I had to do an AB plot and get the liner resized a bit. Wasn't a big deal but lost another week of time and a couple hundred $'s. Second liner install went much better than the first leaving no wrinkles. That finished the work we did that year (2010) and closed the pool after filling with water
Attachments
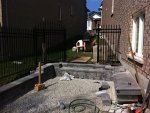
The next year started with a lot of plumbing as well as setting the spa and retaining wall construction and backfill around the pool.
- - - Updated - - -
followed by pouring the upper ring beam.
- - - Updated - - -
followed by pouring the upper ring beam.
Attachments
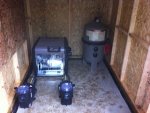
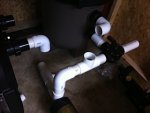
next was build the pump house, connect all the plumbing and get the pool circulating. The pool then stayed in this state of functional but unfinished till this year (2014) due to health issues and busy work schedule.
Attachments
Thread Status
Hello , This thread has been inactive for over 60 days. New postings here are unlikely to be seen or responded to by other members. For better visibility, consider Starting A New Thread.