Looks like a plan, but you will probably need some extra fittings for that, usually sold as split panel kits, or similar.

solar heater advice needed
- Thread starter caycarem
- Start date
You are using an out of date browser. It may not display this or other websites correctly.
You should upgrade or use an alternative browser.
You should upgrade or use an alternative browser.
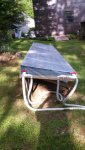
So it turned out they were not aquasol. they were Elm with 2" headers and in pretty good, unused shape. for $600 i got 5 panels and 5 rubber-like fittings, 50 pvc elbows 45degree and 90 degrees. I bought them anyway.
Still the same thing, Elm is another Private label version of the AquaTherm panels, did you get any header mounting brackets, or strap tie downs? Should be 10 not 5 of the rubber hose connectors, 2 per panel, plus a pair for the system connection, if you don't have it yet Elm has a copy of the Aquatherm installation manual on their page, it is fairly detailed, http://www.elmdistribution.com/wp-conte ... Manual.pdf
there is another version of the manual here
www.solar-components.com/Aquatherm-Inst ... Manual.pdf
it looks like Elm changed versions listed on their web site since I was last there a couple of months ago, the graphic still shows the cover of the old manual, but links to the powerpoint looking one in the first link
Ike
the rubber connectors look like this kit.
http://www.ebay.com/itm/Elm-Solar-P...629?pt=LH_DefaultDomain_0&hash=item3cd1ebd5ed
good to know it's the same thing, he said these are 10 years warranty no matter who owns them. there's a roll of strap tie downs, i think that's it. I'll check them again later. thanks for the manual i will check it out.
Here is an online dealer for Elm panels, parts and accessories, price is a little higher than that ebay seller, but not much
http://www.infinigi.com/solar-pool-heat ... 69iqauim70
http://www.infinigi.com/solar-pool-heat ... 69iqauim70
wow, didnt pay attention to this. is this the "add a row" kit they are selling? quite expensive for some fittings. so for my placement i would need 4 of these or how else can i connect them?Isaac-1 said:Looks like a plan, but you will probably need some extra fittings for that, usually sold as split panel kits, or similar.
http://www.infinigi.com/elm-2-addar...html?osCsid=uhjmoshn83sena6n69iqauim70&ref=99
Thanks that layout looks good...however I just went up the roof again and found out I made a mistake on the measurements, the top right panel in our picture won't fit...it's too narrow only 3.7' wide. what can I do? Do i have to build some kind of wood frame for that panel and put its edge on the edge of my woodshake roof or the sky lights?
Also i am trying to read the manual but still not sure what other fittings/clamps, etc. should be on my shopping list. all I got are 90 degree and 45 degree PVC elbows, and these:
Also i am trying to read the manual but still not sure what other fittings/clamps, etc. should be on my shopping list. all I got are 90 degree and 45 degree PVC elbows, and these:
Attachments
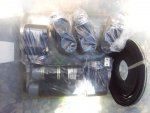
Without seeing it I am not sure what I can suggest on the roof situation, as to the fittings it looks like you have 5 panel kits, and 1 system kit, (assuming the large bag in the lower left of the photo is a system kit, it should probably have 4 seconds of black hose, 1 end plug, 1 end plug with a vacuum breaker valve and 2 pipe fitting adapters, plus clamps and mounting hardware) This is all you would need if you were to install in a single bank of panels with no spacing between each. If you are going to layout something like the above plan, you will need additional hose sections and pipe adapters, plus mounting hardware such as landing points for the straps, you will not need an end plugs or vacuum breakers though, in general you should only have 1 vacuum breaker valve per system. (all of these things should be included in that $59 kit on the ebay link you posted, basically you need 1 of those for each panel that is not directly connected to its neighbor)
For your plumbing run in addition to your assortment of 90 and 45 degree fittings (I assume these are 2 inch white PVC), you will also need some number of 10 ft sections of white Schedule 40 PVC pipe (make sure it is Schedule 40 and not foam core DWV drain pipe, dual rated Schedule 40/DWV is ok). It is also advised to use a check valve on the return line and you will likely want to put a couple of screw in plugs or ball valves with T fittings on both lines so you can drain them in case of freezing. In your mostly flat roof situation I would use 2 inch fittings for at least one side so you could blow the water out with a shop vac, or similar.
Ike
The example layout above only has 2 panels directly connected, the other 3 would each need one of the $59 kits, so 3 kits total. If you can arrange more side by side another way you could cut down even more.
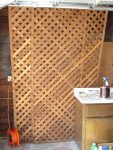
As to the lattice work, would it support the weight of the panels with water? Elm shows dry weight for the 4x12 at 22 pounds and wet weight at 54 pounds, plus some extra for plumbing.
As to the lattice work, would it support the weight of the panels with water? Elm shows dry weight for the 4x12 at 22 pounds and wet weight at 54 pounds, plus some extra for plumbing.
Thanks I will probably have to buy 3 of those kits and the valves (didn't see any in the system kit I got). i've checked out some wood lattice but not very desirable. the 5/15" thick lattice @Lowes seems like it might hold up, they cost $28 for 4x8' so $56 for 2 to make a 4x12'. May not be worth it, going to try to figure out how to build a 4x12' frame from wood.
So i ordered 3 row spacer kits should arrive by the weekend. I'm thinking I'd need 2 check valves, 2 T ball isolation valves, 1 bypass valve, possibly a temperature gauge, a pressure gauge?
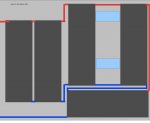
I am also worried about the design. see pic:
[attachment=0:1df4obhr]pool solar design.png[/attachment:1df4obhr]
patio is about less than 1' higher than white room top. i'd need to place part of panel 5 on top of the woodshake roof as no room, so panel 5 right edge might be more or less 1' higher than left edge. i am not sure which would be higher, patio top panel 1 or woodshake top right edge of panel 5. in either case (won't know until i make the wood frame for panel 5 and put it up against the woodshake). how should i plumb this? is it still possible?
Attachments

My best plumbing thought on this is likely to be 4,1,2,3,5 with the hot return line being from the highest corner on 5 and the cold inlet feed being the lowest point on 4, would require raising 3 and the lower part of 5 to be at the same height as 1 and 2. this might also allow 3 and 5 to be at the same level if the low side of 5 were also elevated on a rack. If this is not possible, plumbing might get complicated. Am I correct in reading that the patio roof does slope where the top of the panel is higher than the bottom, but the white roof is flat and the right side only of panel 5 would be elevated?
If the high side of panel 5 is at or lower than the highest point on panel 2 I think this would work:
Vacuum breaker should probably go a open cold corner
If the high side of panel 5 is at or lower than the highest point on panel 2 I think this would work:
Vacuum breaker should probably go a open cold corner
Attachments

" Am I correct in reading that the patio roof does slope where the top of the panel is higher than the bottom, but the white roof is flat and the right side only of panel 5 would be elevated?"
this is correct. I am hoping 1,2 would be higher than 5's highest point. your design makes a lot of sense in this case. i will try to measure tomorrow.
this is correct. I am hoping 1,2 would be higher than 5's highest point. your design makes a lot of sense in this case. i will try to measure tomorrow.
If this is not a passive set up, then top and bottom only matter when draining. Just ensure you can let all the water out, or blow it out with a shop vac or air compressor (low volume flow). I must mention that I once blew my water lines out in my RV and it was not mentioned, nor did I think of it, that one must drain the tank as air bypasses the water and will not remove it. I think this is because the inlet and outlet are in such a position that air can flow without pushing the water out. My bad... Cost me a water heater in my RV 
Oh, Pool hose may be cheaper then hard schedule 40 pvc, but will require different fittings for hose (hose barbs and clamps). My solar set up is 5 100' coils of black poly water pipe (1/2") connected to a send and return 1 and 1/2" schedule 40 pvc. I installed a bypass using three valves (only because they are easy to get from any big box building supply store) one on the outlet side before the bypass return and two on the inlet side. One for the bypass and one for the solar heater. The bypass must allow water to pass to the heater so it is important to put this valve on the T facing the bypass. It is a process to turn the heater on and off. I am looking into automatic options already. I almost forgot... I also covered my heaters with plastic (solar oven effect) to gain extra heat.
Note: My final cost was under $250!!!!!
Note: My final cost was under $250!!!!!
Take a look at the animation for air pockets on this page for why slope does matter.
http://h2otsun.com/PG5ht.html
Ike
http://h2otsun.com/PG5ht.html
Ike
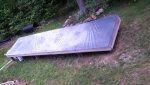
Here are pictures of my solar heater. You cannot really see the collectors as they are under a plastic cover (very clear, but not as clear as I would like.) There is a very good shot of my valve setup though. 
[attachment=0:25z0jt2n]IMG_20130609_175011_857small.jpg[/attachment:25z0jt2n]
[attachment=1:25z0jt2n]IMG_20130609_174942_705small.jpg[/attachment:25z0jt2n]
The old panels in the back have many holes and was the reason for the upgrade!! Does anyone know how to repair the holes in them?
[attachment=0:25z0jt2n]IMG_20130609_175011_857small.jpg[/attachment:25z0jt2n]
[attachment=1:25z0jt2n]IMG_20130609_174942_705small.jpg[/attachment:25z0jt2n]
The old panels in the back have many holes and was the reason for the upgrade!! Does anyone know how to repair the holes in them?
Attachments
Smid87, there are little plugs you can stick inside those holes to stop water from going through them preventing leaks. not an expert but you can google solar panel repair kits.
Thread Status
Hello , This thread has been inactive for over 60 days. New postings here are unlikely to be seen or responded to by other members. For better visibility, consider Starting A New Thread.