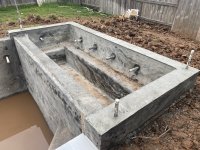
1st Pool Build | Sugar Land - Skimmer Repairs Done - Hardscape Finished

Discuss it with your builder because you have to cover that area with tile. Your bond beam looks to be 7' and your skimmer mouth another 8". You may need to adjust your tile design.
Thank you for confirming my issue.

I knew something was off. Now the question will be how they are going to adjust it to make it work and look good to match the other side since we have 2 identical 6" raised beams and in the middle an 18" raised beams. They were designed to be 1 tile for the 6" and then 2 for the 18" to make it all work with the water line.

They better have a good solution that will look right at this point because I don't want one side looking different than the other.
 
Question guys. While bonding with my pool something caught my eye and before I email the builder I wanted to see if I am seeing this right.

On one side where we have a 6 inch raised beam we also have the skimmer. Our design calls for a single 12x24 tile to go across so 6 inches would be the raised beam and 6 inches the water line.

From looking at the Skimmer it’s 14.5 close to 15” to the bottom of the skimmer.

They told us they would be filing the inside of the skimmer with matching tiles but given the measurements wouldn’t this be leaving about 2-3 inches of no tile on the skimmer?

Don’t want it to look weird since it’s part of the feature wall.

View attachment 329643
You may wish to post a picture of your selected tile which may help in getting ideas. Furthermore, your PB may need for you to select a smaller tile so they can make it work better in the dimensions that are now firm. Just remember that it is best to get the top part right because that is what you see everyday. You really do not notice the "fit" of the tile below the water level as much.
 
@ajw22 @HermanTX

Just got done talking to the project manager here at the house. He assured me that the tile will be right. He said the skimmer opening in the gunite is much bigger than the actual skimmer opening. He stated that they do that to give a lot of room for the tiler guys to be able to float everything properly and that it will still be one single tile that lines up exactly where it needs to be.
 
  • Like
Reactions: kne and HermanTX
So today was the Long plumbing install. Everything completed and they are I believe pressure testing the water since I noticed them filling the pipes and the gauge. I think I noticed it around 15psi.

Some random pictures.

DC49E970-B0F6-4598-B8E9-1E1608C1AF3F.jpeg
6EADA16D-2C36-499D-B467-709EF537641E.jpeg64D1B63B-4764-4EDE-81E7-50F089794E5A.jpeg
 
So they are working on the coping right now and I need some help. They had this laid out with full tiles like this, but I have normally seen them in 45 degreen angles. The guy here doesn't speak much english but I have been able to communicate. He is asking do I want it squared off like this with one tile then the next starting or do 45 degrees.

Is this just an aesthetic thing at this point. My pool is geometric modern.

IMG_0196.JPG

Thanks
 
45 degrees is the better look, whether classic or modern, in my view.

Thanks, ultimately I went with the 45 Degree cuts. it's going to leave one smaller tile on the far end of the pool but that shouldn't be noticeable. Then on the spa we have to cut evenly on both ends to get full pieces to work. I think it will look best and won't be noticeable like that.
 
Thanks, ultimately I went with the 45 Degree cuts. it's going to leave one smaller tile on the far end of the pool but that shouldn't be noticeable. Then on the spa we have to cut evenly on both ends to get full pieces to work. I think it will look best and won't be noticeable like that.
Ensure all the corners have equal size tiles with 45 deg cuts. Then the shorter length tile on a straight can be placed most anywhere. You may want to look as to where that won't be noticeable - like on a far end where people do not walk.
 

Enjoying this content?

Support TFP with a donation.

Give Support
Ensure all the corners have equal size tiles with 45 deg cuts. Then the shorter length tile on a straight can be placed most anywhere. You may want to look as to where that won't be noticeable - like on a far end where people do not walk.
Yeah I was very adamant about that but it worked out right with the length. I have attached pictures. On the Spa part that is raised I have them taking a couple inches of each tile that is on the corner to make sure full tiles will fit in between it as well.

Day 1 of Tile and Coping in the books as well as all the drains pipes were put in.

IMG_0193.JPGIMG_0195.JPGIMG_0197.JPGIMG_0200.JPGIMG_0201.JPG
 
@HermanTX @BigPapaSmurf

Hi Guys, before the tile guys get here I wanted to ask your opinion. I talked to him yesterday but now that I think about it more I think I want to adjust this and don't know best method. So with the spa the back long wall is 166" with the overhang on each end so it would be 2 corner pieces cut to 23" each and then 5 full pieces of coping in the middle.

On the sides it's 81" which originally he had said he could cut it around 22-23 or something and then 3 pieces cut to 19" to fit full looking pieces. But after you mentioned having them be the same size, if I go with 23" on that side of the 45 Degree cut it will leave me with 58" which would be 2 full coping pieces and then a 10" piece at the end near the edge of the spa by the spill way.

Would that location on both sides be okay for the smaller piece if I go that route? Or should I put those small pieces in between two full pieces (I feel like this would be weird) Or put that extra 10" piece right after the corner cut piece?

Or just stick to original plan of essentially 3 19" pieces + the corner piece on the sides so it's full pieces.

They will be here soon and just want to have the discussion. Thank you in advance.
 

Attachments

  • IMG_0203.JPG
    IMG_0203.JPG
    784.3 KB · Views: 24
Last edited:
So the Skimmer issue came back up when the tile guy was saying he was going to put a tile that doesn't fit and I was like this is going to be off. I called the builder and spoke to them and he explained that they didn't float up the bottom enough. It is almost like 2 inches that they would have to float it up and then angle it down to the bottom of the skimmer.

I am not knowledgeable enough to know if having the bottom tile angled from where the tile ends to the bottom of the skimmer opening is okay to have and the skimmer will still function right. Or does the bottom of that skimmer have to be flat?

Or is that too much of an angle to have? I drew a line to make it clear what they are saying will happen.

IMG_0212 2.jpg

Thanks
 
Last edited:
Can you tell if your waterline will be to the center of the skimmer weir flap or will it be above it. The goal is to have proper skimming and based on your photo you are narrowing the entry of your skimmer by those 2 inches (approx.) so it really depends where the waterline will sit to ensure this works. Normally your waterline should be the center of your waterline tile but based on your photo angle that could be at the very top of your weir and thus not really able to skim properly.
It seems the PB is fixing the cosmetic part but will it maintain its functionality.

After you mentioned that, now I notice what the main issue will be and you are absolutely right. I measured it and since all the water line tile is at the same height so its easy to add 3" to the bottom of this and with the 2" or so gap, the water is definitely too high no matter what the slope will be.

I called both the designer and the construction manager (who is probably tired as heck of me but I don't care cause I want this right). Explained that even with cosmetic fix that it doesn't change that the waterline is going to be at the top of the skimmer.

He said 100% the skimmer is not installed too low it has to be an issue with the tile guys starting the waterline tile 2 inches too high or floating the coping too much but definitely not a skimmer issue. He is talking to the tile guy and waiting to hear an answer on what is going on.

But that doesn't make sense at this point because if you bring these down the almost 2 inches we are off, the rest of the waterline tile around the pool would be off. He said it could be a case of the coping being floated too high which pushed up the waterline tile etc.

Someone's measurements are off somewhere for sure at this point. My designer did say he would get with the project manager as well as the owner to see what is going on.

Sucks cause we are expecting week the whole week so this week is a wash in terms of work.
 

Enjoying this content?

Support TFP with a donation.

Give Support
Thread Status
Hello , This thread has been inactive for over 60 days. New postings here are unlikely to be seen or responded to by other members. For better visibility, consider Starting A New Thread.