Concrete pool renovation - PebbleSheen, glass tiles, etc.

pushin glass

0
Silver Supporter
Bronze Supporter
Jun 16, 2016
128
East Central MS
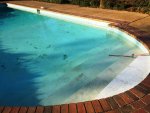
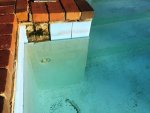
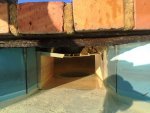
After purchasing our house a little over a year ago, it is time to renovate the 1977 concrete pool. Many of the lines are not holding pressure, the coping is falling apart, only one skimmer works, the pool light is burned out, and the pool paint that the prior owner used is flaking off as is what's left of the plaster finish underneath it.

We will be redoing all of the plumbing, a new LED light, pump timer, glass waterline tiles, PebbleSheen finish, refinishing the coping, and installling new skimmers. May replace the sand filter and add a saltwater generator along the way as well, have not yet decided. We should be getting started within the next month. I will post pictures and commentary along the way with materials used, etc. Any suggestions from forum members are welcome as well.

Before photos:

IMG_0083.jpgIMG_0071.jpgIMG_0084.jpg
 
I know what to do! Build up the steps all the way to the last step and make it into a sun shelf! You can have your steps coming off to the side of the shelf.

Add a bench along the side of the deep end.

This is going to be fun!

Kim:kim:
 
You may want to look into AquaBright. I know someone that has pebblesheen (or maybe pebble tech, I'm not sure now) and is switching to aquabright.

I really like that layout. The pool house really makes the whole thing look magestic.

Will you you stick to the brick coping?

a couple of suggestions, add an auto fill if you can, and SWGs are really nice. Automation seems like a luxury (control everything with your iPhone/iPad or android), but I can imagine not having it. SWGs stop you from having to lug liquid chlorine--basically set and (mostly) forget.
 
Will probably use Lotus Prisma Marine 1x2 glass tiles. Can order directly from Classic Pool Tile in Atlanta. Unfortunately they are made in China, but the Italian glass tiles were a little over what I wanted to pay for exterior waterline tiles. For mortar, we will probably use Laticrete 254 Platinum with Laticrete Spectralock Pro Premium Grout, which is an epoxy grout. Both are designed for glass tiles. If used as a system they carry a 25 year warranty. I was considering using Mapei products but don't think they have an epoxy grout designed for glass tiles. There will be an expansion joint between the glass tiles and the coping and throughout the glass tile installation including at every corner. Not sure yet whether those will be vertical or horizontal. I will probably use a silicone caulk for the expansion joints like Mapesil T, but may use NP1. Have not decided yet.

Prisma marine glass tile.jpg

- - - Updated - - -

I know what to do! Build up the steps all the way to the last step and make it into a sun shelf! You can have your steps coming off to the side of the shelf.

Add a bench along the side of the deep end.

We have considered a sun shelf and may add one. Meeting with our pool builder this week to finalize plans.
 
I love the classic shape of your pool. It is truly timeless. Personally, I would keep the steps exactly as they are. I think they are much more practical and better looking than a sun shelf, but sun shelves are very popular so that's a subjective call :)

We just installed a very similar tile in a 1x1 format. Our pebbletec is being installed today; I will try to get pics when it is done. I think you will love the one you picked in the 1x2.
 
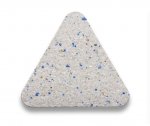
We will probably leave it as is because our house and pool house are Georgian colonial in design (i.e. symmetrical), but have not ruled anything out yet. We went with the 1x2's because the weakest link is the mortar joints, so fewer mortar joints equals less mortar and hopefully a longer lasting tile job. Would love to see your pebbletec pics. We will be going with PebbleSheen cool blue. Should give us a similar color to the present white bottom, reflect a lot of UV in the hot Mississippi summers, and complement the tile and pool house ceiling well.

07-15_PS_Cool_Blue_72dpi.jpgPTI_DepthChart-PS_CoolBlue-279x150px1.jpg
 
I debated the 1x1 versus 1x2 and think on hindsight the 1x2 is the better choice for the reasons you identified. Also, I think the slightly larger format is shinier (due to less mortar). So pretty when the sun hits it.
 
I'd go taller with the tile if you can for the reason that the water line will either be on a grout line or not, either way, any slight imperfection in the installation [i.e., not perfectly level] will be obvious. This glass tile does look good though!
 

Enjoying this content?

Support TFP with a donation.

Give Support
We decided to replace the coping with Indiana limestone coping but have run into an issue that has put the project temporarily on hold. Apparently the arch is not really an arch at all, and is not based upon a single radius, but rather three different radii that are so disparate, they can't be rectified with a single radius to provide a smooth arch. The radii vary from 6'10" to 16'1". Thus, the limestone may have to be cut segmented rather than with a smooth curve. I have asked the draftsman to look into cutting the stones smaller to see if at least the outer edge can be "arch-like." We will see. Otherwise, I have to choose between options A and B. Any thoughts? View attachment 1586 CURVE OPTION B.pdfView attachment 1586 CURVE OPTION A.pdfView attachment Pool Arch Sketch.pdf
 
So what you are saying is the stone you want to use comes in large rectangle shapes. Because of the radii of the arch you will have to lay the stone so there is a gap between the outside ends?

Well............I don't like A or B. I really, as in REALLY, think your stone worker should be able to cut the stone in such a way you will have a smooth arch. That is if they are worth a paycheck. It will take some doing and thinking BUT if they have any skill at all they can do it.

Where there is a will there is a way.

Kim:kim:
 
Do you have a water jet fabricator in your area? They can lay out the multiple radiuses in CAD and cut the pieces to meet the curves you want. It won't be cheap because you'll have substantial waste off-cuts, but its the only way to achieve a perfectly smooth curve.
 
I am working with a CAD draftsman at the stone quarry. I had to have a surveyor shoot the dimensions of the arch because they were so crazy. I think a block layer in the 70's just eyeballed the arch when he laid it.

What you were seeing and thinking were large gaps were the measured sections of each piece of stone. Regardless, this morning the draftsman was able to rectify the arch by designing each piece of cut stone with a different radius. It will match my existing arch and the eye won't really be able to tell that the curve is weird (it looked just fine with the brick coping before). I gave them the go-ahead to begin fabrication and the project will resume shortly.

Included are the CAD drawings of the pool where you can see the odd-shaped arch, the dimensions of the cut stone, and a side profile of the coping.
CAD pool dimensions.jpgCAD coping.jpgCAD coping profile.jpg
 
SO glad to hear it is all working out! I like the idea of each stone being done as needed.

That CAD does show the wacky curve!! I bet you are correct that brick layer did it like you said....cut as needed and the eye does not notice. That means your stone guy can do it and it will look great!

Kim:kim:
 
Still under construction. Waiting on a crew to sandblast the pool and install the glass tiles. Probably a few weeks out before the coping arrives. In the meantime we are going to have the bushes and front columns (leaning badly secondary to overgrown roots) ripped out in preparation for a new brick wall surround. The question at this point is if it is worth it to rip out the old concrete deck and pour a new one as well (~20k). The cost to rip out is nearly the same as the cost to pour. We are leaning toward leaving the existing deck and simply filling in the voids created for the new plumbing with similar pea gravel concrete. Twenty thousand dollars is a lot to spend on a new concrete deck when the existing one is performing just fine. Still debating. It might hinge on whether the deck is damaged when the bushes are ripped out...

under construction.jpg
 

Enjoying this content?

Support TFP with a donation.

Give Support
Thread Status
Hello , This thread has been inactive for over 60 days. New postings here are unlikely to be seen or responded to by other members. For better visibility, consider Starting A New Thread.