Caulking expanion joint, DIY tips needed

May 28, 2016
6
Hopkinton, MA
Hi all,

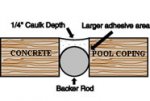
First time pool owner here. Just bought a house with a very old inground pool and the expansion joint caulking desperately needs to be replaced. Below is a link to article we found with instructions on how to do it yourself (which we'd prefer). Basically it says to do the following:

  • Thoroughly clean out old caulk
  • Insert backing rod
  • Apply self-leveling caulk

Does this sound right to everyone? Anyone have any other suggestions or additional tips for us?

Thank you so much in advance!

http://blog.poolcenter.com/article.aspx?articleid=6289
 
I have found the self-leveling caulk very difficult to work with.

If your joint is sloped away from the pool, the self-leveling feature will let the caulk run out of the high side and overfill the lower end.

I'm sure with experience I could've done a better job but a DIY guy doesn't get much to practice with.
 
I just did the cut joints on my pool deck, a little different than the expansion joint around the perimeter, but I used Vulkem 116 and it flowed very good and easily applied. I sat the tubes in the sun for a few minutes prior to using and cut a very small end so I didn't get gobs coming out.
http://www.tremcosealants.com/products/vulkem-116.aspx


https://www.youtube.com/watch?v=xt3NxNyo9fU

I've tried the self leveling before, unless you have the backer rod snug in place and even all the way around it was difficult for me and in all honesty, where I did apply it (sealed concrete walkway to black top driveway),, it only lasted one season and now it is cracking up.

Coping-Repair.jpg
 
I used the Vulkem 45SSL which is a Semi - Self Leveling Sealant in a tube. (You need a quart sized caulking gun). Worked great and is recommended for pool expansion joints. It flowed just enough to level itself as needed, but wasn't so watery that it ran everywhere like a full self level would have. This stuff is pretty pricey from poolcenter.com, but I found it for half the price at coastalone.com and they have a few different colors to choose from. Once the joint was cleaned I used a shop vacuum to vacuum the joint and then used the garden hose spray to clean some more. Once dry I installed all the backer rod then went to caulking. After each tube I applied a sand coating to the top and then moved on to the next tube around the pool. If you are going to use on any vertical surfaces such as steps you will need to put a stop in place because it will just run down with gravity. Also, if you have any plastic type expansion joints that butt up to your pool joint I would recommend putting a little silicone in the gaps where these joints meet prior to caulking. Otherwise you will lose some of your caulking product into these gaps and the joint will slump in these areas. I learned this after the fact.
 
Thanks everyone for the great tips, much appreciated!

Do others have experience with DIY caulking jobs lasting just one season? Seems like a lot of manual labor for it to not last long. Is it expensive to have a professional do it?

Again, many thanks!
 
We used a professional to do ours.

Very pleased with the results. It wasn't cheap because we had about 180' to caulk (pool to deck and walls to deck) at $4.75/ft. But it really gives it a finished appearance and functional too of course. I did do some grinding of the areas to be caulked in preparation because the foam, especially around the wall/tables, was not consistent. So I essentially created a joint to be caulked by going down about a 1/2" into the decking in several stretches. Glad I did that as the look is very consistent now.

Below is something I posted in someone else's thread on the topic of our caulk guy...

Here is a website from the guy I'm going to use to caulk my new pool and other joints around the pool deck. After talking with several pool builders, they feel this is the highest quality way to fill these gaps. It's a non-sag (i.e. non-self-leveling) caulk and they also use a professional grade urethane sealant on it.

http://www.caulking-unlimited.com/

Here's a link to the post with an after and before picture.

http://www.troublefreepool.com/threads/53452-Pool-Build-Baltimore?p=586383&viewfull=1#post586383
 
Thread Status
Hello , This thread has been inactive for over 60 days. New postings here are unlikely to be seen or responded to by other members. For better visibility, consider Starting A New Thread.