Need Help With Pool Slide

PS: by the way, up by the roof, that gizmo that is attached to the plumbing in an L shape is your solar vacuum relief valve. That's a necessary component of a solar heater and is fine right where it is, just as it is. I can describe more about that if you're interested.
 
You don't actually have a solar bypass, in a true sense. So you were misinformed. Refer to the drawings I did for you. I'm assuming all those valves are still in the same position as photographed.

Water leaves your filter and enters the solar valve where it is blocked by the current position of the valve and sent to the left, into a tee fitting. The water tries to go both up and down the tee. The water going up runs into the solar check valve and can't get past that. So it goes down, on to your heater, and then into the pool.

If the solar valve is turned, the water would then go up from the solar valve, but is currently being blocked by the solar isolation valve. I cautioned you about being sure not to engage the solar system, or allow the solar controller to do so, because the closed solar isolation valve would then deadhead your main pump and that is bad.

So technically the solar valve is "bypassing" the solar system, but a true solar bypass valve is a separate thing, used for a separate purpose, and you don't have one of those. Now if your "someone" stating "no longer good" was referring to the solar valve, or the solar check valve, and either of those is not effectively stopping the water from going up, then that would be a big problem and could explain why your pool is half empty.

I was going to get to that... Once you raise the water level 6" or so, with the pump OFF, and pause a bit to make sure it doesn't leak back down, then fill the pool. Then start your pump and see if water comes leaking or spewing out of either of the cut off PVC pipes up by your roof. Those steps will determine a lot. Report back here when you do those three things.

So, for future reference:

All PVC ball valves are junk. You have at least three that I can see. The solar isolation valve is a PVC ball valve. As are the two near the ground that look the same (red handles). All junk. In fact, the two near the ground serve no purpose, other than negative ones. If either is closed, you'll deadhead your pump. And one or both will eventually start leaking. All three should be removed and replaced with PVC pipe.

While I probably shouldn't declare your solar check valve as junk, it probably is. It's a cheap version of one, anyway. You need a proper Jandy check valve at that location, and a second one between the filter and the solar valve. You could replace the ball valve after the filter with a proper check valve and solve both of those problems at once. A Jandy check valve is a high quality component, it's repairable, and it has a clear cover that allows you to not only see if it's working or not, but also allows you to see water flowing through it. They look like this:

View attachment 174122

Or you could install a Jandy check valve in place of the solar check valve, and a FlowVis in place of the ball valve after the filter. That would allow you to fine-tune your solar heater's efficiency. I can explain more about that some other time, if you're interested in that topic. You can retrofit a FlowVis onto a Jandy check valve body later, as an alternate option. A FlowVis is a check valve, so it serves as both a check valve and a flow meter.

So you've got some tasks. Fill the pool 6", confirm it's not leaking, then fill the pool 100%. Start the pump and report back here with what happens.

Later, perhaps if you reinstall the solar system, swap out the three PVC ball valves and the PVC check valve as described above.

would this be the solar bypass valve ? Thats the picture the guy took and sent to me after viewing the property today. Thank you again
 

Attachments

  • 749C379D-D277-4227-ACD1-F55B1622F165.jpeg
    749C379D-D277-4227-ACD1-F55B1622F165.jpeg
    79.8 KB · Views: 14
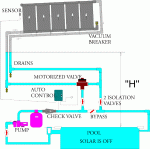
No, see post #21. That's your solar vacuum relief valve (sometime called "vacuum breaker"). You don't have a solar bypass valve. See the valve labeled "Bypass" in the drawing below. If you had one, it'd be in between the two pipes leading to and out of your solar valve. Actually, this drawing is very much like your setup. The two PVC ball valves I warned you about, about removing them, could have been Isolation valves (see "2 ISOLATION VALVES" below), but you can't engage them as isolation valves without the bypass valve (also shown below). Maybe your bypass valve was removed at some point? Follow the water paths in the drawing. With the bypass open, you could close the two isolation valves to isolate the entire solar heating system from the rest of your pool plumbing. This might be used to repair the system, or to temporarily remove the panels, as was done on your house. Or to winterize the panels after removing all the water. But without the bypass valve (which you don't have), closing either isolation valve will deadhead your pump. So you could add a bypass valve, if you thought you needed it. Or you can remove the two isolation valves as I suggested. But leaving the two isolation valves in place without the bypass valve is not only useless, but creates a possible hazard (deadheading your pump), as I described earlier.

Notice also in the drawing the check valve near the filter. That's the check valve I mentioned was missing from your system that needs to be added (unless it's hiding somewhere in your pictures).

This drawing doesn't show the second check valve (where your solar check valve is now). Many installers show that second check valve as optional. I don't believe it is, I believe it should be there.

dlrauttx33.gif
 
Last edited:
No, see post #21. That's your solar vacuum relief valve (sometime called "vacuum breaker"). You don't have a solar bypass valve. See the valve labeled "Bypass" in the drawing below. If you had one, it'd be in between the two pipes leading to and out of your solar valve. Actually, this drawing is very much like your setup. The two PVC ball valves I warned you about, about removing them, could have been Isolation valves (see "2 ISOLATION VALVES" below), but you can't engage them as isolation valves without the bypass valve (also shown below). Maybe your bypass valve was removed at some point? Follow the water paths in the drawing. With the bypass open, you could close the two isolation valves to isolate the entire solar heating system from the rest of your pool plumbing. This might be used to repair the system, or to temporarily remove the panels, as was done on your house. Or to winterize the panels after removing all the water. But without the bypass valve (which you don't have), closing either isolation valve will deadhead your pump. So you could add a bypass valve, if you thought you needed it. Or you can remove the two isolation valves as I suggested. But leaving the two isolation valves in place without the bypass valve is not only useless, but creates a possible hazard (deadheading your pump), as I described earlier.

Notice also in the drawing the check valve near the filter. That's the check valve I mentioned was missing from your system that needs to be added (unless it's hiding somewhere in your pictures).

This drawing doesn't show the second check valve (where your solar check valve is now). Many installers show that second check valve as optional. I don't believe it is, I believe it should be there.

View attachment 174149
How do I turn off the pump so I am able to refill the pool
 
In one of the boxes mounted on the wall above your equipment pad you’ll find a set of circuit breakers. One will be for the pump. Hopefully it is labeled. Turn it off.
 
Thread Status
Hello , This thread has been inactive for over 60 days. New postings here are unlikely to be seen or responded to by other members. For better visibility, consider Starting A New Thread.