Hello everyone,
I have been working on this pool system for over a week. Each time I halt flow, I have a devil of a time re-establishing same, even when just focused on the skimmer line. You can see the various hacks I have implemented, aiming to inject water from a garden hose. It's still a battle. I was racing to keep ahead of the pool turning green.... now it's time to figure out if I have vacc leaks in either/both returns.
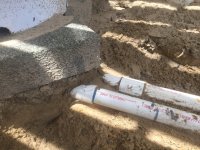
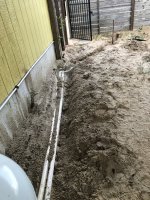
I'm now beginning to expose the pipe run (all this installed before we bought this home, no history avail) - I can already see how poorly the return lines were laid in. Look at the proximity to the overhead (and 200lbs+) propane tank! The lines, moving away from the equipment pad and back to the pool, snake slightly upward from the initial 90 transition (from vertical to horizontal). Never more than a few inches below grade, they then dip again, go to 45 elbows, and then seriously start descending. It's aprox another 50 ft until they will cross under the pool deck.
My thought is to excavate and expose these until I reach an insurmountable submerged obstacle, or the deck edge itself. What I could then do is run new, straight pipe runs to the equipment pad - the line includes sand and a section of garden with pebbles to remove. I am wondering it would be important to lay in that new section as close to horizontal as possible? Does that have a significant positive effect on fluid flow?
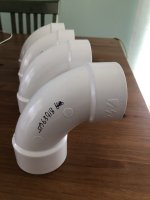
After this is done, I could run a pressure test on at least the skimmer line. As for the main drains return line, I cannot think of any way to test that. Potentially, both skimmer and drain lines could have vacc leaks..... Even when I have good flow established with the skimmer line, if I open the cut-off valve for the main drains, even slightly, I immediately lose flow again. It's tough to get any water flow, even with all the flow injection points I have added (see my fitting for the skimmer box - cobbled together from scrap Sched 40 pieces from someone else's debris pile).
Any other ideas as to how to proceed? Would it be better to pressure test the existing lines before taking anything apart? I know for sure I want to at least replace the section of run under the propane tank!
I have been working on this pool system for over a week. Each time I halt flow, I have a devil of a time re-establishing same, even when just focused on the skimmer line. You can see the various hacks I have implemented, aiming to inject water from a garden hose. It's still a battle. I was racing to keep ahead of the pool turning green.... now it's time to figure out if I have vacc leaks in either/both returns.
I'm now beginning to expose the pipe run (all this installed before we bought this home, no history avail) - I can already see how poorly the return lines were laid in. Look at the proximity to the overhead (and 200lbs+) propane tank! The lines, moving away from the equipment pad and back to the pool, snake slightly upward from the initial 90 transition (from vertical to horizontal). Never more than a few inches below grade, they then dip again, go to 45 elbows, and then seriously start descending. It's aprox another 50 ft until they will cross under the pool deck.
My thought is to excavate and expose these until I reach an insurmountable submerged obstacle, or the deck edge itself. What I could then do is run new, straight pipe runs to the equipment pad - the line includes sand and a section of garden with pebbles to remove. I am wondering it would be important to lay in that new section as close to horizontal as possible? Does that have a significant positive effect on fluid flow?
After this is done, I could run a pressure test on at least the skimmer line. As for the main drains return line, I cannot think of any way to test that. Potentially, both skimmer and drain lines could have vacc leaks..... Even when I have good flow established with the skimmer line, if I open the cut-off valve for the main drains, even slightly, I immediately lose flow again. It's tough to get any water flow, even with all the flow injection points I have added (see my fitting for the skimmer box - cobbled together from scrap Sched 40 pieces from someone else's debris pile).
Any other ideas as to how to proceed? Would it be better to pressure test the existing lines before taking anything apart? I know for sure I want to at least replace the section of run under the propane tank!