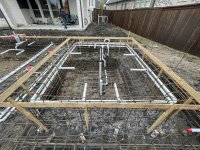
We made it to gunite... finally!

For a 2” pipe at 45 GPM, the head loss is 3.4 feet per 100 feet of pipe or 0.034 feet head loss per foot of pipe.

If they specify 25 feet for the distance, then that is 25 x 0.034 = 0.85 feet of head loss.

For 2.5” PVC pipe, the head loss is 0.014 feet head loss per foot of PVC pipe.

0.85/0.014 = 60.7 feet.

So, if the distance is limited to 25 feet with 2” pipe, the distance limit for 2.5” pipe is about 61 feet.

The Total Equivalent feet is the length of the straight pipe plus about 5 feet for a hard 90 or about 3.5 feet for a sweep 90.

For example, if the plumbing is 40 feet plus 5 sweep 90s, then the total equivalent length is 40 + (5 x 3.5) = 57.5 feet.

You would need the pump performance chart to know the actual flow vs. head loss.

Below, you can see the performance of two different submersible pumps vs. the head loss.

The rated flow maximum of 1,745 gph ( 29.1 gpm) happens at 0 head loss.

Typically, a pump like that will operate in the 5 to 15 foot head loss range, so the limits of 0.85 feet of head loss seem way too low.

1700665850580.png

1700666130066.png

1700257275756-png.540958


apcp-1700-jpg.540933
 
TECH SPECIFCATIONS

1/3 or ½ HP sump pump.

Non-rusting FRP casing and basin.

1/2, 1, 1 ½ HP fan motors (220/230).

60 – 125 GPM output.

Low amps

Output water temp. max. 75 degrees

Glacier Pool Coolers 237 Series 1/3 HP Sump Pump Non-Corrosive | SP-237

Liberty brand submersible pumps.

1700667189386.png
 
1700667357987.png


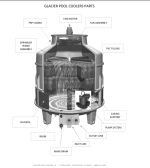
As the water is processed through the unit, the chilled water collects in the bottom basin.

The water level in the basin should rise and fall, allowing the internal sump pump to push the water into the pool line in cycles.

The internal pump works on a float switch, thus the water should rise to almost the top of the basin, kicking on the sump pump and draining the basin into your pool line.

In residential units, these cycles can last 2-3 minutes.

Your installer must read the instructions in the manual!

The Glacier Pool Cooler is not installed like a heater.

The cold water leaving through the outlet line should be plumbed either into the SUCTION side of your pool pump, or into a designated line (as seen in new build diagram).

If the unit is plumbed incorrectly, the chilled water will headwall in your plumbing lines and not cool your pool.

Our units rely on your pool's pressure to operate the unit and your pool pump's suction to move the chilled water to the pool.

Commercial installations have additional options; please refer to the manual.

1700667644524.png
 

Attachments

  • Glacier Chiller.pdf
    3.3 MB · Views: 0
1. FIRST STEP - Replace to a PVC T- Fitting right after the FINAL Heater return/ or Filter return to the pool , then ADD your PVC line FIRST, a 2lb. Jandy Check valve SECOND and LAST a (red or blue handle) Ball valve on this line going to the MIDDLE inlet hole to the cooler (connect and glue all parts).

Use 2" pipe (Must ADD 2" Coupling Reducer after ball valve, if using 2" pipe on install).

2. SECOND STEP - Then connect and glue your 1.5" inch Nipple PVC going out of cooler, then ADD a 2" coupling reducer to your 2" inch pipe dedicated line back to the pool.

(This must be a designated line to the bottom center of the pool ). NOT ON THE SIDE WALLS.

3. THIRD STEP - ADD 1" Plug in the top hole on the left side of bottom basin.

ADD 1" Ball valve (fitted) at bottom lower outlet drain.

4. FOURTH STEP - ELECTRICAL The pool cooler works with the pool pump power.

The minimum amperage needed is a 20 amp breaker to operate the pool cooler with the pool pump.

Electrical installation on a 220v intermatic timeclock.

The cooler is 110v and most pool systems operate @ 220v, therefore take the hot leg from the cooler and run it to either load on the T104R3 220v timeclock.

The ground ties into the grounding lug on the bottom of the timeclock.

The Neutral wire needs to be run either to the ground or to the open screw on the far left of the terminal.

Run an extra piece of ground wire to the open terminal (far left, and a little offset)if you decide to use the extra terminal for the ground wire, which is preferred.

Electrical installation using an Aqualink or Compool system.

Installation of a Glacier Cooler on a Pentair,Jandy, Hayward or a Compool is virtually the same.

First, find the primary filter pump which will be feeding the cooler. The relay has 4 screws 2 lines and 2 loads as follows from left to right....Line1 Load1 Line2 Load2. Use one of the Loads as your HOT for the Cooler, either one, but only one, you will need an available relay or add another if space is available. Take the cooler relay's (line) and wire it to either of the filter pumps load, this will keep the cooler from running without the filter pump. Ground and Neutral tie into the Grounding terminal. Each relay has a plug that must be plugged into an open Aux female socket to allow control through the automated system. When using actuators, you will need (Factory recommends one actuator per valve actuator control) otherwise both actuators can be tied together and plugged into one valve control. There are many different ways to electrically install a Glacier Cooler, depending on the needs of your customers This product must be installed and serviced by authorized personnel, qualified in pool equipment installation. Improper installation and/or operation could cause serious injury or property damage. Improper installation and/or operation will void the warranty.
1700668241491.png


Attachments

  • newer-glacier-pool-chiller-manual.pdf
    1.1 MB · Views: 0
The manual does not specify a distance.

You would need to get the details from Glacier.

In any case, whatever distance is specified for 2” can be increased by 2.4 times if you use 2.5” pipe.

For example, if the limit is 50 feet for 2” pipe, the limit for 2.5” pipe is 120 feet.


1700668866286.png


1700668975912.png
 
What will be the elevation of the chiller compared to the pool water surface?

If the chiller is higher than the pool, then you can subtract the height difference from the head loss and that will increase the flow.

If the chiller is lower than the pool, then you have to add the height difference to the head loss and that will decrease the flow.

For example, if the chiller sump pump is 3.4 feet above the pool water surface, then the head loss will be zero and the pump will get to about 44 GPM.

If the chiller sump pump is 1.6 feet below the pool water surface, then the head loss will be 5 feet at 45 GPM and the pump will get to about 38 GPM.
 

Enjoying this content?

Support TFP with a donation.

Give Support
What will be the elevation of the chiller compared to the pool water surface?

If the chiller is higher than the pool, then you can subtract the height difference from the head loss and that will increase the flow.

If the chiller is lower than the pool, then you have to add the height difference to the head loss and that will decrease the flow.

For example, if the chiller sump pump is 3.4 feet above the pool water surface, then the head loss will be zero and the pump will get to about 44 GPM.

If the chiller sump pump is 1.6 feet below the pool water surface, then the head loss will be 5 feet at 45 GPM and the pump will get to about 38 GPM.

The chiller height is slightly below the pool level maybe 1-2 feet is my best guess.

If I’m understanding the data you provided, the 50 foot distance between the chiller and the pool won’t be an issue with my 2” dedicated return, but the 5 sweep 90s might be the bigger issue?

IMG_4169.jpeg
 
If I’m understanding the data you provided, the 50 foot distance between the chiller and the pool won’t be an issue with my 2” dedicated return, but the 5 sweep 90s might be the bigger issue?
In my opinion, the 50 foot distance is not a problem.

The 5 sweep 90s are equivalent to adding about 18 feet of pvc pipe, so the total distance is equivalent to about 68 feet.

In my opinion, 100 feet of 2" PVC pipe is fine.

The flow should be about 38 GPM.

Note: I do not have actual experience with these systems, so this is my best understanding.

Check with Glacier to see what they say.

I can't thank you enough for the guidance and effort in helping with this item. I truly appreciate it!

It makes me feel a lot better about moving forward with the chiller as it's currently plumbed. I did reach out to Glacier and their guidance was literally no guidance. All they would say is "closer is better." lol
 
  • Like
Reactions: Newdude and JamesW
The city inspector was out today and he failed the pool belly inspection:
  1. Cave Ins
    • He wants the cave in cleaned up and the debris removed.
  2. Rebar
    • He wants rebar chairs installed so we have equal, appropriate spacing all around the pool.
  3. Water
    • We have a bit of ground water seeping into the deep end, and he wants it pumped out.
My pool builder said his rebar crew will be out Monday to address everything.


In the interim, I'm trying to iron out all the details behind the main channel drain (floor), the spa drain (floor), the two chiller returns (floor), and the water feature suction (two wall ports).

I want to use Color Match Pool Fittings, but for the channel drains I noticed Color Match is only selling the cover and it has to be coupled with the matching A&A AVSC Channel Drain.
  1. Pool Main Drain
  2. Spa Drain Floor
  3. Chiller Return
  4. Water Feature Suction (Wall)

Should I be doing anything special with the pool returns, side suction cleaner, and autofill? I noticed Color Match has some flush mount pool returns, threaded pool fittings, and pebble top pole holders.

Flush Mount Return Fitting (5" and 7")

Pebble Top Pole Holder

Threaded Wall Fitting

Sorry for all the questions, but I'd like to give my pool builder a list today or tomorrow, as I'm losing faith in relying on him to show up with the right stuff. It'd be nice to source all this locally so we can gunite Wednesday or Thursday of next week. With the pool being excavated already, I feel its riskier everyday we aren't in gunite yet.
 
  • Like
Reactions: Newdude
The city inspector was out today and he failed the pool belly inspection:
  1. Cave Ins
    • He wants the cave in cleaned up and the debris removed.
  2. Rebar
    • He wants rebar chairs installed so we have equal, appropriate spacing all around the pool.
  3. Water
    • We have a bit of ground water seeping into the deep end, and he wants it pumped out.
My pool builder said his rebar crew will be out Monday to address everything.
That worked out for the best. So happy the inspector was able to denote these things and force the PB to do the proper repairs prior to application of gunite.
 
  • Like
Reactions: kimkats and sll0037
Update: Large Dry Cave In

Well… we were waiting for the pool builder to clean up the small cave in on the long side of the pool (deep end) so we could gunite mid next week and tonight I heard a large rumbling from the backyard.

I head out to check it out and the once small cave in is now easily 3x larger. It took the return loop and bent some of the rebar on the way down.

I’m sure this isn’t too abnormal in pool builds, but is there a best way to fix it. I want to make sure the pool builder doesn’t cut any corners in fixing it.

It’s on the long 38’ side of the pool closer to the deep end. The other concern is that side of the pool wall is also serving as a retaining wall that extends 24”-36” above the pool.

I’ll share a good picture tomorrow when we have daylight.

IMG_4200.jpeg

IMG_4197.jpeg
 

Attachments

  • IMG_4200.jpeg
    IMG_4200.jpeg
    857.6 KB · Views: 7
Last edited:
  • Sad
Reactions: kimkats
Rebar cage to be straightened to original condition and shape.
Excess dirt to be removed from inside of cage to obtain the required clearance from cage to outside of shell.
Form a wall using drywall between the cage and the cave in area to separate the two and allow for the Shotcrete crew to shoot product on and then correct the unstable area of concern properly.
 
  • Like
Reactions: kimkats and sll0037
I have nothing technical to add on your build because I have no pool building experience. But I will say that I am part of a few forums besides this one (the others are automobile related). This is the only pool forum you need to be on. The details and advice you have received here from the experts on this site are invaluable. I’ve seen these sort of “new build” posts with such detailed information given. These people spend hours upon hours of their personal time helping folks like yourself. You won’t find this level of support on any other type of forum.
Well worth the membership that I pay for the information that these great folks have given me over the years! It’s an incredible group.
…. That’s all I wanted to add, back to your build.
 
Last edited:

Enjoying this content?

Support TFP with a donation.

Give Support
Thread Status
Hello , This thread has been inactive for over 60 days. New postings here are unlikely to be seen or responded to by other members. For better visibility, consider Starting A New Thread.