Backyard Oasis Build Thread - Houston - All Done. =)

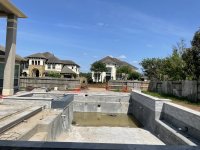
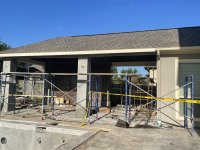
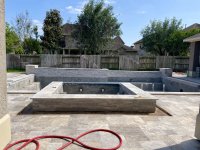
Just a quick update - the PB has been working on the kitchen/covered patio. Just minor fixes here and there but overall good. The stucco process was the most time consuming but we got through it!

we are most likely doing plaster next week! What do I need to do to prepare?

Posting pics of the progress so far
 

Attachments

  • 5B721E36-C0E6-47FF-83BA-86284AD6AAF6.jpeg
    5B721E36-C0E6-47FF-83BA-86284AD6AAF6.jpeg
    59.2 KB · Views: 149
  • D323512A-0EE0-43AF-BBEF-DBA1B7C2863E.jpeg
    D323512A-0EE0-43AF-BBEF-DBA1B7C2863E.jpeg
    527.9 KB · Views: 140
  • 1ED1568E-C9E9-4D2C-A94E-977BA4E96D04.jpeg
    1ED1568E-C9E9-4D2C-A94E-977BA4E96D04.jpeg
    550.1 KB · Views: 143
  • 550929DB-C6C3-47B6-BDC1-201D62E6A424.jpeg
    550929DB-C6C3-47B6-BDC1-201D62E6A424.jpeg
    668.4 KB · Views: 147
we are most likely doing plaster next week! What do I need to do to prepare?
Some things I picked up while reading comments on the forum that I kept track of. Others may have additional info.

  1. Clean up around the pool area the day before - brush any dirt/mud or debris that could be tracked into the pool during or after plaster
  2. Verify that the bags of plaster are the proper type and color you selected on morning of plaster.
  3. Take a sample of the mixture when they are applying it to the pool by pouring some in a small clear plastic cup (good for reference later)
  4. Do they have all the proper return nozzles and drain covers (type and color) to place after plaster installed
  5. Have you tested your fill water? Are you filling with softened water or regular tap water?
  6. Have your hose ready (and clean) as it will be laying in the pool.
  7. Tie a sock or cloth around the nozzle so it does not sit on the plaster
  8. Ensure you take note (or a picture) of your water meter reading before you start to fill
  9. Be prepared to take note of your water meter as the pool reaches certain levels, i.e bottom of bottom step, top of bottom step, etc. (it helps in the future to know volume of your pool at certain levels - should you ever have to drain portion of it)
  10. Plan to set an alarm every 4 hours (or so) to ensure hose is still in pool, no debris blew into pool, etc.
  11. Take a picture of any chemicals they bring on site that they plan to dump in when they start to add water to pool
  12. Continue to fill pool to center of water tile or center of skimmer. Take picture of water meter at end of fill.
  13. Get clear instructions from PB as what to do the day the pool is full - how often to brush, will the pump be turned on, etc.
  14. Define with PB when will he be back out to set up water chemistry.
Thanks!!
How do I find out what type of water i have? How do I test that?
 
How do I find out what type of water i have? How do I test that?
Do you have your test kit? Please add it to your signature.
Take a sample of your tap from inside (kitchen sink) and take a sample from the outside spigot which will be used to fill your pool. Test both for CH and TA. If one does not have calcium then that has water softener connected to it. You can test for pH as well just so you know. Neither should have CYA and only very small trace amounts of chlorine (if any).
 
  • Like
Reactions: JMSMommy
Do you have your test kit? Please add it to your signature.
Take a sample of your tap from inside (kitchen sink) and take a sample from the outside spigot which will be used to fill your pool. Test both for CH and TA. If one does not have calcium then that has water softener connected to it. You can test for pH as well just so you know. Neither should have CYA and only very small trace amounts of chlorine (if any).
Oh goodness...no I don’t have my test kit. Where do I order that? I was looking yesterday on trouble free but then got side tracked...
 
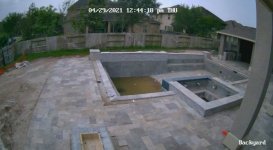
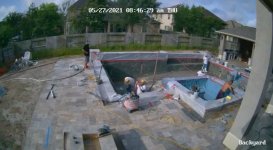
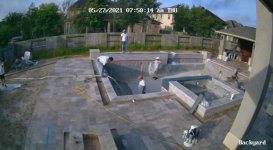
I put up three temporary cameras just to watch the build. I plan to have cameras out there anyway, and have several ethernet cables out to the backyard anyway so it was easy for me to hang them and run the wire. I really liked watching the work whenever I wanted, and even saving some of the videos along the way. Could be helpful as well if there is any damage from any of the subs and no one wants to take credit for. You can see in this picture the black cable hanging there. Now that my project is about done, I'll work on a more permanent mounting solution in the spring.
I just picked up some wireless solar cams (Reolink) and should have them up today (just got them Monday and configured them) so I can record my entire build process.
I love watching peoples build videos!
 
  • Like
Reactions: JMSMommy

Enjoying this content?

Support TFP with a donation.

Give Support
@HermanTX - I found it; ordered the TF-100 Test kit.
did you order the salt test kit as well? You will need that with the SWCG operation. They have the new Pro version kit which has all tests plus a speedstir included. You can call them to make any changes or additions.
 
@HermanTX i tested the inside water and outside water. Based on this - the outside water is really not that hard right? Anything I need to keep in mind when we fill at the end of next week?

Calcium Hardness
Inside - 250 (10 drops) started Purple/pink
Outside - 375 (15 drops) started Red

Total Alkalinity
Inside - 310 (31 drops)
Outside - 330 (33 drops)

PH Test
Inside - 8.2
Outside - 8.2
 
@HermanTX i tested the inside water and outside water. Based on this - the outside water is really not that hard right? Anything I need to keep in mind when we fill at the end of next week?

Calcium Hardness
Inside - 250 (10 drops) started Purple/pink
Outside - 375 (15 drops) started Red

Total Alkalinity
Inside - 310 (31 drops)
Outside - 330 (33 drops)

PH Test
Inside - 8.2
Your Alkalinity concerns me being that high from your tap. Mine is only around 120-150ppm. Are you using the 25ml sample and it starts as GREEN after adding R-0007 & R-0008? Your end point is Red (like a cherry red). Just want to verify your testing and that you are using speedstirrer. May be best to test again - just to confirm. Practice is always good, regardless.

Not sure why Calcium readings are so far apart as it appears you do not have a water softener, unless you have some sort of water purifier for your inside tap. You indicated the start color was a little different but your end point (blue) was the same. Regardless, your CH will be spot on for your fill water- I keep mine in the 250 to 375 range as a norm as that where it seems to work best for my CSI, but every pool is a little different but you should be OK. Just watch overtime as you may build up CH with your fill water.

Similar with pH - you will need to add MA but with that high TA you would be adding MA regardless. So just something you will need to watch and do some adjustments. Remember that bringing down TA takes time because you do not want to drop your pH below 7 so you will need to lower pH, which also drops TA, aerate to increase pH and then do it again to lower TA. This may take several cycles.
Hope this helps
 
  • Like
Reactions: JMSMommy
Your Alkalinity concerns me being that high from your tap. Mine is only around 120-150ppm. Are you using the 25ml sample and it starts as GREEN after adding R-0007 & R-0008? Your end point is Red (like a cherry red). Just want to verify your testing and that you are using speedstirrer. May be best to test again - just to confirm. Practice is always good, regardless.

Not sure why Calcium readings are so far apart as it appears you do not have a water softener, unless you have some sort of water purifier for your inside tap. You indicated the start color was a little different but your end point (blue) was the same. Regardless, your CH will be spot on for your fill water- I keep mine in the 250 to 375 range as a norm as that where it seems to work best for my CSI, but every pool is a little different but you should be OK. Just watch overtime as you may build up CH with your fill water.

Similar with pH - you will need to add MA but with that high TA you would be adding MA regardless. So just something you will need to watch and do some adjustments. Remember that bringing down TA takes time because you do not want to drop your pH below 7 so you will need to lower pH, which also drops TA, aerate to increase pH and then do it again to lower TA. This may take several cycles.
Hope this helps
I’ll do the TA again. I actually used the speed stirer for the outside tap only; I’ll definitely do it again tomorrow. I don’t think I did the inside one right.

we do have a water softener but the outside tap does not connect to the water softener. Now that I type this, I should test the tap the auto fill is connected to which is different from the tap we will use for the initial pool.

Adding MA makes no sense to me right now, but I’ll get the hang of it!
 
we do have a water softener but the outside tap does not connect to the water softener. Now that I type this, I should test the tap the auto fill is connected to which is different from the tap we will use for the initial pool.
If you have a water softener then your inside water should have ZERO calcium. That is the purpose of the water softener is to remove calcium. So test that again. If you have calcium in the inside then your water softener is not functioning properly.

Some water softeners are connected to your outside water bibs and some are not - just depends how they set it up. Maybe take a picture of your water softener set up (from different angles) and I can give you some additional feedback.

So test your 2 different outside water bibs and where your autofeed will be connected so you know which is what.
 
  • Like
Reactions: JMSMommy
If you have a water softener then your inside water should have ZERO calcium. That is the purpose of the water softener is to remove calcium. So test that again. If you have calcium in the inside then your water softener is not functioning properly.

Some water softeners are connected to your outside water bibs and some are not - just depends how they set it up. Maybe take a picture of your water softener set up (from different angles) and I can give you some additional feedback.

So test your 2 different outside water bibs and where your autofeed will be connected so you know which is what.
I’ll re test everything. Thanks!!
 

Enjoying this content?

Support TFP with a donation.

Give Support
Thread Status
Hello , This thread has been inactive for over 60 days. New postings here are unlikely to be seen or responded to by other members. For better visibility, consider Starting A New Thread.