New FG build underway! Northern Kentucky

Thanks for he replies guys. The sump pump idea plus CL is a good one. Other than the less than beautiful color, are there any potential challenges or extra issues we might get into if the green monster continues to fester for another couple of weeks (Max)? Will it be lots harder to clean up or anything - it would be PB responsibility anyway I would expect, just weighing options.

Regarding the coping cost - Jimmy thanks for the reply. I had similar thoughts. Our quote has $3750 in it for stamped coping for roughly 96 linear feet. The way he answered, I’m sure he was just trying to get me to drop the subject. Unfortunately it’s going to work because we aren’t increasing the budget, AND have no desire to further delay the project.

Any suggested questions for the concrete guy? Especially considering poured coping?

Thanks!
 
Depends what type of coping. Is he going to do a one shot deal with the deck or make faux copong stones then do the deck?
BTW 4k is the average cost for decent precast coping on a 14x28 size pool
Our contract has poured in place stamped coping, is that what you mean? That is what is priced at $3750, then he said 5X that amount as an estimate for precast! So yeah, I’m confident that was a “go away“ price estimate

Since our pool is 15.5 x 40 with an auto cover, I assume we really only have coping on 3 sides, is that correct? That’s where my 96‘ number came from.

I will get the nitty gritty on how they will pour the coping in my meeting with the concrete guy. The project manager told me last week that they will pour the bond beam and coping at one time, but I’m not confident he is the best resource for such answers. I’d much rate her hear straight from the concrete specialist.

Am I correct to insist on 4000 psi fiber reinforced material for the coping? Is that mix likely to have a big premium price if it’s not already included in their standard spec?
Man, as we get deeper and deeper into this project I am learning so many more details than I would have imagined! Mostly thanks to you all!
 
The concrete guy is gonna use the mix he wants. Hes not paying from his end for a premium mix. The prep is just as important as the pour.
Stamped pour in place can mean a few different things. It likely means hes going to pour one big coping ring amd then go back amd make it look like pieces, or hes gonna stamp a rock/tile pattern on the wet concrete. I'm surprised you dont have pics or choices made on this, most people want 20 choices!
 
The meeting tomorrow is partially to talk about choices. The amount of info share up front on this part of the project has been minimal. We have ideas of what we like, but without talking to the concrete guy, we don’t really know what our options are within the spec. We are hopeful to get it straightened out in this meeting.

Regarding the material, I’m not sure I understand. Are you saying that he will likely work with what he prefers regardless of our request? Or simply that we need to take it up with the pool builder if we feel strongly About a certain mix? Am I needlessly making a big deal out of the mix itself? I know diddly about concrete if you can’t tell :)

Thanks again Jimmy
 
The concrete sub uses the same mix amd had a sqft price w the builder. Anything additional is an add on amd costs someone more. Doesnt hurt to ask him how much to use a high strength mix over what hes got planned. He may say he already uses it. No way to tell without seeing the mix ticket. Maybe just explain you wanna be one and done and are willing to pay a little extra for the best outcome possible. That is of course if it's in your budget. The mix coat is like 20ish a yard more, 200 or so on a full truck load. The prep under the slab is just as important, if not more so
 
Had our meeting with the concrete guys today. They made a really good impression on both of us One of them is clearly an industry veteran and despite being more of the hands-on type he was great at speaking from his considerable 30 yr experience. Anyway, we learned that they will pour the bond beam and coping in one pour. Then pour the patio area in 2-3 more days. They only use 4000 psi high strength mix, and they seem to be very detail focused.
We are planning on going with stamped coping with acid washing to get a good color variation.
From a prep standpoint, all of the base under the patio will be undisturbed soil (no native backfill) along with crushed compacted stone. They will also use a rebar grid to add support.
The one downside is timing. Currently we are on the schedule for May 19-20 for starting the concrete, so that’s 3+ weeks out assuming no weather delays. PATIENCE is going to be tough to come by for the next3 weeks!
 
  • Like
Reactions: Apsuhead
It has been a week and a half of slow progress since I last posted an update. Weather has not been very cooperative, but some work was done in between breaks in the rain. The PB was onsite for at least 2 days this week reworking plumbing at the equipment pad. They had to change it because all of the lines were coming up directly in line with our future fence, so it needed to be moved. I am happy they realized this on their own, but the rework really made me scratch my head. As of this Wednesday they were still in the process of getting the plumbing right - this has really made me question the experience and knowledge of the crew leader on our job. The guy is really nice and polite, but he seems to have only a loose grasp of things - this is the same guy that drilled and installed only 3 lights in our pool instead of 4. When he re-ran the suction side plumbing, he didn’t install individual valves for the skimmers and main drain this time. They were all ganged together through a single valve (unlike before they realized the fence issue at which point there were individual valves for each source). When I noticed the issue, I showed him the pic of “before” to prove it was originally done correctly, then asked him to redo the PVC work with individual valves. He did rework it, but because “he couldn’t get it to line up” he put individual valves on each skimmer, and only left the common valve to shut off the main drain. This means there is currently no way to throttle or shut off the main drain without shutting off all flow. I’ve since pointed this out to the PB as an issue. I assume this is a real problem to be concerned with - if I am making trouble about nothing, please chime in. I can tell you, my confidence in this crew has dropped due to this situation And he lights mistake.

We also had electrician activity at the house this week. They were to run conduit for our new outdoor outlets, the autocover switch, the auto cover itself, and the spa. We have been out of town since Wednesday night now so we don’t know what has gone on in the last 2 days Including the electrical work.

I do have one question for the group - regarding concrete. At the time our pool deck is poured, the pad for our stand alone spa will be poured. How long should we wait to install the spa on the fresh concrete? Is a week enough? Your thoughts are much appreciated As always!

M&B
 
  • Like
Reactions: Apsuhead
Full cure is 28 days on design strength. Will be fine after a week as long as it's good concrete psi wise.
Post a pic of plumbing, by the sounds of it I cant follow how they laid it out. What's got a 2way valve and what's on a 3 way?
 

Enjoying this content?

Support TFP with a donation.

Give Support
Hi Jimmy, photo of our equipment pad is attached. I am pretty confident it has to be modified. The line in the middle is the main drain with the lines on he left and right each being a skimmer. If it isn’t changed there is no way to throttle or shut off the main drains without shutting everything down to the pump. My understanding is that this isn’t ideal. The SWCG and return line to the pool hasn’t been connected yet obviously.

The guy that did the plumbing is suspect at best. When he first re-ran all of this, he had no valves to he skimmers either. It was basically all or nothing until I requested he change it to have a valve for each line

Let me know if I am off base.

EDIT: I JUST TALKED TO A MORE EXPERIENCED MEMBER OF THE PB TEAM AND HE ASSURED ME THAT THE PLUMBING (SHOWN IN THE PIC) IS WRONG / POORLY DONE AND IT WILL BE FIXED WHEN THEY PLUMB THE RETURN WITH THE IC40.
 

Attachments

  • A89E3932-1008-4B34-8CC1-4FA0FDB36AF1.jpeg
    A89E3932-1008-4B34-8CC1-4FA0FDB36AF1.jpeg
    725.7 KB · Views: 47
Last edited:
One more quick question - with a FG pool does it make sense to push the PB to get the equipment functional and filtering the water before concrete coping and patio are poured? He says they do a thorough pool cleaning after all of that dirty work is done and at that time they start up the equipment. He says they wait u t then because it is impossible to keep the dust and dirt out during those processes (which I fully get).

I was just thinking it might be a good idea to get a jump on the water levels before the concrete is done so that we can use the pool as soon as it’s ready. But maybe this is a dumb idea.
 
I would just have him add the same style valve to the middle line. I prefer 2 way valves over bunched up 3 way valves.

It doesnt really matter either way. The dust and dirt tale a few days to clear out amd balancing the pool is quick, wont take more than 48hrs to get it clean enough to swim. 99% of my builds have a kid in the cold water the day its filled with nothing in the pool. No harm in it. Hes telling you what makes his schedule easier not what's right or wrong.
 
  • Like
Reactions: BrittanyV
After much delay, (basically a MONTH) I am finally posting an update to this now slow developing saga. The last 3 weeks have been a challenge in trying to get the PB onsite to continue work. They have clearly overbooked their resources and are not able to meet schedules as planned. To make matters worse, communication is not their strong suit. I feel like I am being "that customer" which constantly complains about stuff, but I am trying to stay on top of details and drive schedules so that I don't miss half of our first swim season! Our plan was to be done by Memorial Day, something we were assured would not be a challenge by the PB, but you can see in the photos below that we have a considerable distance to go before we reach the end.

Since my last update they have made some progress including:
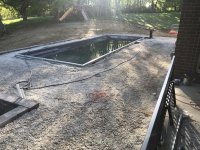
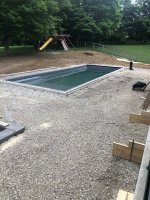
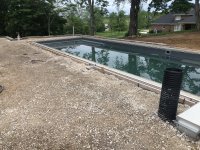
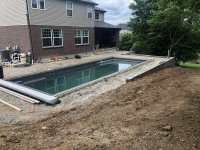
- The backfilling process is finally done around the pool and behind the retaining walls
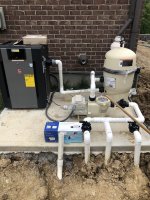
- Plumbing at the equipment pad is now done and done (from what I can tell) correctly. This was some pain because it was done incorrectly twice! It's not the prettiest job I've ever seen, but it should be functional
- The autocover bunker is installed and pre-wired
- The pool wiring is basically complete (including Intellicenter install) except for final connections to the autocover
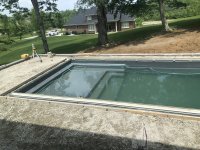
- As of yesterday, the forms are set for the first concrete pour (YAY!) this has been the "long pole in the tent" regarding timing for the last month

We have had some challenges to deal with - one being the realization that from all I have read, large, rectangular fiberglass pools with sun decks are the most difficult to install of all FG pools. The long straight lines of a 40' pool wall are difficult to hold. This becomes much more obvious when using an autocover which extruded aluminum profile rails which get fixed to the FG shell. In our case, the rock backfill had pushed the pool wall in slightly (~1-1.5"). This was clearly visible once the cover track was installed. To address the issue, the PB uses a strange technique (which they claim they were trained on by the factory). They remove some of the gravel backfill in the area that needs adjustment, then the drive 2x2 stakes in the ground a few feet back from the pool shell. The then use ratcheting tie down straps to draw the wall of the pool outward (away from the water) to essentially bend and straighten the wall. It looks kind of... redneck (we are in Kentucky after all)... but it does work to straighten the wall. When the bond beam and decking is poured, it will completely cover the straps and stakes. Because I was concerned, I had the PB commit in writing that this would not impact any expressed or implied warranties on the pool shell or installation. I don't like it, but once it is all covered in concrete I will hopefully forget it is there!

So, like I said, the concrete has been driving our timeline for the past month. I am told these guys are "the best", so we bit the bullet and opted to wait for our pour to fit their schedule instead of getting the "B team". We are thrilled that they were finally onsite getting our project prepped for the pour.

One question about the concrete pour layout- maybe @jimmythegreek can answer? We have a ~3' wide deck/walk along the back edge of the pool. It is bounded on one side by the coping and on the other side by retaining wall. I fully understand that there should be some "fall" in the pour to ensure that water flows away from the pool. This morning before work, I took my trusty 4' level to the pool and found that there is almost exactly (1) 2x4 height in fall (3 1/2") from the outboard edge of the coping forms to the inboard edge of the installed retaining wall. Essentially there is 3 1/2" of fall across our 3' wide walk. This seems steep to me, am I seeing it wrong?

Attached are some updated photos.
 

Attachments

  • 64383181122__895B5636-39AF-4F88-89B3-8CE075496D7A.JPEG
    64383181122__895B5636-39AF-4F88-89B3-8CE075496D7A.JPEG
    736 KB · Views: 86
  • IMG_3533.jpeg
    IMG_3533.jpeg
    819.5 KB · Views: 80
  • IMG_3570.jpeg
    IMG_3570.jpeg
    898.3 KB · Views: 78
  • IMG_3571.jpeg
    IMG_3571.jpeg
    896 KB · Views: 84
  • IMG_3573.jpeg
    IMG_3573.jpeg
    842.1 KB · Views: 85
What is dictating the height on the retaining wall side? Do they have a form set on that side? A pic would help

About 3/4" to an inch max is the right pitch for that
Thank you again for your reply. I snapped a few pics of the area in question first thing this morning. Jeez it is cold out! 43 degrees!
I set a 2x4 at the edge of the retaining wall for illustration only. You can see it is roughly level between the forms and 2x4 sitting on top of the wall, and the 3’ width of the walk.
 

Attachments

  • D815465F-2CC0-4F52-8274-E8174945D348.jpeg
    D815465F-2CC0-4F52-8274-E8174945D348.jpeg
    834.9 KB · Views: 45
Thank you again for your reply. I snapped a few pics of the area in question first thing this morning. Jeez it is cold out! 43 degrees!
I set a 2x4 at the edge of the retaining wall for illustration only. You can see it is roughly level between the forms and 2x4 sitting on top of the wall, and the 3’ width of the walk.
Uggghh.. Looks like someone dropped the ball on that one. Who was responsible for setting the grades of the top of wall? As Jimmy posted it should be 3/4" "Max" (3/8" over 3' would be much more comfortable). For 3.5" of drop you would need 14.5' of run. This means the other back section will have too much pitch on it as well. It almost looks like you might have that in the far back corner assuming the top of wall is level. Setting 1 more course of top block might resolve the issue. I would contact both the wall installer and whoever is doing the pour and make sure every one is on the same page to achieve a proper slope as well as address proper drainage off the patio.
 
Do you have plans for fall protection on taller wall sections?
Hi Rich,
Thanks for your input! I’ve gone out and looked a bit more since this AM. Either there is a piece of the puzzle I am missing, or there is likely a mistake with the wall height. The walls were contracted via the PB, so it is all on them to make right THANKFULLY. The wall was technically built by the landscaping sub as opposed to the PB sub, but the site manager handles it all, and they are all under the same ownership.

My wife and I were looking at it more and we think it may come down to a communication issue. We have been told two different stories of how the decking and walls will interface. Story “A” is that the decking will pour on top of the wall. Story “B” is that the decking will pour inside the top cap blocks leaving the tops of them exposed. It looks to me like the elevations could work if they pour on top of the wall (Story ”A”), but I don’t know if this is common practice (feasible?) or not.

To your question about fall protection, that is a concern of ours as well. The highest portions of wall (about 4’ high) will have an additional 18” high seat wall added. We’ve asked questions about railing requirements of the general contractor multiple times and he contends they are not required, and permits were approved without them. Of course we are really hopeful this is truly the case because we don’t want the look of railing.

If you or others have further comments or suggestions, we are all ears.

Marc
 
Story “A” is that the decking will pour on top of the wall. Story “B” is that the decking will pour inside the top cap blocks leaving the tops of them exposed. It looks to me like the elevations could work if they pour on top of the wall (Story ”A”), but I don’t know if this is common practice (feasible?) or not.
It does seem the intent is to pour on top of the wall. However the first concern would be if you only have 3.5" of drop then after you take out approx 1/2" for pitch you deck will now be only 3" thick on top of the wall and it would get thinner the further away the wall gets. The second issue would be running the patio on top of the wall would run a huge risk of developing a crack at the inside edge of the wall, unless they run a expansion joint along the entire inside edge of the wall. These would be my concerns.
 
Last edited:

Enjoying this content?

Support TFP with a donation.

Give Support
Thread Status
Hello , This thread has been inactive for over 60 days. New postings here are unlikely to be seen or responded to by other members. For better visibility, consider Starting A New Thread.