Pad lower than pool, how to winterize main drain

Mar 22, 2017
43
Bedford, IN
Pool Size
13000
Surface
Fiberglass
Chlorine
Liquid Chlorine
I'm not sure if my pool is plumbed properly. I'm currently fighting a plumbing leak so if I'm going to replace 2 valves I want to do any other required or recommended plumbing at the same time, especially related to the main drain.

My pump pad is below the pool so as you can imagine any leak in valves, with winterizing plugs removed, means lots of lost water.

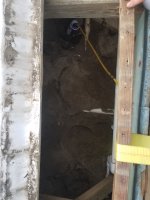
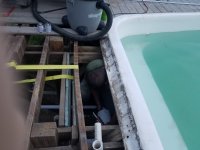
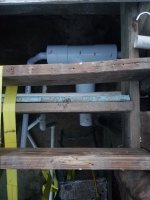
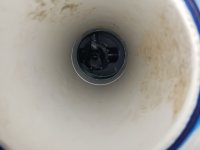
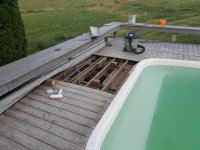
My main drain comes off the drain, rises up at the edge of the pool through sand fill, exits the outer support wall and goes down to the pump. About 9 feet of PVC pipe is exposed before the first valve, which is the leaking culprit (a cheap ball valve). At it's highest point it has an access plug through the pool deck which I believe could be used for either of 2 things. #1 adding antifreeze to this exposed line (which will also add some back to the drain as well), or #2 inserting a test-ball (inflatable plug) to stop the flow of water for plumbing repairs.

Currently there is no way to drain this unless the pool level is lowered in the winter, which is a problem for the cover.

I have a test plug I can use to stop water flow while doing repairs. The problem I have is that I don't know the best way for this to be routed. I can remove boards from the pool deck and excavate sand to a level a couple feet down if plumbing changes to the riser part are needed. I envision the ideal way to do this is to have some sort of valve similar to a fire hydrant in the pool deck, but the actual shutoff portion is down in the sand where it will be less prone to freezing. But that seems like I may be overthinking this as there would be no way to maintain such a valve. Is the best way really to just dump a bunch of antifreeze in that 9' section of pipe so it doesn't freeze? Seems like a way to ensure that if a leak occurs you keep losing the antifreeze.
 
Hey CB !! You are way overthinking this. What you need is a strong blower like a cyclone or a very large compressor. You need high volume of air at relatively low PSI. If you get enough air in the pipe going back to the main drain, and trap it with the regular valve, the leftover water level in said pipe is below the frost line and the rest can’t freeze. I don’t know what your local frost line is, but it’s probably around 2 ft deep for Indiana. So any pipe above that depth needs to be winterized. It will never be cold enough to freeze down to your main drains, or even halfway to them for that matter.
 
Hey CB !! You are way overthinking this. What you need is a strong blower like a cyclone or a very large compressor. You need high volume of air at relatively low PSI. If you get enough air in the pipe going back to the main drain, and trap it with the regular valve, the leftover water level in said pipe is below the frost line and the rest can’t freeze. I don’t know what your local frost line is, but it’s probably around 2 ft deep for Indiana. So any pipe above that depth needs to be winterized. It will never be cold enough to freeze down to your main drains, or even halfway to them for that matter.
I just want to confirm we are both understanding each other. I made a little paint sketch of my main drain layout.

And if I understand you correctly you're saying to blow air in the end of the line at the right (I will have to add a union) while the valve is open forcing the water level in the verticle section of line nearest the drain down below the upper horizontal section then close the ball valve trapping that air bubble? That will still leave water in the section of line near the ball valve and there is no way to evacuate that without losing my air bubble. Even if I were to get that line completely full of air, the slightest leak of air will result in the water pushing back up into that section of exposed pipe because gravity is pushing it there and air pressure is the only thing holding it back.
1610291744637_Pool_Drain.jpg
 
Thanks for the drawing, I’m seeing it better now. Many older pools have the mains tied into the skimmer and if the diverter piece is used to tie the two pipes together in the skimmer, it can be blown just the same, but you’ll need a powerful blower to make a dent. Of course any leaks will negate the process, but if you just fill the pipe with antifreeze it won’t last long and will leech out of the main drain after mixing.

Calling in some pros for their thoughts. @ajw22 @Dirk @Jimrahbe
 
Sorry, I know almost nothing about winterizing a pool. I removed my main drains and didn't experience any difference in circulation. Frankly I would cork the thing up permanently with a drain plug, figure out a way to suck or blow all the water out of it and never worry about it again.

If you don't like that idea, a drain plug could be used temporarily, too, to fix that leaking valve. Don't replace it with another ball valve. Use a high-quality Jandy two-way valve instead.

Newdude's estimate of your frost line looks to be about right, somewhere between 20 and 30 inches.

drain plug.jpgfrost line map.png
 
Last edited:
Best way is to install a winterizing plug with Schrader valve in it when the pool is warm enough to still get in.
The other idea I've seen is to have a dedicated wintwrizer setup with valving amd a pressure guage inline. You air gap it then ahit valve and guage rises slightly with water pressure trying to come back.
Leaks are a rarity and usually above the ground near pad. Use good valves and proper glue work, then dont sweat it
 
  • Like
Reactions: Newdude
Best way is to install a winterizing plug with Schrader valve in it when the pool is warm enough to still get in.
The other idea I've seen is to have a dedicated wintwrizer setup with valving amd a pressure guage inline. You air gap it then ahit valve and guage rises slightly with water pressure trying to come back.
Leaks are a rarity and usually above the ground near pad. Use good valves and proper glue work, then dont sweat it
Thanks everyone! Jimmythegreek, your post gives me an idea. Because the riser goes up through the deck I can tap in there and add a Schrader valve so I can just force an air gap in the high spot and with constant air pressure I can then slowly drain out the exposed pipe section without fear of the water pushing back up the main drain line.

I do plan to use good valves, I plan to use a Jandy Neverlube diverter valve to replace the leaky cheap ball valve. That being said, immediately after the ball valve is a 3-way diverter valve. I don't see the purpose for the ball valve unless it's to enable maintenance of the diverter valve. Maybe I will just replace the current diverter with a Neverlube and pray it seals up tight enough to hold the air bubble.

Oh, and ETA, I'm not a fan of plugging the main drain because I already have lower than planned circulation. Before I bought the house 1 of the return lines under concrete (pool is half concrete deck, half framed wood deck) developed a leak and they plugged and capped it so I'm down to 2 of 3 working return lines.
 
That ball valve is there so that you can work on everything downstream of it without draining your pool. If I'm picturing your setup correctly, the three-way probably can't perform that function, depending on how its plumbed.
 
Post a pic of the actual pad so I can see the setup. As for 2 returns you may wanna try 90deg return fittings, really helps move the water around in your situation and they're cheap
@jimmythegreek
First of all, I apologize about the delay, between work and snow cover I couldn't get good pictures of the pad until recently. The 2 functional returns are at the deep end and are opposite one another. I think a 90-degree on one and straight on another would help induce better circulation to the end that doesn't have a return by getting a circular flow going in the water.

Pad pictures are attached. Bottom drain is the middle line that goes up high and over to the right (has ball valve with broken handle on it near the 3-way valve), skimmer is the line below that on the wall that comes down and runs to the right of the bottom drain line, return is the line that goes into the wall to the left of the post. I don't have any idea what the capped line is.
20210227_074015.jpg
20210227_074037.jpg

That ball valve is there so that you can work on everything downstream of it without draining your pool. If I'm picturing your setup correctly, the three-way probably can't perform that function, depending on how its plumbed.
The next item downstream of the ball valve is the leaking 3-way valve so outside of replacement or maintenance of the 3-way valve it seems redundant. Either way, it's a moot point now as I purchased an inflatable test ball I can drop down the riser part of the bottom drain line to seal it off for any maintenance needs or to evacuate water from the exposed portion of that line and pour in antifreeze.
 

Enjoying this content?

Support TFP with a donation.

Give Support
How deep is your frost line? Usually your waterline entering the house is below that depth of you dont know offhand.
In the pic what is on the other side of the boards pipes go thru?
My advice is to dig a pit and line it with an 8 or 10" pvc sleeve and a lid. Plant 2 valves in there and use that for winterization. You can pack it full of insulation it wont freeze amd use that going forward. I have 3 sump pits near my pool 6 to 7ft deep with active pumps in them. No insulation and just lids with a few inches of mulch over them. Even in super cold snaps they dont freeze the water and earth is warm down there, any snow falling melts on the lids faster than anywhere else
I think if you look back at my previous picture it will help it make sense. The pool is "in-ground" but on a grade so down where the pad is there is a wood retaining wall with sand fill between the wall and the fiberglass pool. That is the wood wall you're seeing.
 
Gotcha, was hoping that wasnt the retaining wall itself. Keep an eye on that wood, if it rots gonna be a nightmare. A pit with valves will work well in this situation.
@jimmythegreek
So far so good on the wood. It's old enough that it was before they changed the composition of the treating chemicals and it's holding up well. It also helps that everywhere there is retaining wall there is overhead deck that shields it from rain and the area is well-drained because of the grade.

As far as the pit goes, because it's pool deck above I don't think I can do an actual pit. I would have to make an access hole in the retaining wall or make a small hole through the deck. Right now I'm thinking put a ball valve (diverter won't seal off well enough would it?) behind the retaining wall and use a 6" PVC section as a small "pit" around the valve. Then I can put a small access hole through the deck and make a tool that can reach down in and turn the valve on/off. Do you have any other ideas how that could be done?
 
That would work fine. I would use a diverter like jandy over a ball valve. They seal air tight amd can be rebuilt, ball valve is a cut out job. Bigger is better amd if you can leave room to work on it in 10yrs even better
@jimmythegreek
Thanks for all of your help. After a long backorder on the Jandy Neverlube I finally got the "pit" done. I had to excavate about a ton of sand to get deep enough in there to be sure it wouldn't freeze. Unfortunately I wasn't able leave much room to work on it. I used a 6" Tee and drilled a hole in the retaining wall to allow access to turn it on/off. As you can see from the attached pics it was tight and I couldn't get a larger Tee to fit. I had to use a ratchet strap to pull the joist over just so I could fit, haha. I think the valve could still be accessed on the front only for maintenance down the road (you can see the 8 screws in the last pic) but only by one hand (it's a full arm reach up in there).
 

Attachments

  • 20210521_202843.jpg
    20210521_202843.jpg
    320.1 KB · Views: 3
  • 20210521_210126.jpg
    20210521_210126.jpg
    335.4 KB · Views: 3
  • 20210521_210901.jpg
    20210521_210901.jpg
    379.9 KB · Views: 3
  • 20210523_205459.jpg
    20210523_205459.jpg
    126.6 KB · Views: 3
Forgot the pic from a bit further back. All the plumbing routes through the area that is torn up so every time I have had a leak it's been in there. I have to pull the crossbar off the cover track and move it so I can pull off the deck boards, suck out the sand with my shop-vac, then crawl down in there.
 

Attachments

  • 20210523_205837.jpg
    20210523_205837.jpg
    464.5 KB · Views: 2
Thread Status
Hello , This thread has been inactive for over 60 days. New postings here are unlikely to be seen or responded to by other members. For better visibility, consider Starting A New Thread.