Balboa Panel Electrical Problem - how bad is this?

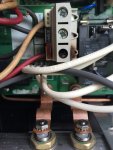
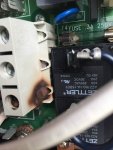
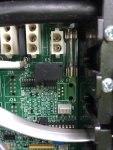
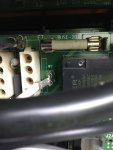
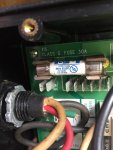
My spa is an older Frankentub that has been refurbished bit by bit over the years. I've got a Balboa VS 501 spa pak in my hot tub - about 3 years old now, and installed by an electrician (well, an apprentice...). I've had NO electrical issues at all, until now. We shut down the spa over the summer and so today I wanted to start it up again. I had everything all prepped, but when I threw the breaker to power it up, I got nothing on the topside. I checked that the breaker hadn't been tripped - it hadn't. I got continuity on the power coming into the pak, so opened it up to check inside and see if any fuses had been blown - they looked okay to me (jpgs attached). However, there is obvious heat damage where the power has been connected to the board (jpgs attached). SO, what am I looking at, both in terms of a problem and a solution? I'm not an electrician, but I can connect and disconnect wires and follow instructions, so I'd like to do as much repair as I can.

Thanks in advance,
 

Attachments

  • Spa power close up.JPG
    Spa power close up.JPG
    284.5 KB · Views: 36
  • Spa power closeup #2.JPG
    Spa power closeup #2.JPG
    317.7 KB · Views: 33
  • spa fuse 1.JPG
    spa fuse 1.JPG
    387.8 KB · Views: 29
  • spa fuse 2.JPG
    spa fuse 2.JPG
    243.7 KB · Views: 26
  • spa fuse 3.JPG
    spa fuse 3.JPG
    325.8 KB · Views: 25
I think you have to take out the board that has the white power block and see if the board is burnt on the back. If you know how to do some soldering your may be able to fix the connection to the power block. It depends how deep into the board that burn goes.
 
Last edited:
  • Like
Reactions: FrankfromPG
That PCB terminal block is definitely toast. However, it looks like the damage is confined to the terminal block.
The good news is that if the board isn't too compromised you can probably fix it with a little cleanup and some soldering.

The terminal block is easy as the info is right on it and visible.
Weidmuller LX 15.00
17M8371-40.jpg
 
As Fred said, it looks like a loose connection at the wire termination. Most likely the screw wasn't tightened properly to begin with.

If you click the link I provided there's a datasheet for the block. It lists required torque as 2.4Nm to 4Nm (1.8ftlb to 3ftlb).
While that's not much, the wires need to be twisted and fully inserted into the terminal block before tightening. It wouldn't be a bad idea to tin the wires either.
 
  • Like
Reactions: FrankfromPG
I've got the board out of the unit and I've already got the replacement, but I can't seem to desolder the connection. I've used three different irons (all the way up to a Weller gun), flux, wicking tape, solder sucker, but can't get the solder to melt. The board heats up a lot, and that caused me to back off. Is there another solution besides nipping off the tips in the back and trying to punch or drill out the holes/contact points?

If/when I do get this solved, I will certainly take everyone's advice and check the tightness of the connections. Thanks again.

@ogdento desoldering tips?
 
I'm assuming you're trying to desolder the gray terminal block... it was probably originally done with lead free solder which can be harder to remove.

I'd try applying some soldering flux and adding a bit of fresh solder to each joint... see if that'll get it melting. You may have to desolder/add solder etc. a couple of times until it's free.

Also, I'd remove any screws or any other metal bits you can (without damaging it) from the existing terminal block because they're just going to sink your iron's heat.
 
  • Like
Reactions: FrankfromPG

Enjoying this content?

Support TFP with a donation.

Give Support
Get a piece of stripped copper wire, twist it well so it holds a straight shape, and smear a little flux on it. You now have a solder wick. As you're attempting to desolder your connection, touch your solder wick to the solder; since copper is such a good conductor and heats up quite quickly, it will draw (wick) the solder away from your connection point.
 
  • Like
Reactions: FrankfromPG
Well just re-read your post and saw that you're having trouble melting the solder. There is likely a copper layer inside the board that is acting as a heat sink, drawing heat away from your solder. So +1 to ogdento's recommendation to add some fresh solder. That should help isolate where the heat is going. You can also try using a hair dryer (but not a heat gun) to moderately heat the board as you're attempting to desolder, if you can make it work (kind of an awkward thing to attempt).
 
  • Like
Reactions: FrankfromPG
Those are some really heavy bars in that terminal strip, and they act like big heat sinks. It'll take a lot of heat to get the penetrations hot enough to melt the solder. If all else fails, I'd take a dremel tool cut the terminal strip apart and get as much metal as I could off without harming the board and then desolder the pins.
 
Before I go any further down this rabbit hole, a friend suggested I check the continuity across each terminal to make sure that I'm not going through all this trouble when the problem is further up the line. I got out the multimeter and check across each of the posts on the back of the board. All three had the same reading (0.7) - doesn't this suggest that the posts/terminals are not fried (even though there is heat damage)? Does this suggest/indicate that the problem is somewhere else down the line - that the board is"fried"?
 
Let's first be sure we're talking about the same thing... in your first picture there's the terminal block with the White(neutral), Black(hot), and Red labels on the board. Are you saying you measure a dead short (0.7ohms) from white to black, white to red, and black to red??
 
Let's first be sure we're talking about the same thing... in your first picture there's the terminal block with the White(neutral), Black(hot), and Red labels on the board. Are you saying you measure a dead short (0.7ohms) from white to black, white to red, and black to red??
On the back of the board, I touched the multimeter tips from white to white, red to red and black to black, getting the same reading each time. Then, I turned the board over and put one tip inside the hole and the other tip on the screw for each of the terminals. Same reading each time. As a sort of control, I did try between colours on the back (one on red, one on black etc) and got no reading at all.
 
Thread Status
Hello , This thread has been inactive for over 60 days. New postings here are unlikely to be seen or responded to by other members. For better visibility, consider Starting A New Thread.