
Cyanuric acid (CYA) is the chemical name for the product commonly called “pool water stabilizer” or “pool water conditioner”. CYA protects free chlorine (FC) from the sun and protects swimmers from chlorine. Accurate testing of the CYA level is critical to managing your pool water and is the one test that is most often performed incorrectly. These instructions are intended to be as detailed as possible to guide you most effectively.
CYA Test Instructions
- Fill your CYA mixing bottle to the lower mark with pool water.
- If you have a TF-Pro CYA mixing bottle, fill with 7.5 mL of pool water.
- If you have a TF-100 CYA mixing bottle, fill to the bottom of the white sticker (15 mL).
- If you have a Taylor #9191 CYA mixing bottle, fill with 7 mL of pool water.
- Continue filling to the upper mark with R-0013 CYA reagent. Regardless of your mixing bottle or view tube, the mixture should be equal volumes of R-0013 and pool water.
- If you have a TF-Pro CYA mixing bottle, add 7.5 mL of R-0013 to yield 15 mL of total mixture.
- If you have a TF-100 CYA mixing bottle, add R-0013 to the top of the white sticker (15 mL, to yield 30 mL of total mixture).
- If you have a Taylor #9191 CYA mixing bottle, add 7 mL of R-0013 to yield 14 mL of total mixture.
- Cap and then mix the mixing bottle for 30 seconds. Mix by inverting the bottle repeatedly.
- The CYA view tube has lines and a number (30, 40, 50, 60 etc.) next to each line. Note that the larger numbers are at the bottom of the tube and smaller numbers at the top. Pour the mixture from the mixing bottle into the CYA view tube until the fill level reaches the first line. The number next to the first line will be 90 or 100.
- Stand outdoors with your back to the sun and hold your CYA view tube at waist level, in the shadow of your body (see notes). Partially cloudy weather is fine. If weather is very overcast or dark, find the brightest artificial light you can.
- Glance (don’t stare) down at the tube at your waist. If the dot is not obscured like “End Test” in the pictures below, proceed to step 7. If the dot is completely obscured, then your CYA is over 90 and you should proceed to step 8.
- Repeat filling to each next line and glancing until the dot is completely obscured and the tube looks like the “End Test” picture below. When the dot is completely obscured, note the number next to the fill line on your CYA view tube, then add 10 to that number. This is your CYA level in parts per million (ppm). CYA should be recorded as a multiple of 10 (i.e. 30, 40, 50, etc.) in PoolMath, to the forum, and with our FC/CYA tool.
- For example, if your dot is not obscured at 60, but when you fill to the next line (50) it is obscured, then the transition from not obscured to obscured happened between 60 and 50. Because the scale is not linear between the lines, you cannot determine CYA between the lines, so we round up to the next higher 10. In this example, your CYA is 60.
- Here is your reference. The last photo is what it should look like at a glance –
don’t stare at the dot!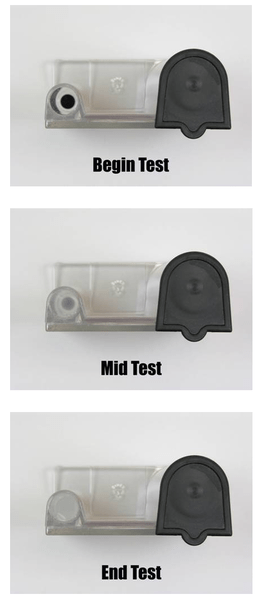
- If the view tube is completely full, and you can still see the black dot clearly, your CYA level is zero.
- If the view tube is completely full and the black dot is only partially obscured, your CYA level is above zero but lower than the lowest level your test kit can measure (20 or 30 ppm).
- If your CYA level is 90 or higher, repeat the test but adjust the procedure as follows:
- Fill the CYA mixing bottle to the lower mark with pool water.
- Continue filling the CYA mixing bottle to the upper mark with tap water.
- Cap the bottle and mix for 30 seconds.
- Pour off half of the contents of the mixing bottle, so it is again filled to the lower mark.
- Continue the test normally from step 2, but multiply the final result by two.
Notes
- This test is influenced by water temperature. If your water sample is below 60 degrees F, allow it to warm to at least 60 degrees F before testing. If necessary, warm the CYA mixing bottle in warm tap water.
- If you are not confident in your reading, you can pour the solution from the view tube back into the mixing bottle and then try filling the view tube again. You can repeat this portion of the test over and over again for several minutes without affecting the test results.
- We instruct to add 10ppm to your CYA reading to essentially round up to the nearest increment of 10. If your dot is not completely obscured at 60ppm, but is completely obscured at 50ppm, the “true” measurement of your CYA is somewhere between 50 and 60 ppm. Always round up to the bigger increment of 10.
- We recommend strong indirect lighting, with the sun to your back. Very roughly speaking, direct overhead sunlight is around 100,000 lux, strong indirect light (i.e. shaded from the sun) is around 10,000 lux, an overcast sky is around 1000-5000 lux but varies on how overcast (which is why a bright white cloud overcast is still OK), indoors is usually < 1000 even in a bright kitchen (more typically 500 lux). Sunlight, even on an overcast day, will provide more accurate results than indoor lighting.
- Very rarely, cloudy or murky water can affect the CYA test. To check for this, fill the view tube with straight pool water. If you can still see the black dot clearly, the cloudy/murky water is not affecting the test result.
- View tubes and mixing bottles come in two common sizes. One set requires 7 ml each of pool water and reagent, and reads CYA levels down to 30. The other set uses 15 ml each of pool water and reagent, and reads CYA levels down to 20.
- R-0013 contains melamine, which binds to cyanuric acid, forming the white precipitate which turns the sample cloudy.
- The precision of the test, when done correctly, is around plus or minus 15 for levels up to 90 and plus or minus 30 for levels between 100 and 200. Novices often have problems reading the test correctly, and tend to get higher than actual readings.


