
Just finished converting our 18x9 Intex pool from hose connections into the pool to PVC connections. I also installed the infamous Hayward skimmer after having subpar results from the floating skimmer.
To install the Hayward skimmer, we had to drain about 7 inches or so out of the pool. Basically, just enough to allow the skimmer gasket to be held in place without any part of it submerged in water. I traced the inside of the gasket with marker on the outside of the pool while holding it up as high as I could against the light gray seam. Cutting it out with a razor blade was easy, but stressful. I hate the finality feeling of "there's no turning back now." I had similar anxiety gluing the PVC connections. Regardless, the install was easy. Once it was cut out, I installed the gasket (without cutting the gasket), lined up the frame, poked holes through ONLY where the screws were going to go, as there are extra holes, fed the screws through and tightened. The gasket was wavy because I undercut the opening, so I was convinced I'd get some leaks. I tightened the screws as much as I could, while remembering that they can't be overtightened because they're screwing into plastic, which could crack. At the last minute, before refilling the pool, my wife had enough of my leak anxiety and told me to just go clear caulk around the skimmer on the outside of the pool. Probably a good call.
My wife had purchased a waterfall attachment for the water going back into the pool. We waffled back and forth about whether we should leave the current incoming water jet or not. In the end, we decided to keep it, as it has its own shut off valve. The executive decision to cap off the original two outgoing water connections was my own. I ended up using the black caps that came with the pool. They installed on the inside of the pool and were then covered with the original gray screw on screen things. I assume they function by the pressure of the water pushing them into place and creating a seal. I'm still not convinced they work 100%, so I may do some plugging or piping on the outside of the pool. I believe they're 3/4" connections, so I was thinking of either using a 3/4" coupling + small section of 3/4" PVC + cap, or using some 3/4" elbows and piping them together to create a loop. I imagine it's mostly an aesthetic decision, as long as the water doesn't leak out. I'm sure there's a cool looking design solution somewhere in there.
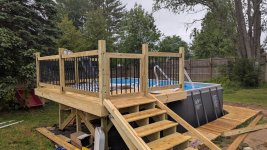
Stepping back to get an overview of the side of the pool, it looked like we had all of our devices in place. This was imperative in my mind, because unlike pliable hoses, hard piping requires everything to be in place exactly as they will be in the future.
Then began the most difficult part for me: finding all of the necessary connection pieces. Idk if it's just me, but standing in that Lowes/Home Depot aisle with the millions of PVC connectors makes my eyes glaze over. Incidentally, I find plumbing to be kind of simple, theoretically. It's really just connecting pipes. But it's almost like they realized it was too easy, so to keep professional plumbers in business, they decided to make the parts confusing as heck. "Oh, you've got a 1.25" PVC dwm female slip on sprocket to 2" counterclockwise-fit shut off valve coupling adapter? That's the wrong part. You must have been measuring the inner diameter instead of the outer diameter under a crescent moon in May." Sorry, that's a bit exaggerated, but I had to make 5 separate trips to the plumbing section, plus 2 Amazon orders, and I still had to rig some stuff up with random scrap parts.
So here's basically what I ended up using. If you're about to tell me there was an easier way, well, I'm not surprised.
ArrogantF Hose Conversion Adapters Kit compatible with Intex Coleman 4560 40mm to 1 1/2 inch conversion kit for Hayward Intex pool hose connector etc. - I got this off Amazon because one of the reviews said I'd need it. They were right. The bottom screw connection of the Hayward skimmer is larger than 2 inches (maybe 2 3/4 or 3"?) so the gray adapter was used to screw into the smaller threads on the bottom of the skimmer. This provided a 2 inch threaded connection on the bottom to allow for...
2 inch PVC DWV Fitting Cleanout Adapter - this was used to screw onto the bottom of the skimmer adapter kit, waterfall, and original shutoff valve for the water jet. I used Teflon tape. No PVC cement, as I'm sure I'll have to remove these at some point. Surprisingly, no leaks from any of them.
1 1/2 in. x 2 in. PVC DWV Hub x Hub Increaser/Reducer Coupling - the larger side of this slid over the 2 in Cleanout Adapter. The smaller side allows 1 1/2" PVC pipe to slide inside. Used PVC primer and cement.
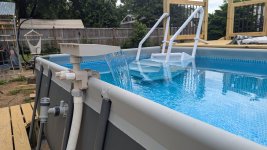
1 1/2 in. PVC Sch. 40 Solvent x Solvent Ball Valve - this accepts 1 1/2" PVC on both sides, and functions as an inline shutoff valve. I installed one below the skimmer, and one below the waterfall. If you ever need to work on the filter or change some hoses, you'll need to stop the water flow. I should have installed another for the original Intex waterjet, but didn't because it already had one. (***More on that later) Also, optionally, it seems that my local Lowes and HD sells different brands. One had a black handle and the other was blue. It may actually be for indicating cold water. Either way, I decided to use blue for the water leaving the pool, and black for the water going back into the pool. Just thought it looked cooler.
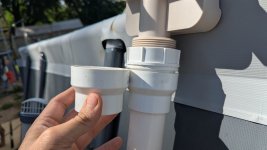
2 in. x 1-1/2 in. PVC Schedule 40 MPT x S male reducer adapter - this is used to connect the 1-1/2 PVC pipe to the original pool hoses. This is the part that, while it worked, I'm sure there is a better option for. The problem is, the gray pool hose screw on thing does not fully screw into the adapter, which means there will be a gap between the hose and the PVC. The solution, as far as I could figure, was to use any o rings and grommets I could find. I think I ended up using the extra black rings from the Amazon hose conversion kit. I wish I would have taken pics of it, but I'm pretty sure I used 2 extra rings for each connection. One of the black rubber rings was roughly the same size as the lip on the end of the pool hose, so I actually put one of those over the lip, onto the pool hose, and up against the lip. Then I slid the gray screw on part into position, which pressed the rubber ring against the inside of the hose lip. Then I took another rubber ring, I think the flatter one, and put that on the outside part of the hose lip, which would compress against the PVC reducer. So holding the hose with the opening facing the right, the order from right to left was PVC reducer, flat black rubber ring, hose lip, smaller rounder rubber ring, gray screw on piece. Hopefully that makes sense. Essentially, you'd need to reduce the amount of space that the gray piece needs to screw into before the rings get compressed.
Red Silicone Rubber Sheet, 60A 1/16 x 9 x 12 Inch Commercial Grade, Made in the USA, No Adhesive Backing, High Temp Gasket Material - I also bought this off Amazon, which is basically a rubber sheet that you can use to cut out custom gaskets and o rings. I didn't end up using it, but I could have, and I don't regret getting it. It will almost certainly get used in the future.
Besides the above, I also used an entire 10ft section of 1-1/2" PVC schedule 40 pipe, three 1-1/2" 90 degree elbows, and one 1-1/2" tee. The Amazon conversion kit came with Teflon tape, but I already had my own of better quality. I used Oatey regular PVC cement (brown) and Oatey purple PVC primer.
Everything was basically piped straight down. The ball valves are roughly 26" down from the top of the pool wall. The tee was used to connect the waterfall and the original water jet together. I opted to install the waterfall ball valve after the tee so that we'd be able to turn off the waterfall and water jet independently. Once everything was piped down to a few inches above ground level, I ran them 90 degree towards the filter. I ran the original white Intex hoses towards the PVC and connected them.
To install the Hayward skimmer, we had to drain about 7 inches or so out of the pool. Basically, just enough to allow the skimmer gasket to be held in place without any part of it submerged in water. I traced the inside of the gasket with marker on the outside of the pool while holding it up as high as I could against the light gray seam. Cutting it out with a razor blade was easy, but stressful. I hate the finality feeling of "there's no turning back now." I had similar anxiety gluing the PVC connections. Regardless, the install was easy. Once it was cut out, I installed the gasket (without cutting the gasket), lined up the frame, poked holes through ONLY where the screws were going to go, as there are extra holes, fed the screws through and tightened. The gasket was wavy because I undercut the opening, so I was convinced I'd get some leaks. I tightened the screws as much as I could, while remembering that they can't be overtightened because they're screwing into plastic, which could crack. At the last minute, before refilling the pool, my wife had enough of my leak anxiety and told me to just go clear caulk around the skimmer on the outside of the pool. Probably a good call.
My wife had purchased a waterfall attachment for the water going back into the pool. We waffled back and forth about whether we should leave the current incoming water jet or not. In the end, we decided to keep it, as it has its own shut off valve. The executive decision to cap off the original two outgoing water connections was my own. I ended up using the black caps that came with the pool. They installed on the inside of the pool and were then covered with the original gray screw on screen things. I assume they function by the pressure of the water pushing them into place and creating a seal. I'm still not convinced they work 100%, so I may do some plugging or piping on the outside of the pool. I believe they're 3/4" connections, so I was thinking of either using a 3/4" coupling + small section of 3/4" PVC + cap, or using some 3/4" elbows and piping them together to create a loop. I imagine it's mostly an aesthetic decision, as long as the water doesn't leak out. I'm sure there's a cool looking design solution somewhere in there.
Stepping back to get an overview of the side of the pool, it looked like we had all of our devices in place. This was imperative in my mind, because unlike pliable hoses, hard piping requires everything to be in place exactly as they will be in the future.
Then began the most difficult part for me: finding all of the necessary connection pieces. Idk if it's just me, but standing in that Lowes/Home Depot aisle with the millions of PVC connectors makes my eyes glaze over. Incidentally, I find plumbing to be kind of simple, theoretically. It's really just connecting pipes. But it's almost like they realized it was too easy, so to keep professional plumbers in business, they decided to make the parts confusing as heck. "Oh, you've got a 1.25" PVC dwm female slip on sprocket to 2" counterclockwise-fit shut off valve coupling adapter? That's the wrong part. You must have been measuring the inner diameter instead of the outer diameter under a crescent moon in May." Sorry, that's a bit exaggerated, but I had to make 5 separate trips to the plumbing section, plus 2 Amazon orders, and I still had to rig some stuff up with random scrap parts.
So here's basically what I ended up using. If you're about to tell me there was an easier way, well, I'm not surprised.
ArrogantF Hose Conversion Adapters Kit compatible with Intex Coleman 4560 40mm to 1 1/2 inch conversion kit for Hayward Intex pool hose connector etc. - I got this off Amazon because one of the reviews said I'd need it. They were right. The bottom screw connection of the Hayward skimmer is larger than 2 inches (maybe 2 3/4 or 3"?) so the gray adapter was used to screw into the smaller threads on the bottom of the skimmer. This provided a 2 inch threaded connection on the bottom to allow for...
2 inch PVC DWV Fitting Cleanout Adapter - this was used to screw onto the bottom of the skimmer adapter kit, waterfall, and original shutoff valve for the water jet. I used Teflon tape. No PVC cement, as I'm sure I'll have to remove these at some point. Surprisingly, no leaks from any of them.
1 1/2 in. x 2 in. PVC DWV Hub x Hub Increaser/Reducer Coupling - the larger side of this slid over the 2 in Cleanout Adapter. The smaller side allows 1 1/2" PVC pipe to slide inside. Used PVC primer and cement.
1 1/2 in. PVC Sch. 40 Solvent x Solvent Ball Valve - this accepts 1 1/2" PVC on both sides, and functions as an inline shutoff valve. I installed one below the skimmer, and one below the waterfall. If you ever need to work on the filter or change some hoses, you'll need to stop the water flow. I should have installed another for the original Intex waterjet, but didn't because it already had one. (***More on that later) Also, optionally, it seems that my local Lowes and HD sells different brands. One had a black handle and the other was blue. It may actually be for indicating cold water. Either way, I decided to use blue for the water leaving the pool, and black for the water going back into the pool. Just thought it looked cooler.
2 in. x 1-1/2 in. PVC Schedule 40 MPT x S male reducer adapter - this is used to connect the 1-1/2 PVC pipe to the original pool hoses. This is the part that, while it worked, I'm sure there is a better option for. The problem is, the gray pool hose screw on thing does not fully screw into the adapter, which means there will be a gap between the hose and the PVC. The solution, as far as I could figure, was to use any o rings and grommets I could find. I think I ended up using the extra black rings from the Amazon hose conversion kit. I wish I would have taken pics of it, but I'm pretty sure I used 2 extra rings for each connection. One of the black rubber rings was roughly the same size as the lip on the end of the pool hose, so I actually put one of those over the lip, onto the pool hose, and up against the lip. Then I slid the gray screw on part into position, which pressed the rubber ring against the inside of the hose lip. Then I took another rubber ring, I think the flatter one, and put that on the outside part of the hose lip, which would compress against the PVC reducer. So holding the hose with the opening facing the right, the order from right to left was PVC reducer, flat black rubber ring, hose lip, smaller rounder rubber ring, gray screw on piece. Hopefully that makes sense. Essentially, you'd need to reduce the amount of space that the gray piece needs to screw into before the rings get compressed.
Red Silicone Rubber Sheet, 60A 1/16 x 9 x 12 Inch Commercial Grade, Made in the USA, No Adhesive Backing, High Temp Gasket Material - I also bought this off Amazon, which is basically a rubber sheet that you can use to cut out custom gaskets and o rings. I didn't end up using it, but I could have, and I don't regret getting it. It will almost certainly get used in the future.
Besides the above, I also used an entire 10ft section of 1-1/2" PVC schedule 40 pipe, three 1-1/2" 90 degree elbows, and one 1-1/2" tee. The Amazon conversion kit came with Teflon tape, but I already had my own of better quality. I used Oatey regular PVC cement (brown) and Oatey purple PVC primer.
Everything was basically piped straight down. The ball valves are roughly 26" down from the top of the pool wall. The tee was used to connect the waterfall and the original water jet together. I opted to install the waterfall ball valve after the tee so that we'd be able to turn off the waterfall and water jet independently. Once everything was piped down to a few inches above ground level, I ran them 90 degree towards the filter. I ran the original white Intex hoses towards the PVC and connected them.
Attachments
-
 PXL_20250526_232611818.MP~2.jpg532.8 KB · Views: 10
 -
 PXL_20250526_232626011.jpg365 KB · Views: 10
 -
 PXL_20250527_134247015.jpg266.9 KB · Views: 10
 -
 PXL_20250521_194151987.jpg683.2 KB · Views: 9
 -
 PXL_20250527_134314346.jpg182.3 KB · Views: 9
 -
 PXL_20250526_200500967.MP.jpg185 KB · Views: 6
 -
 PXL_20250526_200507731.jpg217.8 KB · Views: 7
 -
 PXL_20250523_193533747.jpg393.4 KB · Views: 9
