Waterline tile help

Apr 12, 2013
9
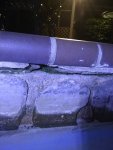
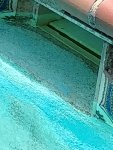
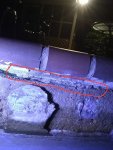
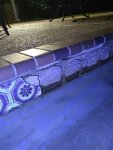
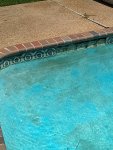
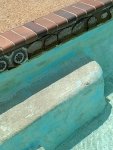
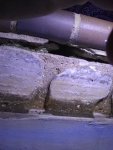
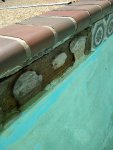
My pool is an in ground gunite 30k gallon. It was built in 1980 with the house. I bought it about 8 years ago. When we bought the house it had a few missing tiles and several mismatched ones. I believe that everything is original on it except the mismatched tiles that I already mentioned. My plan all along was to replace the tiles because of the mismatched ones. My daughter (she was much younger at the time or this would have really angered me) was trying to "help me out" and during the course of that first summer removed a lot of tiles. I had no idea she was the culprit until I had fished out a lot of tiles and tile pieces. So I have neglected this project until now. Now I'm ready to get this waterline looking good again. I want the whole pool resurfaced but my budget will not allow that all at once. I got a quote from one pool company and they want $5800 to remove and replace waterline tiles. No coping work or anything else. To me that seems excessive. I called several but so far they were the only ones who showed up to give me a quote. I have also found out that 90% of the pool work regarding tiles and plaster is done by one company and the pool contractors sub the work out. I am a handy guy and I have tools, including air compressors and a pneumatic hammer. What I do not have is experience with tiles, especially pool tiles. I am getting a quote from a tile guy, but he didn't want to even do the job if he has to tear out the old tile. I need some advice please. I will post pictures with my questions. Any help is greatly appreciated.
 

Attachments

  • IMG_20200524_210311336.jpg
    IMG_20200524_210311336.jpg
    284.8 KB · Views: 26
  • IMG_20200522_120626055.jpg
    IMG_20200522_120626055.jpg
    306.8 KB · Views: 32
  • 20200524_211056.jpg
    20200524_211056.jpg
    369.4 KB · Views: 29
  • IMG_20200524_210343785.jpg
    IMG_20200524_210343785.jpg
    347.8 KB · Views: 28
  • IMG_20200522_120151594.jpg
    IMG_20200522_120151594.jpg
    476.2 KB · Views: 27
  • IMG_20200522_120218577.jpg
    IMG_20200522_120218577.jpg
    419.2 KB · Views: 26
  • 20200524_211906.jpg
    20200524_211906.jpg
    372.6 KB · Views: 26
  • IMG_20200524_211356450.jpg
    IMG_20200524_211356450.jpg
    444.8 KB · Views: 24
  • IMG_20200522_120125063_HDR.jpg
    IMG_20200522_120125063_HDR.jpg
    568.8 KB · Views: 23
  • IMG_20200522_120730268.jpg
    IMG_20200522_120730268.jpg
    492.5 KB · Views: 21
On the 3rd picture I circled the spot under the coping. I am thinking I need to run a bead of polyurethane caulk to fill this void. Is that right? I need to take my angle grinder and cut underneath the tiles to prevent the plaster from chipping off when I remove the old tiles and thinset. On the 7th picture I drew a line where I think I should make my cut. Am I correct about the placement of that cut?
I am also planning to paint HydroBan on the concrete before installing the new tile. Is this recommended, and if so do I just paint it on after removing the old thinset and cleaning the concrete real good?
I'm replacing with porcelain tiles btw.
Sorry for the length of the post. I appreciate any help I can get. : )
 
As far as chipping/replacing tiles. How hard can it be? Buy the proper thinset. Read the instruction on prep and application. Then have at it.

Looks like your main issue would be the 30k gallons of water. Idk how to work around that. Bathing suit? Lol
 
I did something similar over winter. I bet you could re-tile it for a couple hundred bucks.

I would do the under cut as you described so you don't damage the plaster.

The thinset behind your original tiles (circular blobs) looks exactly how mine was. I don't know what they used to use, but its not like any thinset I've ever seen before. It broke off in shards almost like glass. It was very sharp (hard to describe, but its did not seem like a cement based thinset).

After chipping out the thinset I had a fairly damaged area. I ended up using Rapid Set Mortar Mix to fill in the area to make it smoother.
I then added red guard waterproof membrane over this smooth layer, then finally tiled.

I have attached some pictures.

One shows after the tile was removed.
20191205_085214.jpg

One shows after all the thinset was removed.
IMG_20191228_134007.jpg

One shows after the mortar mix and redguard was applied.
IMG_20200106_092115.jpg

The only thing you have to look out for is that because your are not resurfacing now you will have to pay more attention to the depth you are building up behind the tile. It did not matter for me, since I was having it plastered afterwards.
 
@WhiteWine You are spot on with the stuff they set the tiles with. It comes off pretty easy, but definitely creates a bunch of sharp shards. My plan is to build it up back to level with the plaster like they are now. I am wondering if I need to someth out the concrete surface behind whatever that material was or if the redguard or HydroBan will paint on and seal it as is? I'll probably do the demo and prep work (the hard stuff lol) and then let a tile contractor come in to actually set the new tiles and do the mortar. @Richardz202 that 30k of water is an issue, but I have a cordless angle grinder for cutting and an air chisel for chipping out so you are right, I will be doing some floating around. Lol Originally I was going to use my small aluminum boat, which would also catch the chipped off material, but I'm thinking it would sit too high in the water. I made a floating catch-all for that instead and I will float around and work from above for the deep end. Shallow end is simple. : )
Thanks for the input!
 
Thread Status
Hello , This thread has been inactive for over 60 days. New postings here are unlikely to be seen or responded to by other members. For better visibility, consider Starting A New Thread.