Should I install a valve before this pump (picture)?

TwinsPool

Silver Supporter
Oct 3, 2021
70
Los Angeles
Do I need to install a valve to prevent water flowing back to the pool whenever I open the pump basket, or is a valve not necessary?
The instructions for the pump say to never run the pump without water:
1744945584327.png
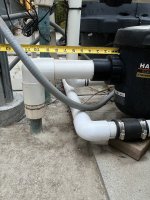
Here is a thumbnail picture of my pump inlet with a ruler:
pump inlet.jpg

Whenever I try to clean my pump basket, the pump drains back toward the pool skimmer, or at least straight down to a pool level (if assuming the horizontal pipe running to the pool is all below pool level). I can't prime the pump with a bucket of water, because the water just immediately drains out, so when priming it sucks air for some time before it gets any water. I did finally install a Hayward manual 3-way diverter valve between the pump and the filter, so at least I can block the filter from draining. The pump was installed at an unknown time by the previous house owner (we bought the house in Sept 2021), so the pump has been run this way for years. Hope it is not damaged.

A few facts (not sure if any of these are important besides the length of inlet pipe before the pump):
-pump inlet is higher than the pool surface by 12-14 inches.
-there is 2" pipe entering the pump, but you can see 1.5" copper pipe going underground to the pool skimmer.
-horizontal distance from pump to skimmer is 26 ft.

If it is best to install a valve at the pump inlet, then do I have enough straight inlet pipe to do this?
If okay to install a valve, are there any suggestions on the type?

Thanks!
 
There is not much room to put a valve (either a 2 way valve or a check valve) before the pump unless you completely redo plumbing/move pump, Since you have a VS pump - could you consider running 24 hrs at a low speed? Many members have run pumps continuously for years.

A check valve would be best because it automatically closes when flow stops.
 
Mine is plumbed similar to yours. What you’re asking about is called a “check valve” or a one-way valve. As an new pool owner I used to worry about it too.

All I need is a little water in the basket to prime up. Whatever water backflows out when you crack the lid will usually leave enough in the basket to reprime. Mine takes about 30-45 seconds with similar head (vertical distance). I don’t consider that time running “dry”. I don’t lose prime between pump runs, but having studied mine I wouldn’t worry about it if I did have a leak somewhere (I had one right in front of the pump recently).

What you’re really worried about is the ceramic pump seal, which can deteriorate when run dry. On the new VS pumps, a lot of them will get set to a 2-4 minute high-speed “prime” cycle on startup, before dropping down to whatever run speed the user has ordered.
 
Both helpful replies. Thanks.

Regarding a constantly ON pump, my pump has been set that way for the past 5 months since the pool got replastered (at 1750 RPM, which seems to be the slowest that will show any effect at the skimmer), but I was hoping to reduce it to about 12 hours a day if possible. My electricity bill is crazy high and trying to cut down if possible.

I hadn't considered a check valve for unknown reasons, but hours of scouring the internet did not find a check valve short enough to fit; most seem to require about 6.5 inches of 2" tubing space for insertion. From the attached picture you can see I have about 4.75 inches of 2" tubing to work with, although I could push my pump back about a small amount (max about 1 inch before a wall), but that would put a little stress of the outlet pipe.
pump inlet 2.jpg

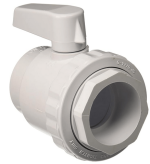
I did manage to find a shorter 2-way ball valve from Hayward (part #SP0724S) that requires only 5.01 inches. I think I could squeeze that in and only push the pump back about 1/4". I think the outlet tube to the filter can deal with that (or I could do something to fix that if necessary). I would have to disconnect the inlet union from the pump (and maybe also the outlet union) to get the valve inserted. What do you guys think about this valve?
1745090686107.png1745093729527.png

The valve might have a designated inlet side (I see the non-union side is labeled "Port No. 1"), but I presume that is supposed to be the high pressure side. This valve will never see any significant pressure when closed, so I presume I can orient it however I want. Do you guys agree?

I really do want to install a valve here. I have some trouble with what I perceive as too much air in the basket area in general (and air getting into the filter also), so maybe good priming will help that -- I hope I don't have air getting in somewhere (hopefully not the underground [under concrete] inlet pipe?).

Many thanks for your advice and input.
 
Both helpful replies. Thanks.

Regarding a constantly ON pump, my pump has been set that way for the past 5 months since the pool got replastered (at 1750 RPM, which seems to be the slowest that will show any effect at the skimmer), but I was hoping to reduce it to about 12 hours a day if possible. My electricity bill is crazy high and trying to cut down if possible.

I hadn't considered a check valve for unknown reasons, but hours of scouring the internet did not find a check valve short enough to fit; most seem to require about 6.5 inches of 2" tubing space for insertion. From the attached picture you can see I have about 4.75 inches of 2" tubing to work with, although I could push my pump back about a small amount (max about 1 inch before a wall), but that would put a little stress of the outlet pipe.
View attachment 639158

I did manage to find a shorter 2-way ball valve from Hayward (part #SP0724S) that requires only 5.01 inches. I think I could squeeze that in and only push the pump back about 1/4". I think the outlet tube to the filter can deal with that (or I could do something to fix that if necessary). I would have to disconnect the inlet union from the pump (and maybe also the outlet union) to get the valve inserted. What do you guys think about this valve?
View attachment 639174View attachment 639205

The valve might have a designated inlet side (I see the non-union side is labeled "Port No. 1"), but I presume that is supposed to be the high pressure side. This valve will never see any significant pressure when closed, so I presume I can orient it however I want. Do you guys agree?

I really do want to install a valve here. I have some trouble with what I perceive as too much air in the basket area in general (and air getting into the filter also), so maybe good priming will help that -- I hope I don't have air getting in somewhere (hopefully not the underground [under concrete] inlet pipe?).

Many thanks for your advice and input.
I am not crazy about that valve but it does have a union on it so it appears it can be repairable without removing the whole valve. that and being short are the 2 benefits to fit the existing gap.

I have another idea. Can the pump shift left or right about 3 inches? You will need to also adjust the exit side plumbing. But you could go the opposite direction then turn back to have enough straight to put in a check valve.
I am leaning to a check valve because it will automatically close when flow stops and hold water in the pump.
On your example, you would have to manually turn the valve, open the pump basket to add water before you turn on pump.
Just a thought
IMG_0669.png
 
I'm not sure why you are concerned about water draining. That is normal. You pump is built to prime.
When they never run without water, they mean without putting some water in the pump. Just put some water in the pump basket, a gallon or so is fine. This water is used to protect and cool the shaft seal.
With some water in the pump, turn it on and it will prime. It is built to do that.
I would not cut into that for a few seconds to minutes of priming...not necessary.

As instructed...just fill the strainer housing with enough water to protect the shaft seal:
1745110665539.png
 
Last edited:
Try this for me. Go out and crack the pump strainer lid. Let the water back flow down to whatever natural level it will. Then put the lid back on, flip it on, and time how long it takes to prime up to whatever you consider normal. Shoot a photo of the lid full of air if you want us to look at it. Do you just have some bubbles moving around or is it constantly a torrent of water swishing around loosely in the basket.

I’ll try and explain it to the best of my understanding, which means this will be a poor explanation and likely full of error. When that pump starts spinning, it won’t actually empty completely. The impeller is going to spin, and in doing so will push whatever water is in the basket out against the housing, where it forms a fluid seal. The pump basket will look empty, but in fact there’s still some water in it (just turn it off and watch the basket). As it spins, the impeller will suck the air in the suction line and push it into the pool filter, but its a weak suction because that impeller is designed for water and not air. It works, but its inefficient. As the pump primes up, it gradually goes from 100% air 0% water to the opposite. The basket doesn’t have enough water to cool the pump shaft seal under regular operation (which is the reason for the warning), but its enough to prime up.

Looking at your pump photo, I wouldn’t want to cut into that line to add a valve. I’d rather have the existing pipe real estate when i need it next.

I really do want to install a valve here. I have some trouble with what I perceive as too much air in the basket area in general (and air getting into the filter also), so maybe good priming will help that
I see you are wanting a valve, but what I’m hearing is that you have an air leak upstream of the pump that is troubling you. A valve won’t fix that. You can fill the basket 100% to the brim with water and get the world’s fastest prime, but if you have an air leak upstream, you’ll still end up with air in the lid.

Try this: Go turn the pump on and let it normalize with air. Then take a hose and spray a stream of water on the nearest plumbing glue joint on the suction line. Does the air in the pump seem to lessen? If yes, you’ve found your air leak. If no, hose down the next glue joint upstream. Rinse and repeat until you get to where the line enters dirt. What you’re doing is using the water hose a temporary sealant to test for failed glue joints. It happens. Also check out the O ring on the pump lid. It may need some silicone grease, or replacement.

In case you can’t get a hose to it: alternate leak check methods

Maybe we’re crossing wires, but it sounds like your pain point is air in the pump, not necessarily a love of adding valves. Hate to see a guy do unnecessary work… From what you’re describing to me, I’m still thinking that pump should self prime fairly quickly if all else is right with the world.
 
Thank you all. I see that no one is really in favor of the valve. I'll respond to the comments/suggestions (sorry it got too wordy). ..

@HermanTX That's an interesting idea about shifting the pump and adding a U-turn of pipe with a check valve. The space is rather tight. It might be possible, but I would probably have to move a thing or two to make room (probably just the drain-to-waste PVC routing that I added last year). I will do some of the things the others requested first to see how things go.

@PoolStored I'm not sure whether I understand your suggestion completely. The instructions say to "fill" the housing, but it cannot be filled. And you say to add a gallon of water. I'm not sure if you are realizing that the inlet pipe is an open path to the pool, which is a foot below the pump, so any water added in the basket housing drains immediately back to the pool. Even a hose going full blast in the basket never overflows.
But maybe you mean just to add what I can and whatever remains after it drains is going to be enough to not be detrimental to the pump over time. I'm just concerned about the pump instructions (which appear to request the basket housing to be *full* of water when priming) and am worried (maybe without cause, if you all are correct) that repeated daily primings with little water in the basket will eventually cause premature pump problems. I'll take some pictures of the basket tomorrow when there's light and see what you guys think. (By the way, you helped me greatly last year when I had a lot of plaster problems, a swamp, balancing, etc, so thanks again for that help.)

@ol_whistle_britches You suggested two things: time the priming after opening and closing the lid, and test for leaks at the glue joint and basket lid O-ring. I will do these great suggestions and get pictures if I can see throught the lid (it looks rather frosted [from sun exposure?], but I will try to clean it up). I haven't primed it in months (it's been running continuously), but when I did, it almost never filled to near completion with just some bubbles moving around, but rather the water level was usually about an inch or more below the lid with a lot of splashing. We'll see how it acts tomorrow. My filter is getting a LOT of air lately (every day it has to be purged), so there must be an air leak somewhere. The O-ring is definitely something to look at closely, but I will test the joints also.

I think my reasons for considering the inlet valve was really two-fold: 1) thinking that most or all good pool plumbing had such a valve, together with the instructions even saying to "close the suction and outlet valves before filling the housing with water", and 2) thinking that having so much air in the pump when trying to prime may be a reason for my big air pocket in basket housing during regular pumping, together with the air that is always getting into the filter (lately getting to be a big problem). From what you guys are saying, my reason #1 is probably not a valid reason (but I still am a little queasy about it), but #2 needs to be investigated.

I'll not order the 2-way valve if you guys think it isn't necessary after you see how my pump behaves. Again, many thanks for you thoughts and suggestions.
 
I have the same issue: no shutoff valve between my pump and skimmers.

When I need to clean the pump basket, I first let water drain out of the filter. Then I plug my 2 skimmers with Gizzmos before opening the pump; otherwise, water will flow between the skimmers and the pump as in your case.

I think this is the simplest way to prevent water drain; some of the suggestions above seem crazy complicated to me.
 
But maybe you mean just to add what I can and whatever remains after it drains is going to be enough to not be detrimental to the pump over time.
Yes, exactly. Pumps are made to prime, but not dry. Add as much as you want, any excess will just overflow. Prime it. The water in the volute will protect the shaft seal.

1745148165742.png
 
Last edited:

Enjoying this content?

Support TFP with a donation.

Give Support
I'm not sure if you are realizing that the inlet pipe is an open path to the pool, which is a foot below the pump, so any water added in the basket housing drains immediately back to the pool
We get it. I’m telling you mine is exactly this way and before I fixed the leak a few months back, this is what had happened every time it shut off for years before I bought this house.

Yes, exactly. Pumps are made to prime, but not dry. Add as much as you want, any excess will just overflow. Prime it. The water in the volute will protect the shaft seal.
Listen to this man.

repeated daily primings with little water in the basket will eventually cause premature pump problems.
Does not appear to have affected my pump life, as it’s old as dirt and on a second or third motor. Or any others that I know of, including yours I will guess. Good on you for recognizing a problem, now let’s get to the solution.

test for leaks at the glue joint and basket lid O-ring.
Really check that connection between the PVC and the copper fitting. I’m willing to bet $5/$10 that’s where your crack is. Any time you have an interface between a spinning motor (pump) and a fixed anchor (that copper pipe coming up through the concrete slab) you run the risk of a stress fracture.
 
Okay, you guys are persuasive, so I think I am a believer now about not needing the inlet valve.

However, I am still not getting priming. This is what I did today...

First, I turned off the pump and cleaned the pump basket. I removed the lid o-ring, and cleaned it and its contact areas on the pump and lid well and re-lubed the o-ring with silicone paste. I saw no defects in the O-ring. I added water to the basket area (which drained as expected), waited a few minutes while I dealt with the o-ring, and then took this picture:
After fillling and drain.jpg

I then tried priming for its usual 3-minute priming time but there was no priming (that is, the basket area did not fill with water). During this 3 minutes I flooded the pump's drain plugs, all fitting joints including the copper junction, and the underside of the lid where the O-ring is. The floodings had no effect on priming (I gave it at least 10-15 seconds of flooding at each point).

During priming, the water just seemed to be flowing straight through the basket from the inlet to the impeller. I couldn't really tell if the water flow had air in it or not, but presumably it did. At the 3-minute endpoint, priming was ending and it started to change back to 1700 rpm (its usual speed these days) so I immediately hit the "Quick Clean" button, which basically sets it at full speed for an hour. I ran it this way (at full speed, which I'm pretty sure is the same speed as priming) until it had been a total of 7 minutes of "priming", then I stopped the pump because there was still no priming at this point. During this 7 minutes I tested the filter for air and, yes, it was getting air during the entire 7 minutes -- I purged the air several times to completion.

There is one caveat that I need to disclose which may or may not be relevant. Because the pool is a bit low on water (still above the skimmer basket by an inch or two), I didn't want to use priming speed at this low level, as it would probably start sucking air. So, to avoid it sucking air at the skimmer, I attached my vacuum hose to the skimmer (via an adapter plate) so that the water would be sucked from the end of the hose under water and not directly from the skimmer. I don't know if this would affect the results or not -- it seems to me this should be fine, since, as far as this novice knows, this is how one normally vacuums a pool. However, I suppose if the hose is not air tight, it could be introducing air (part of it normally semi-floats at the surface), but the hose is not old or damaged. It's 40 ft long. I did go to the trouble of removing all the air from the hose before starting this procedure today.

Then I took a picture after the 7 minutes of priming. The lid was fogged up on the inside and shows that no water reached the lid. The lid cleaned up pretty well and I could see through it relatively well before priming.
After priming for 7 mins.jpg

I'm guessing the only remaining sources for the air are either the hose or an underground leak (unless I am missing it near the pump), but am very curious what others are thinking or if there are other possibilities. I do plan to fill the pool higher tomorrow afternoon and try again without the hose. Thanks.
 
Last edited:
I added water to the pool and removed the vacuum hose.

This improved the priming, but after 8 minutes of full speed priming, it did not fill the pump basket completely. After stopping, I could see that the water level was slightly above the white strainer basket, but still about a 1/2-3/4 inch below the viewing window. I don't recall when it stabilized at this level, but it was probably around 3-5 minutes of priming. I took this picture around the 8 minute mark while priming was in progress. You can see that the water was strongly hitting the right side of the strainer basket and "rolling" up onto the right side of the viewing window in this picture (just some splashing droplets on the left side of the window). But it never filled the area with water to the viewing window.
During priming.jpgWater is incoming from the left in this picture.

For one thing, I guess this means I cannot use the vacuum hose. Hmmm, oh well. Do others have a problem like this when vacuuming the pool to the filter?

So priming has improved, but there is still a bit of a problem somewhere. I didn't do any flooding of the joints this time but I probably should have.

My next step will be to remove the filter panels from my filter and wash off all the dirty DE, and try again after examining the filter panels and adding fresh DE. Maybe dirty filters are slowing down the flow speed. I don't see a significant increase in filter pressure lately, but I am pretty sure the filters need cleaning nevertheless.
 
Maybe dirty filters are slowing down the flow speed
This is the next thing I would check, along with using a hose on the suction side to see if you can get a bead on suction side leak. Not priming is a classic symptom of a dirty filter.
 
  • Like
Reactions: ol_whistle_britches
@ Rocket J Squirrel:

Thanks for your suggestion. I have also tried plugging the skimmer pipe going to the pump (I did it with rags) so I could fill the pump, but as I remember it didn't work all that well for me, and also I am sure one day I will start the pump without removing the "plug" and end up with my plug getting stuck somewhere in the pipe. In my case, the pipe going to the pump actually enters the side of a single central vertical pipe in the bottom of the skimmer, so it cannot accept a Gizzmo and is even hard to get to with rags.
 
What happens to the prime when you turn the pump off overnight? Does the water level leak down out the pump inlet or does it hold whatever its got? My system is currently air-tight, so if I shut it off overnight, when the timer kicks on in the AM it doesn’t have to re-prime at all.

Next time you do the flood test, soak each joint for a little longer. Give it a minute so to really see if the amount of air in the system is purging. That copper / PVC transition is giving me the heeby-jeebies.
 
Ol_whistle,
Good question!! I just checked it and it appears that the water level in the pump is the same as yesterday when I finished my testing (about 20 hours ago). So the system appears to be relatively air-tight, although that may change under the heavy vacuum of high-speed priming. I'll report back after my filter cleaning, and if necessary, more flooding of the suction-side joints.

Yes, I am also a bit concerned about that copper/PVC transition. I have never worked with such transitions before, so I was really hoping I don't have to try to replace that and was another reason I don't want to re-do all the plumbing in that area in order to install a 2-way or check valve. My fingers are crossed regarding that junction, but hopefully the apparent air-tightness of the system means I have no fitting/transition leaks and the problem is simply a dirty filter.
 
  • Like
Reactions: ol_whistle_britches
I completed the filter disassembly, cleaning an reassembly (have not added DE yet while troubleshooting the priming problem). I also decided to replace the big O-ring on the pump's strainer lid. The priming has improved a bit but it is still not filling the strainer area fully or nearly so. The level of the water when pump is off is just below the dome of the plastic view window (a little higher than before, but still not reaching the dome).

I tried flooding everything I could see for about a minute or more (I spent about 15 minutes doing this), but no change. Maybe I missed a spot somehow.

I saw on a YouTube video that someone said to look for a momentary water leak at the various junctions, etc, immediately after stopping the prime. I did this using a paper towel as my detection device and I seem to have found a very slight leak when stopping the prime. It is located at the junction of the copper pipe to the PVC, as Ol_whistle suggested.

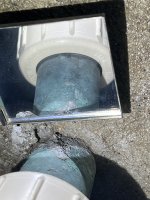
Here is a picture of the underneath of that junction taken with the help of a small mirror (click on any of these thumbnails to enlarge):
Underside of transition via mirror.jpg

I tested this area for leaking many times with a paper towel and it showed a small leak (maybe like a drop of water each time) showing up on my paper towel coming out from underneath the PVC nut (no leaking detected after drying when the pump is ON). Here's a picture of the wet spot on the paper towel:
Water detected at transition after priming.jpg

As a reminder, here again is a picture of the entire plumbing going to the pump:
pump inlet.jpg

So it is under that PVC nut, which I presume is part of some sort of copper-to-PVC union. I guess the copper pipe has a flange on its end that meets an O-ring on the PVC half of the union. Or is it something different?

The priming is near complete, but I suppose it needs to be complete since it is causing air to get into the filter, which requires me to constantly purge it.

My questions now are... Should I just smear silicone sealant (or something else) over the problem area where leak is, or should I rebuild this junction and perhaps the whole path to the pump?
If rebuild, does anyone have an idea what sort of junction this actually is, and where I would get parts for it?

Many thanks.
 
Just to confirm, are you noticing/measuring this air when you are running the pump 100% or are you measuring at a different speed?

I don't know that you are going to "prove" much more regarding that copper/PVC transition. It may be faster to delete it than it would be to keep diagnosing it to perfection. You seem to have determined there is a leak there, so if nothing else, you'll have solved one problem. I'm not 100% sure it's your only source of air, but its hard to tell at this point.

You don't happen to have a way to find the other side of the suction line, do you? I'm highly doubtful that your drain is plumbed wholly in copper. I would not be surprised if it was just copper through the concrete slab itself. (Second transition to leak...) If you can find the other side of the suction line, I'd probably just cut it out and plumb it above ground at this point. Bum news, I know. Maybe there's another view here I'm missing...
 
  • Like
Reactions: HermanTX

Enjoying this content?

Support TFP with a donation.

Give Support