Barbja -- I was told that we needed that jut for the motor powering the automatic safety cover. It does go quite a bit into the corner. we have some rails for the deep and shallow end also going in soon. I was definitely anxious and likely pestered my pool builder quite a bit to ensure the coping/deck came out well....hopefully I wasn't too much of a worry wart -- but yeah, I'm amazed at how well everything seems to have come out almost exactly how we hoped/pictured it would be!

San Diego In Ground Pool Build w/ Pictures
- Thread starter MattM
- Start date
You are using an out of date browser. It may not display this or other websites correctly.
You should upgrade or use an alternative browser.
You should upgrade or use an alternative browser.
Matt - looking great! Do you have any pics of your equipment setup? I recall it was goin to. E a unique configuration ...
There is an recessed embedded undertrack built just underneath the coping into the side of the gunite (will not pull coping down) - there were a few guys working for quite a bit to get it setup properly. Details, the manufacturer is a company named "pool safe" here in san diego, cover is designated an automatic safety cover and poolsafe has pictures of entire families standing on it, we're going to have a dark "navy blue" color. If there is something that really doesn't look right - let me know and I'll clarify with them. Our contract includes: cover, motor, electronic controls/keypad, encapsulated undertrack, 14" lid tray system, initial warranty, and all installation work. Note that pool safe is the manufacturer that nearly all pool builders in San Diego include with their proposals.
It was a definitive requirement that the cover can be walked on -- we have a dog and several kids, plus likely many friends of the kids coming over and didn't want to take any chances with someone or the pet falling in the pool.
Equipment is being installed next week, I hope....we went over whether to go forward with an intellichem all week long, but finally decided yes because the cover would essentially cause the pool to have almost indoor type properties....very little sunlight getting through the cover, cover only open when we are swimming or performing maintenance, and pentair tech assisting with the setup plus initial startup period.
OK, thanks for explaining. I was wondering about the 14" lid tray system, and if it was going to get the same coping as the rest of the pool?
James -- see the picture titled poolconstruction30.jpg on the previous page, I think those are meant to be the lids and look like the coping (they used the same concrete mixture). To my understanding, when opened, the cover slides underneath the lid so that it is completely hidden. We'll have to see what it looks like when installed.
Electrical connections were completed today....awaiting arrival of equipment. Intellitouch indoor control panel did get put in already although it's turned off and not displaying anything....boy - it is a real step down from the in wall touch screens, but I'm just not willing to pay an extra $1K+ just for a more friendly automation user interface - especially if it doesn't allow my linux workstation to monitor pool variables via a network api.
Anyhow, I discussed tile with the pool builder today. We've decided on:
http://www.nptgonline.com/nptg_national ... /pa41.html
Seven Seas - Lake Blue - PA 41
Also, given that we have a blue granite pebble tech finish, I'm leaning towards not putting any decorations or tiles on the pool steps. I'm leery of any glass going in the pool, which most of the reflective tiles require. Although, the pebble tech strands can look nice but I also assume those are pricey, along with completely unnecessary.
Lastly, the wife unit and kids plan to do a significant amount of laps in the pool....I'd be surprised if we don't have dedicated lap hours on a regular basis. We thought about putting in lap lane markings, but this would interfere quite a bit with the appearance of the pool and have skipped it. I'm not sure if there is anything else we can do that would be more subtle while helping out. I assume the major concern is letting swimmers know to slow down before hitting the end of the pool on each lap. Is this a real concern? Anyone else put some kind of markings near the end of each of the major sides of the pool?
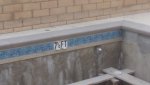
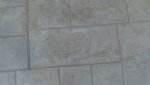
First tiles were put in today -- picture below.
Pebble tech installer confirmed they would provide us a 10yr written warranty before the start of work (thank you), which is about the most that one could ask for up front.
We've also setup a new sprinkler timer with auto rain shutoff to reflect new landscaping zones and to schedule when the pool autofill runs each day. Timer was put in the house just underneath the intellitouch indoor controller (another picture).
Attachments

Looks like we will be plastering on Saturday and filling up the pool Monday night!
Equipment is all installed (except for intellichem which was backordered and which should be arriving sometime next week). Pool cover will also be installed roughly 1 week after plaster.
Two issues:
a) we're happy with our stamped sealed concrete deck, but there are some "white" spots showing up which our PB says is efflorescence and which will go away when the deck finishes curing?
b) PB noted that the plaster company recommends we install a hydrostatic plug rather than valve in the deep end. Apparently, the valves have a tendency to fail after 10-20yrs and which tends to cause problems for older pools. We have a very low water table here so the need for the valve is minimal..but I thought I'd see what others think.
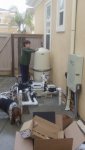
I'll include pictures of pool equipment and deck stains below in a few minutes.
We'll be putting a small veranda over the main pool equipment once everything is up and running (open space in concrete near pipes is to allow pillars).
Equipment is all installed (except for intellichem which was backordered and which should be arriving sometime next week). Pool cover will also be installed roughly 1 week after plaster.
Two issues:
a) we're happy with our stamped sealed concrete deck, but there are some "white" spots showing up which our PB says is efflorescence and which will go away when the deck finishes curing?
b) PB noted that the plaster company recommends we install a hydrostatic plug rather than valve in the deep end. Apparently, the valves have a tendency to fail after 10-20yrs and which tends to cause problems for older pools. We have a very low water table here so the need for the valve is minimal..but I thought I'd see what others think.
I'll include pictures of pool equipment and deck stains below in a few minutes.
We'll be putting a small veranda over the main pool equipment once everything is up and running (open space in concrete near pipes is to allow pillars).
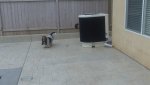

Nice! I like the table in the pool too - had a picnic out there?
I thought you were going to have to do something funky with raising the pump or something off of the ground? Why did the heat pump have to be out in the open like that?
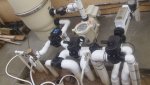
Are the solar connections the two pipes going into the ground under the return valve in front of thew SWG cell? It's hard to tell from the pictures for how the solar is plumbed in but it looks like it's controlling the water flow from the return side of the solar...mine is controlled on the supply side and has a check valve on the return side to prevent water from flowing backwards when the solar is not enabled. I think the manual valve is to block off the supply to the panels?
I thought you were going to have to do something funky with raising the pump or something off of the ground? Why did the heat pump have to be out in the open like that?
Are the solar connections the two pipes going into the ground under the return valve in front of thew SWG cell? It's hard to tell from the pictures for how the solar is plumbed in but it looks like it's controlling the water flow from the return side of the solar...mine is controlled on the supply side and has a check valve on the return side to prevent water from flowing backwards when the solar is not enabled. I think the manual valve is to block off the supply to the panels?
Everything appears to be coming together nicely, but the HP jutting out into the pool area would kill me.
We originally planned to put the heat pump with the other equipment, but pentair requires that there be at least 2ft clearance on all sides, including the back (according to my builder). Our side walkway with width of the heat pump and the required 4ft clearance to the fence just wasn't big enough. We thought about putting it on the hill, but the quotes I received there were pricey and wouldn't support moving the house a/c to the same location which also needed relocating. End result, corner of the deck or nothing.
The solar actuator takes water leaving the filter and sends some of it to the panels and the rest to the heat pump. After the heat pump, water goes to the intellichlor and/or presumably the intellichem before reaching the junction that selects which returns are active. Water returning from the solar panels goes though a check valve and then back to just before the solar actuator. At least thats the way I understand it - I'm still becoming familiar with how the whole pool plumbing stuff actually works. Note that I think our PB was doing a review of the solar guys plumbing today so if anything is wrong, hopefully he'll catch it.
As for the pool table, we had it on the other side of the house...I guess the last workers out here must have been having a nice picnic or just needed a place to hold stuff.
Yeah thats too bad about the HP location.
But it's looking great. The white stuff on the deck should go away. It's moisture coming out unevenly and should stop happening on s the cement is fully cured.
But it's looking great. The white stuff on the deck should go away. It's moisture coming out unevenly and should stop happening on s the cement is fully cured.
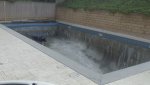
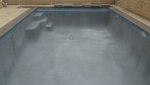
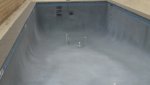
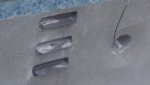
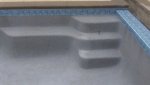
Plastering guys just left, looks mostly very good......fun to watch as it dries ")
Only concerns now are if the deep end steps will clean up properly and I'm not sure if there might be a small slight streak in the middle right of the pool.
Only concerns now are if the deep end steps will clean up properly and I'm not sure if there might be a small slight streak in the middle right of the pool.
Attachments

Thread Status
Hello , This thread has been inactive for over 60 days. New postings here are unlikely to be seen or responded to by other members. For better visibility, consider Starting A New Thread.