- Aug 3, 2013
- 26
Backstory:
In 2016, I bought a HASA Liquidator and although it worked, it was a maintenance nightmare. It never consistently worked; different parts would get clogged/etc. I had a lifetime warranty (which they were great about sending me new parts over the years), but everything was swapped multiple times.
Eventually, in February 2023, the Liquidator tank cracked a few inches from the bottom and was no longer usable. But they didn't have any tanks available. I suggested they upgrade me to the liquid feeder system and then they'd never have me call back in about the old one. They actually sent me an entire new HLF system for free.
In April 2023, I received and installed the HASA Liquid Feeder system. I was disappointed that although a brand new design, it's the same basic thing as the Liquidator. And it clogged up even worse. I invariably would walk by and the flow control spinner wouldn't be going.
Last week, In September 2023, I noticed water streaming out to the street from the side of my house. The HLF had sprung a leak a few inches from the bottom and was draining out. I called HASA and they immediately knew what the issue was and offered to send me a new-and-improved tank. I haven't seen a tracking number or any follow-up since then. I've seen posts on here detailing that others have also experienced leaks/cracks in both of the HASA implementations. Needless to say, I was so frustrated with yet another problem and my entire system is down yet again
-------------------------
Path Forward:
1. I went onto Facebook marketplace and found many people selling plastic barrels (55 gallon and 30 gallon). I bought a 30 gallon blue barrel (19" diameter) for $25. A 55 gallon would not have fit in my space.
2. On Amazon, for $30 I bought this pump based on some recommendations on TFP. Pump on Amazon
3. On Amazon, for $7 I bought this adapter to allow my 3/8" OD tubing to plug into my Pentair 320C Chlorinator to avoid drilling addition holes into my PVC.
4. On Amazon, for $9 I bought this strainer to sit on the end of my 3/8" OD tubing in the barrel to avoid sucking in particulates/trash. Strainer on Amazon
5. I already had a 12V transformer for the pump, as well as electrical wiring, and I reused 3/8" tubing, check valve, on/off valve, flow control indicator from my HASA equipment
Description of Build (I didn't take photos):
0. I cleaned the barrel well and tested out the pump to ensure it was operational and I understood how it worked. Measure it's output (see step 18)
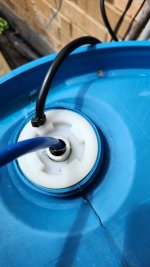
1. Drilled a hole in one of the caps for the barrel. The diameter is the same as a piece of plastic electrical conduit
2. Took a 25" piece of grey electrical plastic conduit and put a cotter pin in the top. When inserted into the hole in the cap, it will slide in and the cotter pin will keep it from falling in. 25" was a depth that would put the end of the conduit just above the bottom of the barrel.
3. Inserted 3/8" tubing into this conduit and ran it down to the bottom of the conduit. I put a strainer on the end to avoid sucking in anything solid.
4. The above steps ensure that my intake tubing will be down at the bottom of the barrel
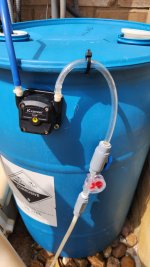
5. I cut a 56mm hole in the side of the barrel to mount the pump. That number came from these manufacturer specs (bottom left drawing). Pump Mechanical Specs
6. To cut the hole, I printed the following template, cut out the circle, traced it on the side of the barrel, and used a dremel to cut it out. 56mm Circle Template
7. I drilled another hole in the same cap as the conduit. The diameter was of the power cable I used, which was from an old extension cord
8. Although this is low-voltage 12V application, I wanted to use a robust cord and not what was on the 12V adapter, which I didn't think would hold up to weather. My choice also eliminated the need to put any protection around the wires.
9. The power cable was inserted into the hole in the cap and then fished out through the 56mm hole I had made.
10. I soldered the ends of the power cable onto the + and - of the motor. (The designations are shown in a photo on the Amazon listing)
11. Drilled a small hole in the bottom two corners of the pump. I put in two screws through the pump and into the barrel to hold the pump. The top two holes are really difficult to get two behind the tubing connectors, so I didn't secure the top
12. Use sealant around the pump edges to keep water/dust/trash from getting into barrel and to ensure it is secure.
13. Now that the pump is secure, I attached the 3/8 tubing coming out of the barrel to the input of the pump.
14. Slack was removed from the power cable by pulling it out through the cap. I used a zip tie around it to prevent it from sliding back in.
15. From the output of the pump, I ran 3/8" tubing through an on/off valve, a flow control indicator, a check valve, and then into my chlorinator using the adapter I purchased. You could also run it straight into the drain of the pump, which is what HASA did for the liquid feeder. However, my reading on here said that you want to insert the chlorine after all of the equipment (pump, filter, heater).
16. I ran the power cable into my Aqualink and used a spare relay to control the power from a 12V adapter to the pump. I plugged the adapter into a 120V outlet that I have on the inside of the panel.
17. Best practice would be to have this set up so that the relay for the pump will only activate if the pump is running. I didn't do that. I will program it to go on during a period where my pump should be on. This avoided some complexity but I may go back and change this someday
18. I tested the pump before assembling everything, and it pumped 24 oz of water in 90 seconds. I used that to calculate how many minutes a day to have the pump operate via my Aqualink
19. Drilled a drain hole in the rim of the barrel so that if chlorine spills while filling, it can drain off. Rain too.
20. I will cover the top of the conduit with something to prevent rain/dust/trash from getting into the barrel. There does need to be an opening for air to get into the barrel or the pump won't be able to suction out.
-------------------------
I think this looks pretty good and it only cost me $75. I should have done this long ago.
Let me know if you have any questions or comments.
Jeff


In 2016, I bought a HASA Liquidator and although it worked, it was a maintenance nightmare. It never consistently worked; different parts would get clogged/etc. I had a lifetime warranty (which they were great about sending me new parts over the years), but everything was swapped multiple times.
Eventually, in February 2023, the Liquidator tank cracked a few inches from the bottom and was no longer usable. But they didn't have any tanks available. I suggested they upgrade me to the liquid feeder system and then they'd never have me call back in about the old one. They actually sent me an entire new HLF system for free.
In April 2023, I received and installed the HASA Liquid Feeder system. I was disappointed that although a brand new design, it's the same basic thing as the Liquidator. And it clogged up even worse. I invariably would walk by and the flow control spinner wouldn't be going.
Last week, In September 2023, I noticed water streaming out to the street from the side of my house. The HLF had sprung a leak a few inches from the bottom and was draining out. I called HASA and they immediately knew what the issue was and offered to send me a new-and-improved tank. I haven't seen a tracking number or any follow-up since then. I've seen posts on here detailing that others have also experienced leaks/cracks in both of the HASA implementations. Needless to say, I was so frustrated with yet another problem and my entire system is down yet again
-------------------------
Path Forward:
1. I went onto Facebook marketplace and found many people selling plastic barrels (55 gallon and 30 gallon). I bought a 30 gallon blue barrel (19" diameter) for $25. A 55 gallon would not have fit in my space.
2. On Amazon, for $30 I bought this pump based on some recommendations on TFP. Pump on Amazon
3. On Amazon, for $7 I bought this adapter to allow my 3/8" OD tubing to plug into my Pentair 320C Chlorinator to avoid drilling addition holes into my PVC.
4. On Amazon, for $9 I bought this strainer to sit on the end of my 3/8" OD tubing in the barrel to avoid sucking in particulates/trash. Strainer on Amazon
5. I already had a 12V transformer for the pump, as well as electrical wiring, and I reused 3/8" tubing, check valve, on/off valve, flow control indicator from my HASA equipment
Description of Build (I didn't take photos):
0. I cleaned the barrel well and tested out the pump to ensure it was operational and I understood how it worked. Measure it's output (see step 18)
1. Drilled a hole in one of the caps for the barrel. The diameter is the same as a piece of plastic electrical conduit
2. Took a 25" piece of grey electrical plastic conduit and put a cotter pin in the top. When inserted into the hole in the cap, it will slide in and the cotter pin will keep it from falling in. 25" was a depth that would put the end of the conduit just above the bottom of the barrel.
3. Inserted 3/8" tubing into this conduit and ran it down to the bottom of the conduit. I put a strainer on the end to avoid sucking in anything solid.
4. The above steps ensure that my intake tubing will be down at the bottom of the barrel
5. I cut a 56mm hole in the side of the barrel to mount the pump. That number came from these manufacturer specs (bottom left drawing). Pump Mechanical Specs
6. To cut the hole, I printed the following template, cut out the circle, traced it on the side of the barrel, and used a dremel to cut it out. 56mm Circle Template
7. I drilled another hole in the same cap as the conduit. The diameter was of the power cable I used, which was from an old extension cord
8. Although this is low-voltage 12V application, I wanted to use a robust cord and not what was on the 12V adapter, which I didn't think would hold up to weather. My choice also eliminated the need to put any protection around the wires.
9. The power cable was inserted into the hole in the cap and then fished out through the 56mm hole I had made.
10. I soldered the ends of the power cable onto the + and - of the motor. (The designations are shown in a photo on the Amazon listing)
11. Drilled a small hole in the bottom two corners of the pump. I put in two screws through the pump and into the barrel to hold the pump. The top two holes are really difficult to get two behind the tubing connectors, so I didn't secure the top
12. Use sealant around the pump edges to keep water/dust/trash from getting into barrel and to ensure it is secure.
13. Now that the pump is secure, I attached the 3/8 tubing coming out of the barrel to the input of the pump.
14. Slack was removed from the power cable by pulling it out through the cap. I used a zip tie around it to prevent it from sliding back in.
15. From the output of the pump, I ran 3/8" tubing through an on/off valve, a flow control indicator, a check valve, and then into my chlorinator using the adapter I purchased. You could also run it straight into the drain of the pump, which is what HASA did for the liquid feeder. However, my reading on here said that you want to insert the chlorine after all of the equipment (pump, filter, heater).
16. I ran the power cable into my Aqualink and used a spare relay to control the power from a 12V adapter to the pump. I plugged the adapter into a 120V outlet that I have on the inside of the panel.
17. Best practice would be to have this set up so that the relay for the pump will only activate if the pump is running. I didn't do that. I will program it to go on during a period where my pump should be on. This avoided some complexity but I may go back and change this someday
18. I tested the pump before assembling everything, and it pumped 24 oz of water in 90 seconds. I used that to calculate how many minutes a day to have the pump operate via my Aqualink
19. Drilled a drain hole in the rim of the barrel so that if chlorine spills while filling, it can drain off. Rain too.
20. I will cover the top of the conduit with something to prevent rain/dust/trash from getting into the barrel. There does need to be an opening for air to get into the barrel or the pump won't be able to suction out.
-------------------------
I think this looks pretty good and it only cost me $75. I should have done this long ago.
Let me know if you have any questions or comments.
Jeff