Hey All,
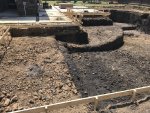
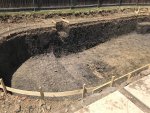
New to the site, wanted to share the pool build we have started. 1st pool for me. We are using a local PB in Keller, and so far so good. They are extremely responsive to many many questions I have had. We have our construction meeting on Tuesday next week, and then they will commence digging. I am not sure all the information everyone is curious about, so I will give the info I know.
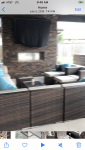
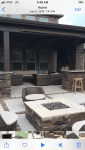
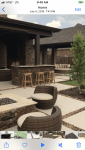
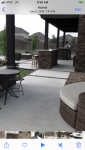
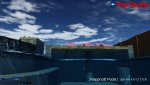
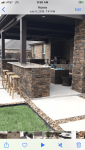
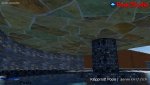
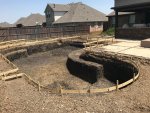
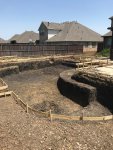
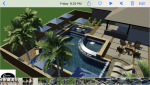
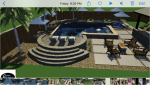
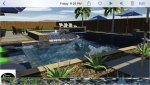
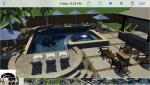
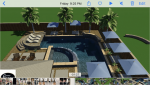
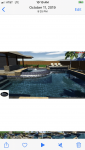
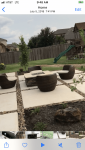
The pool design was actually designed by me. My wife and I built an outdoor living area a few years ago, and I had always wanted to add a pool in the future. I have worked on the design for over a year, and I finally had it the way I wanted and went to a pool builder to have them put it into a CAD program. The design I will show below does not have all the little tweeks and changes, but does give the overall impression of what the pool will look like. Further the landscaping will be kind of similar to what they have in, but a lot nicer with 3 Sabal Palms, 2 Pindo Palms, 2 Windmill Palms, and 5 Banana trees, plus my existing plants being laid in areas. The new pavers will be between the palm trees. And river rock 3-5" will fill in the entire area like you will see in the design below. This rock matches the look we currently have. I will also add a few photos of our existing porch so you can see the ledger stone that will go on the grotto and spa and the way the rock will look. These photos were taken a few days after construction and landscaping ended, so grass hasn't grown back in etc.
The size of the pool, as I found out after taking it to 5 different companies for bids (and I did not take the lowest, I took the one I trusted the most, was most responsive, and rendered something that was what I had envisioned.) was larger than a typical pool. REMEMBER I AM NEW TO THIS. But I liked it and was set on what I wanted.
So we have an L shape 14' wide on both sides of the L but roughly 37' long and 43' long. The 37' side will have a tanning ledge and will go from 3.5' ft to 4.5' to allow some volleyball to be played. The other side will then go from 4.5' to 6' to allow jumping off the grotto. The grotto was a MUST HAVE for me, and I wanted a huge one.. I also wanted it to be able to be a tanning ledge on the top. The problem is, I did not want boulders, as I thought they would look silly in my backyard and not natural at all. So I wanted a modern or contemporary grotto. However, I couldnt find squat I liked online at all. I am happy that what I drew actually looked good in CAD. So it was engineered and has a 14' wide sheer waterfall that spills over it. And about 9' from front to back with seating and a table underneath. The wall in the grotto shows stone, but noone will lean against ledger stone, so are going to do tile water to ceiling. The spa is also rather large, as I have a MASSIVE family (9 brothers etc) and didnt want my legs touching anothers haha.. So it is 11'5" x 11' 1/4" with a ZERO edge, roughly a 41' perimeter.
Anyway I can update some more later. Let me know what you think, BE NICE.. This is my design and my feelings on personal art is fragile haha!
AGAIN ... IT IS IMPORTANT TO NOTE THAT THE CONCEPT ART ETC BELOW WITH LANDSCAPING ETC ARE NOT TO SCALE YET AND HAVE EDITS.
Del Ozone Eclipse with Inline Chlorinater & UV.
525 Cartridge Filter
OmniLogic w/Smart Device App Capability & Touchscreen Control System
3 Variable Speed TriStar 950 Pumps. (One for our Grotto, One for Spa, and One for pool which has 2 bubblers and a 6 foot wide water feature.)
Polaris Quattro Robot with booster pump.
500K Gas Heater
4 LED Color Accent Lights (3 in pool, 1 in spa).. Both bubblers on tanning ledge will have LEDs as well.
We are doing Travertine for the coping, and the new pavers roughly 7x5 ft (5 of them) will have the travertine laid on concrete to match the pool. We have a lot of existing pavers the pool will fitting into.
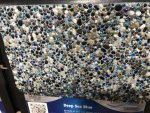
Wet Edge Prism Matrix - Deep Blue Sea (which I have seen some other builds on here, and I am so glad I picked it as theirs looks amazing.. even in a photo.)
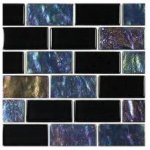
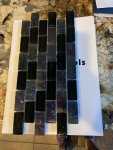
The tile is 1"x2" and I added a couple pics.. The sample on my counter looks really dark because it wasnt photoed in the light. It is AMAZING tile.. TONS OF COLOR. In the sun it is incredible. Anyway ENJOY!!!
New to the site, wanted to share the pool build we have started. 1st pool for me. We are using a local PB in Keller, and so far so good. They are extremely responsive to many many questions I have had. We have our construction meeting on Tuesday next week, and then they will commence digging. I am not sure all the information everyone is curious about, so I will give the info I know.
The pool design was actually designed by me. My wife and I built an outdoor living area a few years ago, and I had always wanted to add a pool in the future. I have worked on the design for over a year, and I finally had it the way I wanted and went to a pool builder to have them put it into a CAD program. The design I will show below does not have all the little tweeks and changes, but does give the overall impression of what the pool will look like. Further the landscaping will be kind of similar to what they have in, but a lot nicer with 3 Sabal Palms, 2 Pindo Palms, 2 Windmill Palms, and 5 Banana trees, plus my existing plants being laid in areas. The new pavers will be between the palm trees. And river rock 3-5" will fill in the entire area like you will see in the design below. This rock matches the look we currently have. I will also add a few photos of our existing porch so you can see the ledger stone that will go on the grotto and spa and the way the rock will look. These photos were taken a few days after construction and landscaping ended, so grass hasn't grown back in etc.
The size of the pool, as I found out after taking it to 5 different companies for bids (and I did not take the lowest, I took the one I trusted the most, was most responsive, and rendered something that was what I had envisioned.) was larger than a typical pool. REMEMBER I AM NEW TO THIS. But I liked it and was set on what I wanted.
So we have an L shape 14' wide on both sides of the L but roughly 37' long and 43' long. The 37' side will have a tanning ledge and will go from 3.5' ft to 4.5' to allow some volleyball to be played. The other side will then go from 4.5' to 6' to allow jumping off the grotto. The grotto was a MUST HAVE for me, and I wanted a huge one.. I also wanted it to be able to be a tanning ledge on the top. The problem is, I did not want boulders, as I thought they would look silly in my backyard and not natural at all. So I wanted a modern or contemporary grotto. However, I couldnt find squat I liked online at all. I am happy that what I drew actually looked good in CAD. So it was engineered and has a 14' wide sheer waterfall that spills over it. And about 9' from front to back with seating and a table underneath. The wall in the grotto shows stone, but noone will lean against ledger stone, so are going to do tile water to ceiling. The spa is also rather large, as I have a MASSIVE family (9 brothers etc) and didnt want my legs touching anothers haha.. So it is 11'5" x 11' 1/4" with a ZERO edge, roughly a 41' perimeter.
Anyway I can update some more later. Let me know what you think, BE NICE.. This is my design and my feelings on personal art is fragile haha!
AGAIN ... IT IS IMPORTANT TO NOTE THAT THE CONCEPT ART ETC BELOW WITH LANDSCAPING ETC ARE NOT TO SCALE YET AND HAVE EDITS.
Del Ozone Eclipse with Inline Chlorinater & UV.
525 Cartridge Filter
OmniLogic w/Smart Device App Capability & Touchscreen Control System
3 Variable Speed TriStar 950 Pumps. (One for our Grotto, One for Spa, and One for pool which has 2 bubblers and a 6 foot wide water feature.)
Polaris Quattro Robot with booster pump.
500K Gas Heater
4 LED Color Accent Lights (3 in pool, 1 in spa).. Both bubblers on tanning ledge will have LEDs as well.
We are doing Travertine for the coping, and the new pavers roughly 7x5 ft (5 of them) will have the travertine laid on concrete to match the pool. We have a lot of existing pavers the pool will fitting into.
Wet Edge Prism Matrix - Deep Blue Sea (which I have seen some other builds on here, and I am so glad I picked it as theirs looks amazing.. even in a photo.)
The tile is 1"x2" and I added a couple pics.. The sample on my counter looks really dark because it wasnt photoed in the light. It is AMAZING tile.. TONS OF COLOR. In the sun it is incredible. Anyway ENJOY!!!
Attachments
-
Landscaping.pdf289.6 KB · Views: 86
-
 Pool 1.PNG468 KB · Views: 367
 -
 Pool 2.PNG475.6 KB · Views: 363
 -
 Pool 3.PNG424.9 KB · Views: 338
 -
 Pool 4.PNG458.2 KB · Views: 327
 -
 Pool 5.PNG398.9 KB · Views: 318
 -
 Pool 6.PNG195.1 KB · Views: 312
 -
Pool Measurements.pdf338.3 KB · Views: 29
-
 Porch 0.png504.7 KB · Views: 283
 -
 Porch 1.png427 KB · Views: 277
Last edited: