Old Spa Jet Fittings

Gourockian

Well-known member
Jun 23, 2024
45
Tampa Bay area, FL
My pool and spa were constructed in 1992 and we bought the property in 1996. Apart from pump, filter and valve replacements over the years, nothing else has been changed.

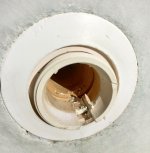
I suspect I have a small pressure leak in one of the two spa jet returns and plan on building a pressure test rig to check it out. I also think there is a suction leak on the spa drain so today, before buying test plugs, I decided to remove one of the eyeballs to check the pipe size and took some pictures.

I don't have any experience working on these so I'm not sure if these are 'normal' fittings by today's standards but I think I'm going to have a problem plugging the jets, due to the slots on either side. Is the outer threaded section supposed to be removed also and if so, should it just be pulled out? I did try gently pulling it but there was no movement and didn't want to force anything. The inner threaded section looks like it is keyed to fit in the slots

As far as I can tell, the inner threaded piece has an inner diameter of 1.5" but it may be difficult to insert a plug back there without removing the outer one. The narrow 'jet' sits about 3.25" back from the front of the outer threaded section.

I plan on replacing the two eyeballs in the spa plus the two in the pool and hope they will be compatible with what's there just now. One other thing I should mention is that I intend to have both the pool and spa resurfaced so if the return jets are required to be completely replaced, it would probably make sense to wait until then. Meanwhile, I would like to test for leaks and try to get those dealt with.

If anyone is familiar with this style of jet, I would welcome your comments and advice.

Regards,

Al
 

Attachments

  • IMG20240628171329.jpg
    IMG20240628171329.jpg
    282.7 KB · Views: 4
  • IMG20240628171256.jpg
    IMG20240628171256.jpg
    428.9 KB · Views: 3
  • IMG20240628171132.jpg
    IMG20240628171132.jpg
    438.3 KB · Views: 3
The inner piece is threaded in. You need a tool like this to thread it out. Link-->
Thanks very much for letting me know about the tool. After taking a look on Amazon, I decided to order a slightly different one which has a wider 'shaft' between the handle and blade. Amazon.com

Apart from being cheaper, (not always a good thing) it is slightly heavier at 5 ounces compared to 4.2 ounces so that might indicate greater durability. I'm in Florida and don't have to winterize so I anticipate using this very infrequently.

Another question - now that I know I'm dealing with a threaded fitting, would screw-in winterisation plugs and teflon tape be sufficient for pressure testing up to about 20 psi?
 
Well the spa jet removal tool arrived and I managed to get one of the fittings removed, after some 'gentle' persuasion but the other one is a lot tighter.

I wedged the blade right in as far as it would go in the slots but even applying torque with a 15" adjustable wrench, all that happens is that the edges of the slots get chewed up. I'm wondering if I might need to use an open hacksaw blade to cut into it lengthwise in order to remove it and hopefully not damage the threads of the outer fitting.

Does anyone have any other methods that you have found helpful in dealing with a similar situation?

On another note, my 1-1/2" pressure test plug (see picture) arrived today so I was keen to try it out on a scrap piece of schedule 40 pipe. At first it looked like it was the wrong size but after tightening it a few turns (outside the pipe), it expanded to where it was almost binding on the inside of the pipe. Then I found that once it was fully inserted into the pipe, it was difficult to prevent it from rotating instead of expanding further.
This was happening as a dry run on my workbench. I dread thinking about trying to do this down in the bottom of my spa drain.

Again, any suggestions or tips about using this would be very helpful.

Thanks,

Al
 

Attachments

  • Pool plug.jpg
    Pool plug.jpg
    93.6 KB · Views: 1
On another note, my 1-1/2" pressure test plug (see picture) arrived today so I was keen to try it out on a scrap piece of schedule 40 pipe. At first it looked like it was the wrong size but after tightening it a few turns (outside the pipe), it expanded to where it was almost binding on the inside of the pipe. Then I found that once it was fully inserted into the pipe, it was difficult to prevent it from rotating instead of expanding further.
This was happening as a dry run on my workbench. I dread thinking about trying to do this down in the bottom of my spa drain.

Again, any suggestions or tips about using this would be very helpful.
I believe I may have found a way to prevent the pressure test plug from rotating inside the pipe or more specifically, the spa drain.

I have to admit that I seldom throw anything out before trying to remove what may come in handy 'down the road'. It drives my wife nuts but once again, some of those items have been reused in ways in which they were never intended.

I had scrapped an old burnt-out angle grinder some time ago but held on to the shaft flange nuts and wrench and decided to try and use the outer flange nut to prevent the plug from turning. It meant cobbling together some spacers in the form of washers and a smaller flange nut. The latter was drilled out to be a loose fit over the bolt of the plug and also ground down to fit inside the recess of the larger flange nut to centralize it, without protruding.

I kept the original 'thrust plate' that came with the plug but added the thick rusty washer, which is just the right size to prevent the plug from being pushed too far into the pipe or fitting. This, admittedly, was an afterthought but turned out to be an added bonus. The shiny washer keeps the rusty one more or less centralized. Finally, the two flange nuts and the tightening nut and washer were added. I should say that I did not use the two original washers that were supplied. The nylon one is not required as it only protected the thrust plate. The steel one was not too substantial so I replaced it with a heavier one.

When trying it out on my scrap piece of pipe, I was able to fully tighten the plug using the 2-pin wrench and a 12mm socket so although the modified arrangement does not look very spectacular, it certainly performed spectacularly. I'm just waiting on the injection plug arriving so that I can try out my homemade pressure test kit to verify two suspected leaks.

Maybe this information could be used by other members if they are having problems with rotating plugs. Flange nuts and wrench can be obtained here if needed: Amazon.com

Meanwhile, I definitely could do with some suggestions about removing the very stubborn spa jet fitting. as previously mentioned.

Regards,

Al
 

Attachments

  • 1000019177.jpg
    1000019177.jpg
    176.6 KB · Views: 0
  • 1000019182.jpg
    1000019182.jpg
    246.1 KB · Views: 0
  • 1000019183.jpg
    1000019183.jpg
    339.9 KB · Views: 0
  • 1000019184.jpg
    1000019184.jpg
    138.6 KB · Views: 0
Are you talking about the jet nozzle all the way in the back or something else?

Jet nozzle is probably a 9/16" hex so a long socket wrench can be used to remove that.
 

Enjoying this content?

Support TFP with a donation.

Give Support
See post #1. He has jets that broke. He got one out with the pool plug removal tool, the other will not budge.

View attachment 592980
I forgot to mention that the tool which I bought earlier this week turned out to be not so good after all. It worked okay on the first one but I did have to use a 15-inch adjustable wrench to get it started. When it came to the second jet, again I used the wrench but the blade started to twist so back it went to Amazon the same day. I decided to order the non-handle version and picked up a pair which got good reviews. They are definitely sturdier as there was no sign of twisting when applying full force with the wrench this time. However, that's when the slots got damaged.

After posting the picture of the damage earlier this evening, I started thinking about using an old spark plug socket to try applying equal force to both sides of the blade. So in the last half hour or so, I cut slots in the plug socket and the blade fits in snugly.. I'll have another go tomorrow with this, weather permitting, and hopefully it will free up.
 

Attachments

  • 1000019189.jpg
    1000019189.jpg
    200.1 KB · Views: 2
  • Like
Reactions: PoolStored
What about making new notches 90 degrees from the broken ones? A dremel with a small cutting bit should work.
 
What about making new notches 90 degrees from the broken ones? A dremel with a small cutting bit should work.
The existing slots are still able to hold the blade fairly well. I'm hoping that by using the T-bar and socket, I'll be able to keep the blade better aligned while forcing it in and turning. If that doesn't work, I'll try cutting new ones as you suggest. The other option I was thinking of was to make a couple of cuts then break open the fitting. It's been in there since 1992 so needs to be changed anyway.
 
Success - after a bit of a battle! First I tried using the socket with the 11-inch T-bar first thing this morning but still no movement. I then tried using an 18-inch bar but all that did was to chew up the slots even more. This thing was really locked up in there!

I didn't think the Dremel idea would work, at least not with what I have. Mine only lets me cut at right angles to the shaft so that would have been of no use. Perhaps a multitool would have been better but in my experience, it would be difficult to control the depth of cut while trying to cut precise slots in the correct position.

So, I ended up using the open-ended hacksaw blade and it took lees than two minutes to get the fitting removed. My first cut was on the bottom slot, followed by another about 1/4-inch apart, taking care not to go too deep. I was able to break away the outer part using pliers then used a small screwdriver as a chisel to get in further. Once this was done, I hit the outside of the fitting with a hammer and this broke it at the top. The two pieces were then removed with the pliers and I was relieved to see that there was no damage to the threads, allowing me to screw in a winterising plug, after the debris was cleaned out.

I wouldn't hesitate to use this method again when I get around to removing the pool jets, if they are too tight to loosen with the socket and blade arrangement and would recommend this to others with the same issue.

Regrds,

Al
 

Attachments

  • 1000019199.jpg
    1000019199.jpg
    411.3 KB · Views: 3
  • 1000019200.jpg
    1000019200.jpg
    394.7 KB · Views: 3
  • 1000019201.jpg
    1000019201.jpg
    334.9 KB · Views: 3
  • 1000019203.jpg
    1000019203.jpg
    370.8 KB · Views: 3
  • 1000019204.jpg
    1000019204.jpg
    276.6 KB · Views: 3
  • 1000019205.jpg
    1000019205.jpg
    368.1 KB · Views: 3
  • 1000019208 (1).jpg
    1000019208 (1).jpg
    419.5 KB · Views: 3
  • Like
Reactions: JoeSelf and mas985
This time, the two pool jets refused to budge so again, I had to use the saw and chisel method as previously described. At first, I had tried working on them from above, lying on the pool deck but that was useless so changed into the swimming gear. The one at the shallow end was easy to work on but at the deep end, I had to stand on a small stepladder which of course was not very stable, due to the curvature of the pool surface. The ports were then plugged up so that pressure testing could be done and both pipes held up well, thank goodness.
 
Thread Status
Hello , This thread has been inactive for over 60 days. New postings here are unlikely to be seen or responded to by other members. For better visibility, consider Starting A New Thread.