New Sungrabber Solar Panels - Let the summer begin!

I was asked to post some photos of the solar controller, so here goes.

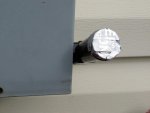
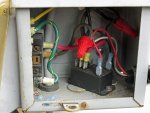
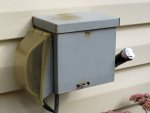
The electrical box, sensor, switch/outlet and rain cover I bought at Home Depot. The relay I bought online at Digikey. I wanted a good relay, I picked well as this one has been in service over 10 years and still going strong. To "calibrate" the light sensor I had to cover a good deal of the sensor's light sensor's surface area. I used cut up pieces of an adhesive metal label, it's held up well over the years out in the elements. The switch allows me to shut off the power to the pump when the pool temperature gets too hot. The inside shot shows the relay and switch wiring.
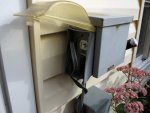
SC1.jpgSC3.jpgSC2.jpgSC4.jpg
 
Thanks so much for posting all this info and pics !! I have a inground pool that is 15' x 30' and was looking at installing 6 panels on my roof and adding a solar pool cover (bubble style). Where did you find those amazing clamp/straps? I don't see them on the SunGrabber Solar Panels website.
 
Yes those mounting strap clamps are great, they came with the panels. I bought heavier duty straps and tossed the ones that came with the panels. The strap clamps I used had a single mounting hole in the center that covers the lag screw when you screw the cap on, so the screw is not exposed to the elements. The bottom of the two piece mounting strap clamp had plastic spikes protruding so even through only ones screw mounted it... the spikes dig into the asphalt shingles so the strap clamp will not spin. Additionally each strap clamp anchors the strap very securely, so even if a strap breaks all remaining ones are still secure. Well designed part.

Panels n Straps.jpg
 
My water intakes are essentially two wall mounted "returns" with large plastic "hot tub" style grating safety covers, connected as a "Y" going to the 3/4 HP pump that pushes the water up to the roof mounted panels. You can put your hand over one intake and just mild suction is felt as most of the water is drawn from the non blocked intake. The two intakes are 8 feet apart so one person can't block both intakes at the same time. Not ideal (skimmers would be ideal) but it work petty well. They are about 8- 12 inches below normal water level, I wouldn't call them deep water intakes...but they are in the deep end of the pool. Too high to pickup bottom sediment, and below the surface so no floating debris is sucked up. My pump does have a leaf basket, but I have never seen anything in it.
 
That is brilliant. Of course and that guards against blockage related pump burn out. Thank you again for your sharing of this wealth of info for us DIY types! i love a good project - especially one that ends with me in a warm pool !! I will start a new thread and show my progress! I am sure I will have some additional questions - and would love to have your feedback on my plan if you find you have the time. Thanks again !!
 

Enjoying this content?

Support TFP with a donation.

Give Support
Solar covers do work, I had one for a couple of seasons. Me I didn't like the hassle of putting it on, taking it off...watching all the cover debris dump into the shallow end. The cover also made the pool "less available". I couldn't just jump in the pool for a quick plunge if I had just finished cutting the grass. Yeah you can peel a corner back, or swim in from the steps but it was just a hassle. With solar panels my pool is always open.

The other benefit of solar panels is the thermal energy that is heating your pool is NOT heating up your house. Your house is cooler using solar panels. Whatever BTU's you dump in the pool each day would have been dumped into your roof/attic. Essentially you have a water cooled roof. Zero hassle, warm pool, cool house...works for me.
 
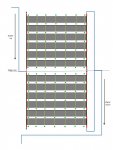
Here is how I plumbed my solar panels. They are all in parallel, but I used a trick (from my daytime gig as an electrical engineer) to help assure that all the panels get equal water through them.

The water goes up to the top of the ridge line (so the pressure is the lowest) and I feed the center of the two halves of the roof as the panel inputs. The two lowest points on the respective roof halves are the outputs. Doing this makes the mean path of the water through each panel the same, thereby equalizing the impedance so all the panels share the load. It's worked great for me on my old panels and the new ones.
 

Attachments

  • Solar Heater May 2014.jpg
    Solar Heater May 2014.jpg
    61 KB · Views: 63
Interesting set up to say the least. Love the homemade solar controller.

Couple of questions, panels are supposed to run vertically so they drain when not in use, yours have water sitting in them I assume? My neighbor did this against my advice and he has major sags and now has two panels with pin holes in them from improper winterization.

Also, have you checked the panels to see if the flow is indeed the same through both sets. I tried that with mine, but they wouldn't regulate, so I run them into the bottom south facing 4 sets, then out the top and back through the bottom north facing panels and out top to return to pool. I know its goofy, but it works here.
 
Jimsky, there is one potential problem from top feeding, it increases the chances of trapped air bubbles blocking water flow since the air bubbles will be trying to rise against the downflow of water in the small tubes.
 
You mean use a Y instead of a T? Not sure that would matter. I would have envisioned just like the drawing, but reversing the flow.

And having a valve at the low point of both sides that you can open in winter to drain the panels.

Unfortunately, with this layout, when the solar is off in the summer there is no way to automatically drain and thus the water in them can become superheated, weakening the little tubes and likely making them start to sag.

If you had the Tee down at ground level and then went up and fed each bank from below (pipe around the house), then they would drain when the pump shuts off, of course with a VRV in the system.
 
For self-draining, you would need 2 supply pipes going up to the low side of each bank ... then can tie the 2 banks together at the top and have one pipe returning to the pool.

If you do not care about self-draining, then basically just reverse the arrows in the drawing.
 

Enjoying this content?

Support TFP with a donation.

Give Support
Thread Status
Hello , This thread has been inactive for over 60 days. New postings here are unlikely to be seen or responded to by other members. For better visibility, consider Starting A New Thread.