New Island Build

Jul 7, 2010
12
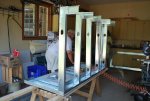
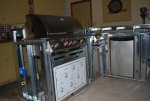
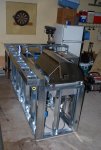
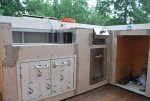
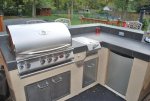
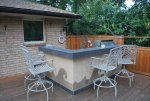
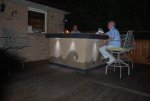
Well, per my previous posts regarding the P.O.S. that Production Contractors built me, I have taken the plunge and started to build my own, the right way. Spent the long weekend working on framing, which is almost complete, will post pics soon.

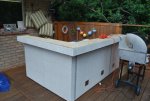
Current plan (and subject to wife change) is to cover countertop with ceramic tile, maybe granite tile. I was planning on using Fiba tape to cover the hardieback joints. So what product should use to mud the tape/screw holes on the counter top in prep for ceramic/granite tile?

For the walls, we are going to stucco (acrylic) so do I use the same product as above to cover the tape/screws? Then I think I have to apply some type of product to make the stucco stick, anybody know what that is called?

Thanks..>JJ15
 

Attachments

  • DSC_0001a.JPG
    DSC_0001a.JPG
    331.8 KB · Views: 1,051
Nice I'd be very curious to see your design, foundation and all as I would love to build my own as well. It's pretty common out here to make them out of concrete block and to stucco over the block.
 
cobra46 said:
I'm glad to see that you will finally end up with a quality island.

What was the outcome with your previous island?


Production Contractors, Inc, did not respond back to the Dallas Better Business Bureau, which doesn't surprise me. I also sent them a registered letter which the Post office tried to drop off but nobody could sign for it, so it is still sitting at their post office after 2 weeks.

I have spoken to my lawyer and we are starting a Small Claims Court filing in the next couple of weeks against this fraudsters.
 
Well, after one week of on / off on the project, I have just wrapped up all the framing. I dry fitted all the appliances, had to make a minor adjustment and all is well...thank god for the pneumatic rivet gun...awesome tool. I posted a pic of the first day to my original post and here is project as of an hour ago. Time to move it to the deck in two pieces while it is light and then connect them together and start putting on the verticals and horizonals.
 

Attachments

  • DSC_0348.JPG
    DSC_0348.JPG
    311.6 KB · Views: 1,051
  • DSC_0351.JPG
    DSC_0351.JPG
    324.6 KB · Views: 1,051
with framing complete, need to clarity my process for walls/countertop after looking at materials on the weekend.

I'll be a little anal on these steps because this is not a subject I am well versed in, so please comment where need (in laymen terms too if you can so this newbie can follow along..haha)

Countertop
1) Put down plywood on all horizontals
2) Thinset
3) Hardieboard set into thinset and screwed down to plywood, no taping required
4) nail down anonized aluminum track around edges so top tile and side tile/trim cut edges are hidden from view
5) apply thinset to HB and skreet on to make level and apply porcelain tile (good material for outside in the great white north, Canada, so they tell me at Home Depot)
6) grout
7) grout sealer
8) don't have to add a sealant to Porcelain, so skipping that step

Verticals Trim
Need to add porcelain tile for trim around the counter top, backsplash and bottom of island. I'm really guessing on these steps.
1) apply some cement adhesive ( this stuff http://quikrete.com/ProductLines/ConcreteBondingAdhesive.asp)
2) Thinset
3) Apply Porcelain Tile
4) Grout
5) Grout sealer

Vertical Walls
1) 1/4" HBoard
2) screw in corner aids (can I use the same aluminum L-shaped drywall molding tracks outside? )
3) tape joints
4) thinset over the joints and screw holes
5) apply some cement adhesive ( that quikrete product above)
6) apply premixed acrylic stucco (plain/white)
7) "fog" with a silicon sealer ( is this it " http://www.seal-krete.com/stuccoguard.htm? or recommendation for another? )
8) paint

Do I need to do any caulking, if so, where would you suggest?

thanks...JJ15
 
well, things are progressing well...my neighbour has been a great partner and has help speed things up working with me. Waiting for my lights to arrive to install under the bar overhang, then will finish putting the backerboard down. Well, a few things are not exactly square, out 1/2", but I'm happy with my weekend work, so we are going to get a professional quote for Stucco this week and are going to pick out our porcelain tiles for the countertops/backsplash and kickerboard.

My wife has seen a bullnose blade to cut the porcelain tile with, we've never done that before so giving that some thought instead of using annonized steel tracking to hide the cut edges. But from what I can see the blade will bullnose the edge, but won't "polish" it up... anyone comment this bullnose blade and then how to polish up the cut edges so that I don't have to use annonized steel track?

Thanks...JJ15
 

Attachments

  • DSC_0363.jpg
    DSC_0363.jpg
    50.9 KB · Views: 975
You are correct that the bullnosing blade will not finish the edge on your tile. If you use a natural stone you can polish it up with high grit sand paper, but you can’t do that with porcelain.

Porcelain comes glazed and unglazed. If you choose a glazed tile there are companies that will glaze the bullnosed edge for you. They charge by the LF, not cheap, but also not completely cost prohibitive. However, the glaze will not mach perfectly. Unglazed through-body porcelain tile might look ok- I haven’t ever seen one cut so I’m kind of working on logic here. Unglazed porcelain is not very popular though so most likely you’re going to end up finding a glazed tile.

If you decided to use the bullnosing blade you will need a wetsaw that has a height adjustment on it.

In an earlier post you commented that you weren’t planning to tape the Hardi joints on the countertop. These DO need to be taped. Use the alkali resistant tape sold for backerboard as thinset is too alkaline for regular mesh tape. It is fine to tape and imbed your thinset at the time of tiling. Doing it at this time will help prevent build up and an uneven setting bed. I can’t tell if you taped the seams on the wall or not, I see the thinset. The tape is what holds it together and makes a monolithic structure. Thinsetting without taping is like mudding drywall without tape- you’ll end up with cracks.
 

Enjoying this content?

Support TFP with a donation.

Give Support
very good feedback Terry, falls into what I was thinking...so my decision is reached...Glazed Porcelain tile for the countertop, a stock product that also has bullnose is what we are looking for...we haven't been too successful on a product with bullnose pieces, but will continue to look.

We will also tape/thinset the countertop, like we did for the verticals prior to tile/stucco.

Thanks very much...JJ
 
jjames15ca said:
very good feedback Terry, falls into what I was thinking...so my decision is reached...Glazed Porcelain tile for the countertop, a stock product that also has bullnose is what we are looking for...we haven't been too successful on a product with bullnose pieces, but will continue to look.

I had great luck finding tile at HD and Lowes. I purchased all my field tiles, and bullnosed trim pieces at Lowes for quite a fair price p/sq. ft., IMHO. We even purchased all the contrast stone there also.

The tilesetter I hired to do our kitchen did bullnose quite a few "full" tiles for the top of my backsplash. Instead of using two thin bullnose pieces, with a cut-down field tile in the center, he took a field tile and bullnosed both edges. That way, I had one piece of tile with a finished edge on both sides along the entire length of my backsplash. You can view a few pics of them in my album.

Kitchen is looking good!!! Keep after it!!! C-Ya Mike
 
Im new here so Im a little late however you can still save your outdoor kitchen. Hardi Board is NOT rated for exterior use at all. Go to hardi site and in specs you will se NO Exterior and no steam shower applications. You need to replace with Durock. 20 years experience can teach you alot and the most basic is to follow manufacture recomendations. But everything else looks awesome.
 
Got real busy the past month, but finally did complete our project this week, we went with cement for the exterior look vs stucco....it was messier then I thought and kind of ruined the deck in spots...will have to clean that up and restain the deck next year.
 

Attachments

  • 1.JPG
    1.JPG
    322.9 KB · Views: 764
  • 2.JPG
    2.JPG
    423.2 KB · Views: 764
  • 3.JPG
    3.JPG
    257.2 KB · Views: 764
Brentr said:
Looks awesome. Might I ask about how much it cost including all the appliances?


no problem...

$1235 for the island, I had to pay a contractor to do the verticals cause I ran out of time, so that was $600 for the concrete work/materials, and then about $2100 for the appliances (grill, burner, trash can drawer, double doors, bottle opener/catcher), so roughly $4,000.
 
Thread Status
Hello , This thread has been inactive for over 60 days. New postings here are unlikely to be seen or responded to by other members. For better visibility, consider Starting A New Thread.