
I had a few posts on the various topics in my title, found out the info i needed (i hope), so i decided I'd put this all together in one thread. Some of the things in here some may find useful, because the info is very hard to figure out or find.. I'll try to break this down as best I can over the next month or so.
First up is the Pool itself.
Its an Intex Ultra Frame 18 foot by 52" deep 6981 Gallon pool. I got it for around $599 at the end of june 2016.
The items i have in play are in my sig but here they are:
Sand Pump System(0.5 hp and 12"?): Intex SF80110 2100 GPH + pump (came with system) $120 new
Salt water system: Krystal Clear 7000 Gallon Salt Water System $107 bought later
**I think it says in the manual 3-4 hours per day to run, however, last years setting is showing 7 hours per day, i need to double check this, also depends on CYA being normal too.
Intex Solar cover: $34 (i cant recall if this ended up being the intex brand or a 3rd party, but very similar either way)
**I may later try the solar panel kit (smartpool s601p) $246 you can put on say a roof and plumb the water through it, for ultimate early season heating.
Salt tester i use to test just salt levels: Eseasongear Salt-3000 $24 (keep around 3000 ppm)
Ph Tester $15.67 (for quick tests)
TF-100 Test kit $70
CYA (to keep around 70-80) $15 (i usually hang in a sock on the side throughout the season)
Salt for the salt water system/pool: Diamond Crystal 40lb $7.56 ( i forget for a "clean" pool water setup how many bags i used, i think 4.5 or 170lbs on first use)
Sand for the sand pump: 1 bags of 50lb sand
HTH sand 61308 $13 at ace or this HTH 67074 $12 would work too, i used the 61308
**from the manual: Use No. 20 silica sand or glass sand with particle size range 0.45 to 0.85 mm (0.018 to 0.033 inches) and a Uniformity Coefficient less than 1.75.
Gorilla pad under the pool: $75
**deluxe wall mount skimmer (now being replaced with inwall variety) $20
**I may later upgrade to the 4500 gph 19" 1HP SKY1639 BestChoice Sand Pump system $239 found on here often (to give more power for things like a floor robot, but likely wont need it based on comments).
UPDATE: this is in progress
After a month or so i started to see rust on the joints of the pool. I decided to put rustoleum gray paint on those areas as well as "rescue tape" wrapped around the same areas.. no issues since.
When i put the pool in, i had someone come with a bull dozer, then i put a layer of sand down (i forget how many ton).. unfortunately somewhere along the line i didnt have it perfectly level, despite using levels and boards to try to get it close. One side might have 2.5 blocks showing from the top while others are at 1 block from the top.. i try to keep it at its "highest point" about 1.5 blocks from the top.
I then added a wooden deck to the pool which has worked out great, though i wish i had extended it about 3 feet further towards the garage so that there is more "splash-free" zone available. I believe the total cost for this deck, not counting the rocks i added around the pool, was in the neighborhood of $900 from lowes. I believe i used 16 foot going from the start of this picture to the rear and from left to right used 12 foot boards cut to length for each part around the semi circle.

I also purchased steps for the pool and a matt for under it.
They are the Confer CCAG 4 step for around $180 on amazon.

I added an intex light to the side too..


On the backside i have an equipment gate, under the deck is the salt water filter system and return inlet.

This was all done between july and early august last year.
In the fall i bought an 18' pool cover to cover the pool.. tried using jugs filled with water hanging off the pool on nylon string, as well as nylon string pulling the side by the deck to the deck, since it was next to impossible to get the tarp down under the deck edge.. this worked ok for a month or two, along with an R16 auto tube (which seemed kinda small but i guess was good enough to break ice), then the tarp blew off from the left side and for the last 2 months was exposed. I think next year ill get a 21' tarp (pool mate 5718-4 $66) and find some sort of pegs to jam into the ground to tie it down with.. still have an issue on the side by the deck though. When i took the tarp off around april 10th, there was a ton of water up on top of the tarp.. i ended up using a shop vac to try to remove most of that green water, very tedious, i know there are better ways.


So april is here, tarp off, ready to roll. I hastily increased the water back to normal levels, from the fall where i was below the Two outlet ports. Only to decide i want to put in bigger outlets, a hayward widemouth skimmer, pvc piping, some splits on the return piping for a future robot and possibly add a second eyeball hayward return about 16" below the existing regular return for efficiency.
Ill update this thread as this part moves forward along with parts used and pictures (as well as last years pics)....
Up first are this years mods i will attemp..
Hayward Sidwall Skimmer Mod + PVC
I've decided to go with the Hayward WideMouth, so i can keep the water level near normal (though you could with the standard too, just raise it up higher).
Model: SP1091WM $41
This filter comes with the round disc you put ontop of the basket inside to do regular vacuuming of the pool, using a standard bagless head (which i've just ordered as well).
The filter comes with a gasket that is "butterfly" in nature, meaning the edges of it are cut/flapped, so you can put the gasket "around" the liner after its cut. Many have said they cut the gasket into 2 pieces, one outside, one inside pool and had success (or added silicone to the outside)..
I've decided i will NOT cut it.. I'm going to go ahead and mount the hayward bracket with the gasket as is, on the Inside of the pool (initially).. take a drill make the holes, feed the bolts through and secure the backside (ill lower the water down as well, after i get the exact height that is halfway or 3/4 on the skimmer bracket)..
Once all this is in place, ill make the cut for the hole.. then ill take it apart again and put the gasket where it belongs overlapping the seem of the liner.
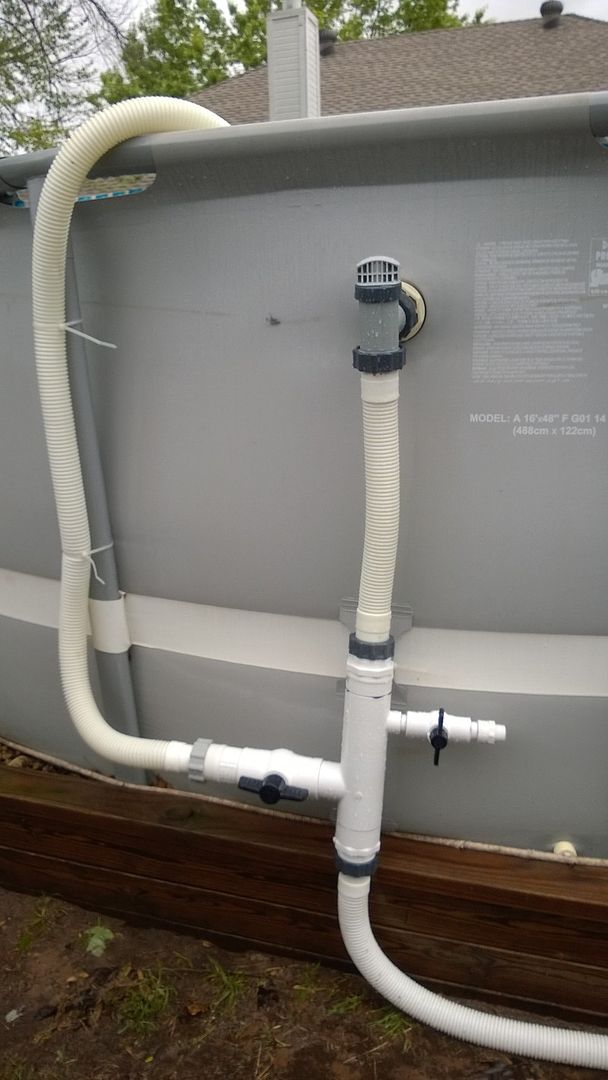
Below is a picture showing the dual outlets i currently have.. the red circle to the right (but higher up in the gray area) is where i intend to put the sidewall skimmer.

To go along with this, i will re-use the 24' 1.25" hose that came with the deluxe kit with the intex..
I bought a new vacuum head:
Poolmaster 18525 Jumbo Head $24
Replacing the two outlets with bigger strainers/connections
The other task which will come in a few days, is removing the old strainers and putting in the new ones, using these:
Intex 11236 large strainers $22 for two shipped
**these come with the nut that goes flush against the pool and the washers for each side.
The issue is, that right now at least, both of these are under water.. its my understanding i should be able to hold a bowl inside the pool and make the cut on the outside and somehow fish them through and quickly put each gasket in place and screw together.
Not sure how i can have it on the outside then after the cut push the larger side of it through, but we will see (or ill just drain it down a tad, again)
This leads me to converting to mostly PVC connections
I intend to still use the flex hoses off the equipment, which i believe are standard 1.5" connections..
The reason for switching to the large strainers from intex is that the threads should also be 1.5"
Ultimately though, i want to split the return side like "Jeffchap" did with his pic here, but with an added hayward return in the middle here (two returns into the pool)
While on the otherside i will go for something like this which "domct203" did per his image:

See below for the full list of PVC and related parts used as well as my actual end result...
UPDATE:
Hayward mod:
I decided to just cut the gasket into two, making two gaskets.. one for the outside and one for the inside, but i stupidly forgot to put the outside gasket on (no leaks after super tightening).. ill either silicone the outside or take it apart and fix, assuming no risk to the already cut hole stretching. It was easy to make the hole cut as well, using push out box cutter, after everything was secured. Water levels will go to the second screw up at the two thirds mark when full.. it was as high as i could get it without interfering with the "bend" of the gray material on the back of the pool and keeping it flush.. i'm glad i went widemouth..
Update: i pulled it off/unscrewed it, added the gasket to the rear, re attached.. no issues.

Before adding water again:

Here are some updated pics of the haywood now that the pvc is done and the water levels are up to normal (to the second screw on the haywood)..

 .
.
Here is a closer view on the connections as well:


Here is the full list of parts used/with diagram:

1: Haywood connector
2: PVC 1.5" cut pipe joiner (not the same as a pvc coupler found at stores)
3: Lasco 1.5" adapter with male inner threads 435015RMC
4: PVC right angle slip on both ends 90 degree 409015RMC
5: PVC 1.5" cut pipe joiner (not the same as a pvc coupler found at stores)
6: Ball valve 1.5" 1.5" non threaded ball valves
7: PVC 1.5" cut pipe joiner (not the same as a pvc coupler found at stores)
8: Right angle 90 degree male inner thread and slip on other end 407015RMC
9: PVC Tee with slip ends 401015RMC
10: PVC 1.5" cut pipe joiner (not the same as a pvc coupler found at stores)
11: GAME 40mm to 1.5" adapter with washer Game 4560 adapters
12: 1.5" pvc cut pipe
13: Union Connector 511-14-112-112B
14: PVC 1.5" cut pipe joiner (not the same as a pvc coupler found at stores)
15: 45 degree 1.5" slip ends 436015RMC
16: PVC 1.5" cut pipe
17: Right angle 90 degree slip on both ends 409015RMC
18: PVC 1.5" cut pipe joiner (not the same as a pvc coupler found at stores)
19: Ball valve 1.5" 1.5" non threaded ball valves
20: PVC 1.5" cut pipe joiner (not the same as a pvc coupler found at stores)
21: Lasco 1.5" adapter with male inner threads 435015RMC
**update 4/2019, swapped out the old hayward inlet return for a 2" (HAYWARD SP1023S2 2") to prevent leaking which was now worse this year. Worked perfectly.
The rest of the PVC items needed to make all this happen:
Then the parts of the return PVC in addition, which are the same basic concept.
Generic PVC piping 1.5", roughly 8-10 feet or more
Hayward overlfow mod
I'm also going to drill a hole in the hayward about 1" above the water level and from there a 90 degree bend and 1/2 pvc pipe to the ground, this will serve as an overflow regulator..
Need 1/2" 90 degree bend :98cents
another 1/2 non threaded for on the ground: 48cents
1/2 PVC pipe, 5 foot section, two of them
Lastly, teflon tape $4(blue hawk 0.6x21), better grade variety.
Total in PVC around $87 plus a few sections of straight 1.5" pipe; Along with the cement/primer kit $9.38 to mix together
Hayward Connector parts:
Strainer Cap
Plug (has a washer which is key)
Here is animated gif showing the construction of the pool and deck from 2016:

Here is a short overview video on whats been done through 4/21/17:
Intex UltraFrame 18x52 pool with pvc mods and intex robot - YouTube
First up is the Pool itself.
Its an Intex Ultra Frame 18 foot by 52" deep 6981 Gallon pool. I got it for around $599 at the end of june 2016.
The items i have in play are in my sig but here they are:
Sand Pump System(0.5 hp and 12"?): Intex SF80110 2100 GPH + pump (came with system) $120 new
Salt water system: Krystal Clear 7000 Gallon Salt Water System $107 bought later
**I think it says in the manual 3-4 hours per day to run, however, last years setting is showing 7 hours per day, i need to double check this, also depends on CYA being normal too.
Intex Solar cover: $34 (i cant recall if this ended up being the intex brand or a 3rd party, but very similar either way)
**I may later try the solar panel kit (smartpool s601p) $246 you can put on say a roof and plumb the water through it, for ultimate early season heating.
Salt tester i use to test just salt levels: Eseasongear Salt-3000 $24 (keep around 3000 ppm)
Ph Tester $15.67 (for quick tests)
TF-100 Test kit $70
CYA (to keep around 70-80) $15 (i usually hang in a sock on the side throughout the season)
Salt for the salt water system/pool: Diamond Crystal 40lb $7.56 ( i forget for a "clean" pool water setup how many bags i used, i think 4.5 or 170lbs on first use)
Sand for the sand pump: 1 bags of 50lb sand
HTH sand 61308 $13 at ace or this HTH 67074 $12 would work too, i used the 61308
**from the manual: Use No. 20 silica sand or glass sand with particle size range 0.45 to 0.85 mm (0.018 to 0.033 inches) and a Uniformity Coefficient less than 1.75.
Gorilla pad under the pool: $75
**deluxe wall mount skimmer (now being replaced with inwall variety) $20
**I may later upgrade to the 4500 gph 19" 1HP SKY1639 BestChoice Sand Pump system $239 found on here often (to give more power for things like a floor robot, but likely wont need it based on comments).
UPDATE: this is in progress
After a month or so i started to see rust on the joints of the pool. I decided to put rustoleum gray paint on those areas as well as "rescue tape" wrapped around the same areas.. no issues since.
When i put the pool in, i had someone come with a bull dozer, then i put a layer of sand down (i forget how many ton).. unfortunately somewhere along the line i didnt have it perfectly level, despite using levels and boards to try to get it close. One side might have 2.5 blocks showing from the top while others are at 1 block from the top.. i try to keep it at its "highest point" about 1.5 blocks from the top.
I then added a wooden deck to the pool which has worked out great, though i wish i had extended it about 3 feet further towards the garage so that there is more "splash-free" zone available. I believe the total cost for this deck, not counting the rocks i added around the pool, was in the neighborhood of $900 from lowes. I believe i used 16 foot going from the start of this picture to the rear and from left to right used 12 foot boards cut to length for each part around the semi circle.
I also purchased steps for the pool and a matt for under it.
They are the Confer CCAG 4 step for around $180 on amazon.
I added an intex light to the side too..
On the backside i have an equipment gate, under the deck is the salt water filter system and return inlet.
This was all done between july and early august last year.
In the fall i bought an 18' pool cover to cover the pool.. tried using jugs filled with water hanging off the pool on nylon string, as well as nylon string pulling the side by the deck to the deck, since it was next to impossible to get the tarp down under the deck edge.. this worked ok for a month or two, along with an R16 auto tube (which seemed kinda small but i guess was good enough to break ice), then the tarp blew off from the left side and for the last 2 months was exposed. I think next year ill get a 21' tarp (pool mate 5718-4 $66) and find some sort of pegs to jam into the ground to tie it down with.. still have an issue on the side by the deck though. When i took the tarp off around april 10th, there was a ton of water up on top of the tarp.. i ended up using a shop vac to try to remove most of that green water, very tedious, i know there are better ways.
So april is here, tarp off, ready to roll. I hastily increased the water back to normal levels, from the fall where i was below the Two outlet ports. Only to decide i want to put in bigger outlets, a hayward widemouth skimmer, pvc piping, some splits on the return piping for a future robot and possibly add a second eyeball hayward return about 16" below the existing regular return for efficiency.
Ill update this thread as this part moves forward along with parts used and pictures (as well as last years pics)....
Up first are this years mods i will attemp..
Hayward Sidwall Skimmer Mod + PVC
I've decided to go with the Hayward WideMouth, so i can keep the water level near normal (though you could with the standard too, just raise it up higher).
Model: SP1091WM $41
This filter comes with the round disc you put ontop of the basket inside to do regular vacuuming of the pool, using a standard bagless head (which i've just ordered as well).
The filter comes with a gasket that is "butterfly" in nature, meaning the edges of it are cut/flapped, so you can put the gasket "around" the liner after its cut. Many have said they cut the gasket into 2 pieces, one outside, one inside pool and had success (or added silicone to the outside)..
I've decided i will NOT cut it.. I'm going to go ahead and mount the hayward bracket with the gasket as is, on the Inside of the pool (initially).. take a drill make the holes, feed the bolts through and secure the backside (ill lower the water down as well, after i get the exact height that is halfway or 3/4 on the skimmer bracket)..
Once all this is in place, ill make the cut for the hole.. then ill take it apart again and put the gasket where it belongs overlapping the seem of the liner.
Below is a picture showing the dual outlets i currently have.. the red circle to the right (but higher up in the gray area) is where i intend to put the sidewall skimmer.
To go along with this, i will re-use the 24' 1.25" hose that came with the deluxe kit with the intex..
I bought a new vacuum head:
Poolmaster 18525 Jumbo Head $24
Replacing the two outlets with bigger strainers/connections
The other task which will come in a few days, is removing the old strainers and putting in the new ones, using these:
Intex 11236 large strainers $22 for two shipped
**these come with the nut that goes flush against the pool and the washers for each side.
The issue is, that right now at least, both of these are under water.. its my understanding i should be able to hold a bowl inside the pool and make the cut on the outside and somehow fish them through and quickly put each gasket in place and screw together.
Not sure how i can have it on the outside then after the cut push the larger side of it through, but we will see (or ill just drain it down a tad, again)
This leads me to converting to mostly PVC connections
I intend to still use the flex hoses off the equipment, which i believe are standard 1.5" connections..
The reason for switching to the large strainers from intex is that the threads should also be 1.5"
Ultimately though, i want to split the return side like "Jeffchap" did with his pic here, but with an added hayward return in the middle here (two returns into the pool)
While on the otherside i will go for something like this which "domct203" did per his image:
See below for the full list of PVC and related parts used as well as my actual end result...
UPDATE:
Hayward mod:
I decided to just cut the gasket into two, making two gaskets.. one for the outside and one for the inside, but i stupidly forgot to put the outside gasket on (no leaks after super tightening).. ill either silicone the outside or take it apart and fix, assuming no risk to the already cut hole stretching. It was easy to make the hole cut as well, using push out box cutter, after everything was secured. Water levels will go to the second screw up at the two thirds mark when full.. it was as high as i could get it without interfering with the "bend" of the gray material on the back of the pool and keeping it flush.. i'm glad i went widemouth..
Update: i pulled it off/unscrewed it, added the gasket to the rear, re attached.. no issues.
Before adding water again:
Here are some updated pics of the haywood now that the pvc is done and the water levels are up to normal (to the second screw on the haywood)..
Here is a closer view on the connections as well:
Here is the full list of parts used/with diagram:
1: Haywood connector
2: PVC 1.5" cut pipe joiner (not the same as a pvc coupler found at stores)
3: Lasco 1.5" adapter with male inner threads 435015RMC
4: PVC right angle slip on both ends 90 degree 409015RMC
5: PVC 1.5" cut pipe joiner (not the same as a pvc coupler found at stores)
6: Ball valve 1.5" 1.5" non threaded ball valves
7: PVC 1.5" cut pipe joiner (not the same as a pvc coupler found at stores)
8: Right angle 90 degree male inner thread and slip on other end 407015RMC
9: PVC Tee with slip ends 401015RMC
10: PVC 1.5" cut pipe joiner (not the same as a pvc coupler found at stores)
11: GAME 40mm to 1.5" adapter with washer Game 4560 adapters
12: 1.5" pvc cut pipe
13: Union Connector 511-14-112-112B
14: PVC 1.5" cut pipe joiner (not the same as a pvc coupler found at stores)
15: 45 degree 1.5" slip ends 436015RMC
16: PVC 1.5" cut pipe
17: Right angle 90 degree slip on both ends 409015RMC
18: PVC 1.5" cut pipe joiner (not the same as a pvc coupler found at stores)
19: Ball valve 1.5" 1.5" non threaded ball valves
20: PVC 1.5" cut pipe joiner (not the same as a pvc coupler found at stores)
21: Lasco 1.5" adapter with male inner threads 435015RMC
**update 4/2019, swapped out the old hayward inlet return for a 2" (HAYWARD SP1023S2 2") to prevent leaking which was now worse this year. Worked perfectly.
The rest of the PVC items needed to make all this happen:
Then the parts of the return PVC in addition, which are the same basic concept.
Generic PVC piping 1.5", roughly 8-10 feet or more
Hayward overlfow mod
I'm also going to drill a hole in the hayward about 1" above the water level and from there a 90 degree bend and 1/2 pvc pipe to the ground, this will serve as an overflow regulator..
Need 1/2" 90 degree bend :98cents
another 1/2 non threaded for on the ground: 48cents
1/2 PVC pipe, 5 foot section, two of them
Lastly, teflon tape $4(blue hawk 0.6x21), better grade variety.
Total in PVC around $87 plus a few sections of straight 1.5" pipe; Along with the cement/primer kit $9.38 to mix together
Hayward Connector parts:
Strainer Cap
Plug (has a washer which is key)
Here is animated gif showing the construction of the pool and deck from 2016:
Here is a short overview video on whats been done through 4/21/17:
Intex UltraFrame 18x52 pool with pvc mods and intex robot - YouTube
Last edited:

