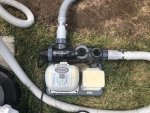
So as we all know, Intex isn't AGP pump friendly out of the box. They obviously use some proprietary connections for their own pools and pumps. But, you can use adapt them with a little plumbing know how and the right items.
This was my shopping list:
I will list the steps and then supply the pictures of the parts and the finished assemblies.
Congratulations, you have just made your very own Intex SWG adapter set. Simply screw them onto the SWG and attach your hoses.


This was my shopping list:
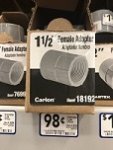
- 1 1/2" Female Adapter (Brand: Carlon, Item#18192) purchased at Lowe's $0.98 each and purchased 2 of them
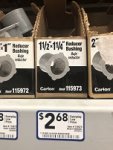
- 1 1/2" x 1 1/4" Reducer Bushing (Brand: Carlon, Item#115973) purchased at Lowe's $2.68 each and purchased 2 of them
- PVC purple primer and PVC gray cement for attaching pvc connections together (These items are critical to prevent leaking.
- 1 1/4"-1 1/2" Hose Adapter (Brand: Hydrotools Swimline, Item# VC 1085) purchased at my local pool store for $2.00 each, purchased 2 of them
- Teflon tape for threaded connections
- Two large Intex nuts off of a stock Intex hose (cut the hose and remove the nuts.
I will list the steps and then supply the pictures of the parts and the finished assemblies.
- Cut/sand/grind off the tabs on the reducer bushing. This will allow it to slide fully into the Intex nut.
- Sand off the lettering on the face of the reducer bushing to provide a smooth sealing surface.
- Slide the reducer bushing into the nut
- Apply a thin layer of purple primer to the outside of the bushing, and the inside of the female adapter.
- Apply a thin layer of gray cement to the outside of the bushing, and the inside of the female adapter.
- While the cement is still wet, slide the reducer bushing all the way into the female adapter and give it a 1/4 turn. This process is critical and it must be allowed to cure for no less than 2 hours. You are basically welding these to parts together. Once the assembly is cured you can move on to the next step.
- Apply Teflon tape to the threads of the hose adapter.
- Screw the hose adapter into the threaded end of the female adapter.
- Use two pairs of pliers to tighten the hose adapter until in cannot be turned anymore.
Congratulations, you have just made your very own Intex SWG adapter set. Simply screw them onto the SWG and attach your hoses.