- Aug 23, 2017
- 109
- Pool Size
- 17700
- Surface
- Plaster
- Chlorine
- Salt Water Generator
- SWG Type
- Hayward Aqua Rite (T-15)
So after a couple months of bad weekend weather, family visits, and a few other house projects that popped up I finally got around to installing my new T-15 SWG cell today. Though in all that time I wasnt idle, I spent it tweaking my chemicals and salt to be optimal for my new gadget. It’s been tough finding chlorine last couple months, and when I have found it it’s both pricey and self one fresh. I did find some fresh pool essentials at HD a couple weeks ago, but was more $$$ than usual.
All in it took probably about 2 hours to plumb in the SWG, flow switch, and tee for my stenner for new acid injection. I could probably do it again in under an hour if I didn’t have a five year old asking me a thousand questions and then running off with my tools, lol. I know I need to work a bit on the TA yet though, but pretty happy with everything else. I find that keeping my CSI on the negative side helps keep my glass tiles clean and sparkling with little effort.
==========================================
POOL
------------------------------------------
Build Type: Plaster
Volume: 17700 gallons
------------------------------------------
Latest Test Result Summary:
FC: 5.5
CC: 0.0
pH: 7.6
TA: 90
CH: 225
CYA: 70
SALT: 2800
BORATES: 30
TEMPERATURE: 83°
CSI: -0.30
==========================================
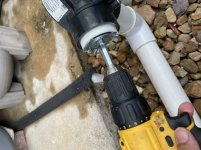
I first started by bleeding the system and removing all the water from the piping. Then I started out cutting out the rainbow chlorinator and removing the old PVC pipe from the three way valve using my new socket saver tool, which worked like a hot knife through butter for removing the PVC within the valve. All in it was like $15 on Amazon for the 2” model. The socket saver made it super easy, and I would highly recommend it to anyone who needs to reuse a socket. Only thing I’d do different would be put down a drop cloth to catch all the PVC shavings as cleaning it out of my landscape stone wasn’t easy.


From there it was just measuring and cutting the plumbing to fit the flow switch and the SWG. Measure, measure again, measure depth of socket, mark, cut, primer, then cement the pipe and sockets. Then I waited a good two hours before I pressurized the system by starting up the pump. I don’t know if two hours was needed, but took about that long to eat dinner and finish off a couple cold ones as I looked in on my new SWG with a big smile on my face.


Once the system was up and running, only a tiny bit of extra torque was needed to stop the drip around one of the SWG unions, all was looking good. I also highly recommend having a strap wrench handy to make sure those unions are nice and snug. I then went into the settings on my AquaLogic, set my cell to T-15, which was the default anyway, and then plugged in both the SWG and the flow switch. I got immediate feedback when it flashed my chlorine output settings and salt levels. I was shocked when the unit said my salt was 2800 which is what I tested this morning with my Taylor test kit.

I have my current SWG output set to 20%, and my VS pump runs from about 7am to 10pm. I’ll probably need to start tracking output % within my pool math app to see what kind of FC chlorine levels I’m getting. Also with my stenner off chlorine duty soon, I’m switching it to acid. My initial thoughts are to add about 12 gallons of water to the tank and then 2 gallons of acid, so 1:6 dilution so effectively about 16% strength of the original 33%. Least I think I’m calculating that right, then play with my injection ounces until I get my pH to balance out. Anyone have any experience with this and can offer pointers? Is a 1:6 dilution too little? Too much? Next month or so I’ll be able to dial it in through a bit of monitoring. Though it will have to wait a bit yet, as I still have about 4-5 gallons of chlorine in it yet that I need to utilize before rinsing it out. I didn’t plan it very well on making sure my pump tank was empty before doing the conversion.
All in, it was a pretty straightforward and easy process, as intimating as cutting into your perfect pool plumbing may be. I think if you’re comfortable with a saw, tape measure, and PVC primer/ glue there’s not much too it. I’m looking forward to seeing how even more trouble free my pool will be this summer with both my SWG and stenner. Plus I’ll get the added benefit of the recycling guy no longer thinking I’m a germophobe when I’m not filling my can with empty bleach bottles all the time.
All in it took probably about 2 hours to plumb in the SWG, flow switch, and tee for my stenner for new acid injection. I could probably do it again in under an hour if I didn’t have a five year old asking me a thousand questions and then running off with my tools, lol. I know I need to work a bit on the TA yet though, but pretty happy with everything else. I find that keeping my CSI on the negative side helps keep my glass tiles clean and sparkling with little effort.
==========================================
POOL
------------------------------------------
Build Type: Plaster
Volume: 17700 gallons
------------------------------------------
Latest Test Result Summary:
FC: 5.5
CC: 0.0
pH: 7.6
TA: 90
CH: 225
CYA: 70
SALT: 2800
BORATES: 30
TEMPERATURE: 83°
CSI: -0.30
==========================================
I first started by bleeding the system and removing all the water from the piping. Then I started out cutting out the rainbow chlorinator and removing the old PVC pipe from the three way valve using my new socket saver tool, which worked like a hot knife through butter for removing the PVC within the valve. All in it was like $15 on Amazon for the 2” model. The socket saver made it super easy, and I would highly recommend it to anyone who needs to reuse a socket. Only thing I’d do different would be put down a drop cloth to catch all the PVC shavings as cleaning it out of my landscape stone wasn’t easy.
From there it was just measuring and cutting the plumbing to fit the flow switch and the SWG. Measure, measure again, measure depth of socket, mark, cut, primer, then cement the pipe and sockets. Then I waited a good two hours before I pressurized the system by starting up the pump. I don’t know if two hours was needed, but took about that long to eat dinner and finish off a couple cold ones as I looked in on my new SWG with a big smile on my face.
Once the system was up and running, only a tiny bit of extra torque was needed to stop the drip around one of the SWG unions, all was looking good. I also highly recommend having a strap wrench handy to make sure those unions are nice and snug. I then went into the settings on my AquaLogic, set my cell to T-15, which was the default anyway, and then plugged in both the SWG and the flow switch. I got immediate feedback when it flashed my chlorine output settings and salt levels. I was shocked when the unit said my salt was 2800 which is what I tested this morning with my Taylor test kit.
I have my current SWG output set to 20%, and my VS pump runs from about 7am to 10pm. I’ll probably need to start tracking output % within my pool math app to see what kind of FC chlorine levels I’m getting. Also with my stenner off chlorine duty soon, I’m switching it to acid. My initial thoughts are to add about 12 gallons of water to the tank and then 2 gallons of acid, so 1:6 dilution so effectively about 16% strength of the original 33%. Least I think I’m calculating that right, then play with my injection ounces until I get my pH to balance out. Anyone have any experience with this and can offer pointers? Is a 1:6 dilution too little? Too much? Next month or so I’ll be able to dial it in through a bit of monitoring. Though it will have to wait a bit yet, as I still have about 4-5 gallons of chlorine in it yet that I need to utilize before rinsing it out. I didn’t plan it very well on making sure my pump tank was empty before doing the conversion.
All in, it was a pretty straightforward and easy process, as intimating as cutting into your perfect pool plumbing may be. I think if you’re comfortable with a saw, tape measure, and PVC primer/ glue there’s not much too it. I’m looking forward to seeing how even more trouble free my pool will be this summer with both my SWG and stenner. Plus I’ll get the added benefit of the recycling guy no longer thinking I’m a germophobe when I’m not filling my can with empty bleach bottles all the time.