Idea to help keep water out of Intex rails and t-connectors....

beggehorn

Well-known member
Sep 14, 2015
50
Azusa, CA
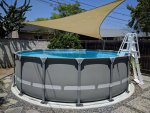
I've made a few posts detailing the rust issues I've experienced with my Intex pools and am brainstorming some ideas in how to best prevent water from getting into the ends of the horizontal supports. My Ultra Frame uses plastic t-connectors with integrated locking pins. With my last Ultra Frame, water got into the connectors and inside the holes at the bottom of the poles where the pins lock causing rust to very quickly eat the poles to where they needed replacement after only two seasons (the vertical legs only lasted one...).

This year with a brand new pool, I've used silicone to seal the bottom of the legs where they join the cups. I also plan to use 2" self-fusing silicone tape to wrap the top of the legs where they connect to the joints (being sure to completely cover the holes/pins).

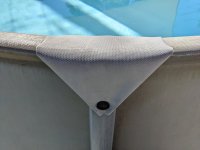
Because of the complex geometry of the t-connectors where the horizontal rails connect, I've been hesitant to attempt a silicone tape wrap. But I had an entirely different idea this morning...

Because I have a through the wall skimmer installed, the hole at the top of the skimmer (which is lower than the "windows" in the liner where the t-connectors are positioned) serves as my overflow point. I realized that while these windows may serve a overflow safety function for some, the through the wall skimmer makes this moot.

Looking at the liner, I though how hard would it be to cut a flap of vinyl and glue it to the inside of the pool (being sure to also glue it down to the vinyl hanging over the top rail) and then hang it over the edge? The flap hanging over could easily be secured to the leg with a zip tie, or even a magnet.

I'm really tempted to try this... If I did, what would be the best glue/adhesive for a permanent, waterproof bond (vinyl patching cement??).

Thoughts?
 
UPDATE!

I just finished installing this mod to my pool and splash tested it with a night swim with the kids ;) Passed the test with flying colors.

Here's a pic of the finished product:

110023

Flaps were patterned and then cut out of vinyl coated PVC fabric and glued with HH-66 vinyl cement. The black "buttons" are strong neodimium magnets. They came epoxy coated but I'll probably use the leftover Rust-Oleum I used on the support poles to paint them gray as well.

The bottom of the flaps are square and rolled underneath. This forms two funnels on the sides of each flap that blocks water from reaching tge t-connectors and allows any water coming in on the sides to flow out the bottom. The magnet holds the folded-in corners to the upright.

The inside of the pool is now completely sealed, no water can splash through the openings and get into the t-connectors now. Of course, this mod depends on the through-the-wall skimmer I had added previously to ensure the water level has an overflow point to prevent accidental overfilling.

Cost:

2 yds vinyl coated PVC - $40 (about $8/yd but shipping was a little expensive. Still have 1/2 yd left over)

(1) can HH-66 vinyl adhesive - $14 (only used about 3/4 can)

(2) 10pk magnets - $28 (only needed 16 magnets)

It took my wife and I about 6 hours to cut the material, do all the surface prep and glue them all on. It did require some extra measuring and marking on the pool and flaps to make sure we applied the glue to the correct areas and that everything would line up cleanly.

We had used silicone tape in the past to seal up the tops and bottoms of the vertical poles when we had to replace them on our last pool but the horizontal unions we're left unprotected and completely rotted out. I never liked how the silicone tape looked (though it served it's purpose well on vertical poles which we are still using). Now we don't need the tape at all. The bottoms of the vertical poles are sealed to the foot cups with clear silicone caulk and the flaps completely cover the top of the t-connectors and protect all the pole unions.

I also bought some 303 UV Protectant spray we are now going to use to treat the vinyl all around the top rail. Hoping with these mods to have *at least* a 5 year pool. Will keep this post updated...
 
I absolutely LOVE this. My pool is probably on it's last season. I am having more problems with sun rot on the vinyl than rust, but have often thought of somehow patching those holes because I hate them! I painted the top of my sleeves with "As Seen on TV" flex seal paint except for one (stuff is expensive, thick and doesn't go far) so of course that one rotted almost all the way through this summer. I just put some of the same product in tape form on it and will see if it holds. At this point I don't want to waste too much more money on it, but when I get the replacement I will be wanting to do this. I wonder if the vinyl you used will hold up as well as the liner vinyl? (6 years in harsh AZ sun for me, only put the paint on a year ago, will do it right away when replacement time comes)

I have one low leg that gets the worst splash out and subsequently has the most rust showing up at the bottom of the leg, I may spring for another roll of tape and at least block that "window" from further splash.
 
  • Like
Reactions: beggehorn
This is a great idea! We replaced our pool last summer and this is the "new" style and I am not real happy with it but what can you do? Our old Ultra Frame was put up in 2010 and would still be standing if I had done something to protect the vinyl on the rail from the brutal Texas sun. When I tore it down the legs had NO rust issues. At the end of our 2nd season I am already seeing some rust start on my "low side" leg. I really do not want to but may tear it down come spring, check and repair any damage, and then go with your solutions. Thanks for sharing!
 
  • Like
Reactions: beggehorn
Hi tam430

I took a quick look through my garage looking for the pattern I know I had saved but I didn't have any luck tracking it down... Sorry about that... Here's a quick and dirty sketch (not to scale) that I hope helps.

pool flap jpeg.JPG

I started with a rectangle piece of vinyl measuring exactly 9 1/2" x 14". The part that hangs outside the pool was not shaped (I just folded the two corners underneath the flap and they're held in place with the magnets). With the other end that goes over the rail and into the pool, the end lines up with the seam of the gray and blue vinyl and then was cut to just create about a 1" border of overlap of the hole, softly rounding all the non 90 degree corners. I used high quality vinyl glue only on the inside and along the top of the rails.

Be aware that this is (for all intents and purposes) a permanent bond. I'm not sure that I would be able to take the pool down without having to cut the liner off. If it was ever necessary, the vertical poles could be replaced easily but I'm not sure how easily the horizontal poles could be removed with the added flaps. The good thing is that it is looking like the vinyl will decompose before my poles and rails show any signs of rust ;)

Here are some fresh pics I took today of the pool that was setup and modded about a year ago:
IMG_20200522_114647.jpg

IMG_20200522_114704.jpg

One thing I realize I forgot to add to the details of the mod was that I used a single wrap around of 2" self-fusing silicone tape at the junction of where pool liner ends on the horizontal rails (you can see that in the picture above ^^^). It may not be necessary but I had some lying around and decided to use it.

Hope this all helps!
 

Attachments

  • IMG_20200522_114647.jpg
    IMG_20200522_114647.jpg
    654.8 KB · Views: 16
Last edited:
... The bottoms of the vertical poles are sealed to the foot cups with clear silicone caulk and the flaps completely cover the top of the t-connectors and protect all the pole unions.

I also bought some 303 UV Protectant spray we are now going to use to treat the vinyl all around the top rail. Hoping with these mods to have *at least* a 5 year pool. Will keep this post updated...
Curious how all this is holding up? We are in the process of putting up our next pool and are very interested in your sealing techniques! We have not previously had rust issues, but alas, 'all good things come to an end' it seems :D
 
Hi tam430

I took a quick look through my garage looking for the pattern I know I had saved but I didn't have any luck tracking it down... Sorry about that... Here's a quick and dirty sketch (not to scale) that I hope helps.

View attachment 141199

I started with a rectangle piece of vinyl measuring exactly 9 1/2" x 14". The part that hangs outside the pool was not shaped (I just folded the two corners underneath the flap and they're held in place with the magnets). With the other end that goes over the rail and into the pool, the end lines up with the seam of the gray and blue vinyl and then was cut to just create about a 1" border of overlap of the hole, softly rounding all the non 90 degree corners. I used high quality vinyl glue only on the inside and along the top of the rails.

Be aware that this is (for all intents and purposes) a permanent bond. I'm not sure that I would be able to take the pool down without having to cut the liner off. If it was ever necessary, the vertical poles could be replaced easily but I'm not sure how easily the horizontal poles could be removed with the added flaps. The good thing is that it is looking like the vinyl will decompose before my poles and rails show any signs of rust ;)

Here are some fresh pics I took today of the pool that was setup and modded about a year ago:
View attachment 141200

View attachment 141202

One thing I realize I forgot to add to the details of the mod was that I used a single wrap around of 2" self-fusing silicone tape at the junction of where pool liner ends on the horizontal rails (you can see that in the picture above ^^^). It may not be necessary but I had some lying around and decided to use it.

Hope this all helps!
I'm also curious if this mod has stood the test of time! Can you give us an update?
 
Sorry, it took awhile to catch the replies here. Attached are pics I took today. No rust at all (just dust!). As I predicted, the liner itself is the weak link now. The vinyl at the top rails are quite deteriorated with itchy fiberglass starting to poke through and the blue square pattern below the water line is all but faded away. To top it off, I had to patch a new leak near the bottom edge today. This pool stays up year round, btw. We'll see if the pool makes it another year. I have a feeling it is going to start sprouting more and more pin hole leaks as time goes on.

We've looked into more permanent (resin) above ground pools. We may be ready for the investment after graduating "pool school" over the last several years ;) Unfortunately, I had assumed 16" would be a common size when pouring the concrete pool pad. It looke like most resin pools come in 15' and then jump up to 18'. The pool pad is only 17' across.

pxl_20220811_222029631-jpg.445494
PXL_20220811_222040746.MP.jpg
 

Attachments

  • PXL_20220811_222029631.jpg
    PXL_20220811_222029631.jpg
    352.7 KB · Views: 75
Last edited:

Enjoying this content?

Support TFP with a donation.

Give Support
Thanks for sharing this. I am going down the same path. I am trying to find material that matches. My approach now is to use marine fabric because it has good UV protection . I have a few samples coming to me this week and then I will buy a yard or so when I decide.

I will share my results in this thread. It would be great is this thread was linked into that "intex pool tips and tricks" thread.

Edit: Well my two smaples came in and both are too light for my tastes. So I am going to order a sample board from the following place. It has some other "pearl" options that I think will match well. And I it might get me closer to repairing some of my boat seats. ha.

 
Last edited:
Thanks for sharing this. I am going down the same path. I am trying to find material that matches. My approach now is to use marine fabric because it has good UV protection . I have a few samples coming to me this week and then I will buy a yard or so when I decide.

I will share my results in this thread. It would be great is this thread was linked into that "intex pool tips and tricks" thread.

Edit: Well my two smaples came in and both are too light for my tastes. So I am going to order a sample board from the following place. It has some other "pearl" options that I think will match well. And I it might get me closer to repairing some of my boat seats. ha.


I ordered 2 yards of "22oz Vinyl Coated PVC Fabric By the Yard Color: GRAY" from tarpsnow.com. I tried to find a west coast source for this but couldn't at the time.

If I did this again, I might consider reinforcing the tops of the rails with strips of vinyl also as they really deteriorated from the So Cal sun. I'd want to make sure those could be removed and replaced so the choice of vinyl cement and application would be key.
 
Thanks for sharing the link. I am midway through a deck now. These patches are a few weeks out.

I am liking your link more than the boat fabric I had found.

I found a lot of options in search of a better color match, but could not get close enough with an online image to warrant ordering a sample. So I will be going with what you suggested in color grey:


I will post back with results and a video to capture the process.
 
Last edited:
  • Like
Reactions: beggehorn
Partial update. The Seattle fabric is the best match and feels to be of good quality. I made a mistake when I ordered it. There is an option at check out to have the fabric folded versus rolled. With the caveat that "rolled may cost more", but it does not state how much more. Nothing more fun than checking out with unknown costs, right? So I figure it's mostly rubber, why not fold it. Mistake. 3 yards came in folded down to a 8" square and shoved into a UPS box For $30 shipping. Heck it could have gone USPS flat rate for $10 at that size. Reminds me of that kids game of "how much can you fold a piece of paper".
I figure the creases would come out with some Alabama sun as my helper. 3 days of rolling it out in the sun and then rolling it up onto a 4" section of tubing. Then repeat each day. Notta. Still obvious creases and it looks bad. Bad like I found some scrap in a trashcan if I where to use it. $80 wasted. There are useful strips of 61" x 8" between each crease. Maybe I will use it for the top rail in a few years?

Video and pictures to come eventually. :(
 
Thread Status
Hello , This thread has been inactive for over 60 days. New postings here are unlikely to be seen or responded to by other members. For better visibility, consider Starting A New Thread.