Thanks to this forum, I have a trouble free, clear, clean pool! The chemistry I've got down now, thanks to this site! My Polyquat 60 will be arriving today. I've watched a million you tube videos. I have my shop vac at the ready....but I have no idea how to blow out the lines properly. I'd rather not hire someone to come in, but I really don't want to damage my lines during the winter, either! What is the best way to blow out the lines for this setup here? I really would like to close the pool by this weekend. Thank you!

I have no idea what I'm doing... (blowing out lines)
- Thread starter Quatelmon
- Start date
You are using an out of date browser. It may not display this or other websites correctly.
You should upgrade or use an alternative browser.
You should upgrade or use an alternative browser.
Having just done this for the first time myself, this is what I did:
Before doing anything I removed the stairs, handrails, skimmer basket, return fittings, brushed and cleaned the pool and ran my robot 3-4 times to get everything as clean as possible.
1. Set MPV (multi-port valve) to Backwash and backwash DE filter until sight glass clear
2. Turn MPV valve to rinse for a minute
(Steps 1 and 2 are not be necessary if you have a cartridge filter)
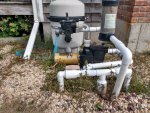
3. Once filter was clean I isolated the skimmer using the drain line jandy (three way) valve so I was only using the main drain and set the MPV to waste. I drained the pool until the water was 2"-3" below the bottom of the skimmer. I can't tell from your photo if you can turn off the skimmers and isolate the main drain. I see two ball valves on the drain line but not sure which lines are plumbed to the skimmers and which is plumbed to the main. You can also use a submersible pump to drain the pool if you want.
4. I purchased a cyclone fan (Air Supply Cyclone Pool Line Blower Vac 4128100 | Pool Supply 4 Less) and a hayward SPX1091Z4 coupling (Amazon.com: Hayward SPX1091Z4 Hose Male Smooth Adapter Replacement for Hayward Automatic Skimmers and Filters: Garden & Outdoor). The coupling threaded into the bottom of my skimmer and I connected a 1-1/2" dia. pool hose from the coupling to the fan.
5. Set the MPV to circulate so you bypass the filter and turn on the fan. You will see air bubbles coming out of the returns and the main drain. I let the fan run for a few minutes then dead headed the main drain at the three way valve. You would do the same thing by turning the ball valve for the main drain off. You don't turn off the fan at all during this part. Since you have two skimmers you can plug the bottom of one with a gizzmo (Amazon.com : Gizzmo 4102 Super Gizzmo in Big Deep Skimmers for Pool : Swimming Pool Covers : Garden & Outdoor) after no more water is blowing out the hole in the bottom but leave the fan attached in the other skimmer. You would then plug the bottom of the second skimmer with another gizzmo after you are finished with step 10 below. I wrapped the threads of the gizzmo with Teflon tape.
6. I plugged my returns with #7 rubber plugs. I had to use a hayward return tool (Amazon.com: Hayward SP1419T Hydrosweep and Hydrostream Directional Flow Inlet Fitting Seat Removal Tool: Garden & Outdoor) to unscrew the threaded collars from inside the return fittings to properly plug the returns. There will be air constantly coming from the returns during this step but I plugged each return one at a time and verified no air was leaking out from any return after it was plugged. Not sure if you need a different size plug but the plug should be fully recessed inside the line, no part should be sticking out.
7. Once all returns are plugged and main drain is dead headed congrats your lines are winterized! I didn't add any antifreeze but you can if you like.
8. I turned off the fan, set the MPV to waste and turned the fan back on. This blew out my waste line which is hard piped.
9. Turned fan off and removed the drain plugs for my DE filter, pump, inline chlorinator and heater. Let everything drain out. If you have a cartridge filter you would remove the cartridges at this point.
10. Set MPV to filter and turned fan on to blow any residual water out of the lines. Turned fan off, installed gizzmo in bottom of skimmer, removed pump basket cover and plugged water line feeding pump with a #7 plug.
11. Covered the pool with my loop loc cover.
That about covers it, took about three hours total since it was my first time and I needed to buy parts as I went along. The cover is the hardest part and requires at least two people. Next time it will take maybe a half hour to do steps 1-10 and another half hour for the cover.
Yes the cyclone fan is expensive but it's still less than the cost of having a pool service winterize the pool once.
Hope this helps!
Before doing anything I removed the stairs, handrails, skimmer basket, return fittings, brushed and cleaned the pool and ran my robot 3-4 times to get everything as clean as possible.
1. Set MPV (multi-port valve) to Backwash and backwash DE filter until sight glass clear
2. Turn MPV valve to rinse for a minute
(Steps 1 and 2 are not be necessary if you have a cartridge filter)
3. Once filter was clean I isolated the skimmer using the drain line jandy (three way) valve so I was only using the main drain and set the MPV to waste. I drained the pool until the water was 2"-3" below the bottom of the skimmer. I can't tell from your photo if you can turn off the skimmers and isolate the main drain. I see two ball valves on the drain line but not sure which lines are plumbed to the skimmers and which is plumbed to the main. You can also use a submersible pump to drain the pool if you want.
4. I purchased a cyclone fan (Air Supply Cyclone Pool Line Blower Vac 4128100 | Pool Supply 4 Less) and a hayward SPX1091Z4 coupling (Amazon.com: Hayward SPX1091Z4 Hose Male Smooth Adapter Replacement for Hayward Automatic Skimmers and Filters: Garden & Outdoor). The coupling threaded into the bottom of my skimmer and I connected a 1-1/2" dia. pool hose from the coupling to the fan.
5. Set the MPV to circulate so you bypass the filter and turn on the fan. You will see air bubbles coming out of the returns and the main drain. I let the fan run for a few minutes then dead headed the main drain at the three way valve. You would do the same thing by turning the ball valve for the main drain off. You don't turn off the fan at all during this part. Since you have two skimmers you can plug the bottom of one with a gizzmo (Amazon.com : Gizzmo 4102 Super Gizzmo in Big Deep Skimmers for Pool : Swimming Pool Covers : Garden & Outdoor) after no more water is blowing out the hole in the bottom but leave the fan attached in the other skimmer. You would then plug the bottom of the second skimmer with another gizzmo after you are finished with step 10 below. I wrapped the threads of the gizzmo with Teflon tape.
6. I plugged my returns with #7 rubber plugs. I had to use a hayward return tool (Amazon.com: Hayward SP1419T Hydrosweep and Hydrostream Directional Flow Inlet Fitting Seat Removal Tool: Garden & Outdoor) to unscrew the threaded collars from inside the return fittings to properly plug the returns. There will be air constantly coming from the returns during this step but I plugged each return one at a time and verified no air was leaking out from any return after it was plugged. Not sure if you need a different size plug but the plug should be fully recessed inside the line, no part should be sticking out.
7. Once all returns are plugged and main drain is dead headed congrats your lines are winterized! I didn't add any antifreeze but you can if you like.
8. I turned off the fan, set the MPV to waste and turned the fan back on. This blew out my waste line which is hard piped.
9. Turned fan off and removed the drain plugs for my DE filter, pump, inline chlorinator and heater. Let everything drain out. If you have a cartridge filter you would remove the cartridges at this point.
10. Set MPV to filter and turned fan on to blow any residual water out of the lines. Turned fan off, installed gizzmo in bottom of skimmer, removed pump basket cover and plugged water line feeding pump with a #7 plug.
11. Covered the pool with my loop loc cover.
That about covers it, took about three hours total since it was my first time and I needed to buy parts as I went along. The cover is the hardest part and requires at least two people. Next time it will take maybe a half hour to do steps 1-10 and another half hour for the cover.
Yes the cyclone fan is expensive but it's still less than the cost of having a pool service winterize the pool once.
Hope this helps!
Last edited:
Took another look at your equipment photo, you have three ball valves so you can independently isolate each skimmer and the main drain. The handle for the ball valve on the right looks like it has broken off and someone put a wrench on it to operate the valve. You can do the same but I would replace that valve at some point
Last edited:
THANK YOU so much for your detailed response! I just looked at my equipment again, and see that yes, there are three valves! I think I can handle this now! I would like to put some antifreeze in. Do you know how I would go about doing that? I'm going to start this process tomorrow, and hopefully my husband can help me get the cover on when he gets home from work. THANK YOU!
Sure thing, to be honest I wanted to write it all down so I could reference it again for next year ")
If you want to add antifreeze I would pour some down each skimmer right before you install the gizzmos. This means adding antifreeze to one skimmer after step 5 (the skimmer the fan is not attached to) and the other skimmer after step 10 (after the fan is removed). It's probably obvious but you will need to either turn off the fan or shut off the skimmer ball valve before you add antifreeze!
For the returns you could try pouring antifreeze into the chlorinator after step 8, otherwise you would have to drain the pool level to be below the returns (instead of just below the skimmer) and use a curved funnel to pour antifreeze into the returns. I would personally add it to the chlorinator until it started backing up but maybe someone else can chime in if that's not correct.
I'm not sure how to add antifreeze to the main drain line but my understanding is the drain is so low the water doesn't freeze at that depth so it's not a concern.
Last edited:
Thread Status
Hello , This thread has been inactive for over 60 days. New postings here are unlikely to be seen or responded to by other members. For better visibility, consider Starting A New Thread.